When you start up ExpertAssist, you will see the System Overview tab. It contains a multitude of useful information about the host computer.
At the top of the page you'll see the following info:
The date and time of the host machine.
Click on the date and time (highlighted in blue) to open a page where you can set the time on that machine.
The date and time of the host machine page is also accessible on the Time page of the Computer Settings.
In the top right corner of the System Overview section of the ExpertAssist Home page, you can see a summary of your security data. This includes the following:
QuickLinks are designed to make access to frequently used features quick and easy.
To view the pages added to ExpertAssist's QuickLinks:
Click the icon in the box on the right hand side of the home page.
Or,
Use the dropdown in the upper frame of every page.
To add a QuickLink:
Click on the QuickLinks icon, which appears on every page.
To remove a QuickLink:
Select Edit your QuickLinks command from the drop down menu.
The performance graph details CPU and memory usage. Data about the physical and committed memory are displayed in an easy to read green and red graph.
Here you can see information about the users who have most recently accessed the ExpertAssist on this computer.
Here you can see data on any current connections on the host machine.
Here you can see information on the computer itself, including the current CPU utilization.
An overview of the operating system of the accessed machine is displayed here, including when it was installed.
Here you can see a list of the Hotfixes that have been installed on the machine.
For more information about a particular Hotfix:
Click on the Hotfix name .
Alternatively, you can view the list of installed hotfixes listed with other updates and applications installed on the remote computer on the Installed Applications page available under Performance Monitoring object.
One of the main features of ExpertAssist is its advanced ability to remotely control the computer on which it is installed, thus enabling you to authentically replicate the experience of sitting in front of the host computer — regardless of where you actually are in the world.
When you select Remote Control, a small Java applet is downloaded to the client and will display the screen of the remote computer. Your actions, such as keyboard usage and mouse movement are emulated by ExpertAssist on the screen and on the remote computer. The Java applet downloads automatically.
Depending on your browser settings, you may see a popup window asking you to accept or reject this. You should accept it in order to use Remote Control.
When typing or using your mouse, it will be exactly as if you were sitting in front of the remote machine. The only real difference will be a few ExpertAssist specific tools which appear at the top of the remote control window, detailed below.
Figure 5: The Remote Control window.
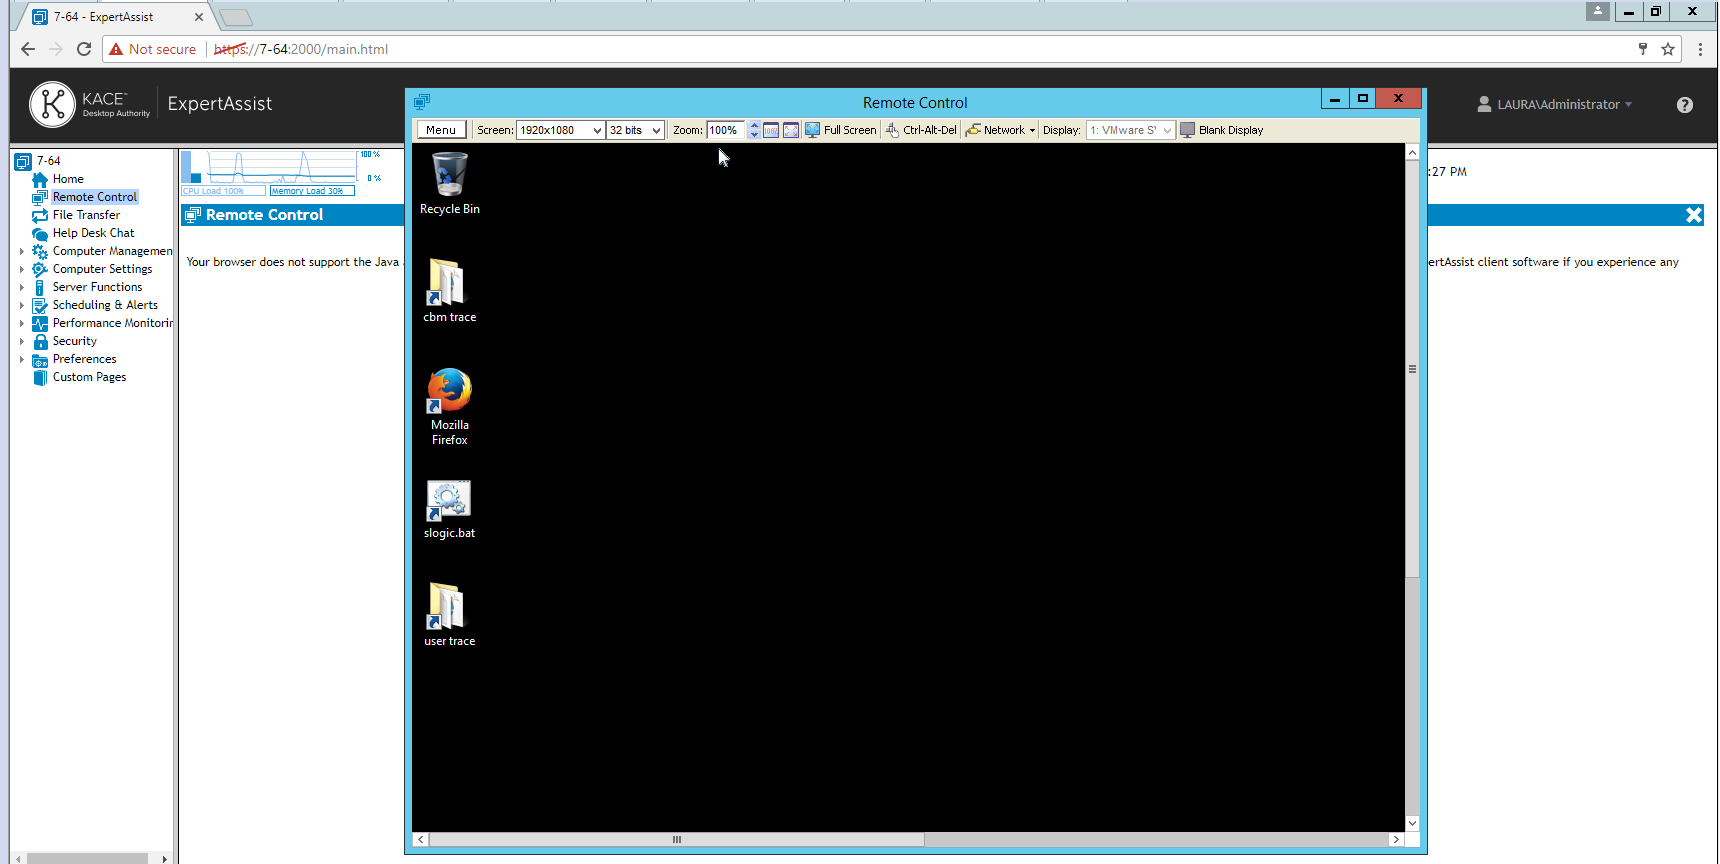
In the top left corner of the remote control screen, you will see the menu with the following options:
Pressing Ctrl-Alt-Delete cannot be captured by the applet, but you can still send the combination via this menu item. Selecting this menu item will immediately send the Ctrl-Alt-Del key sequence to the host computer.
Certain keystrokes, such as Alt-Tab, cannot be captured by the applet, but you can still send them via this menu item.
Select Send Special Keys to gain access to a whole list of special key combinations you might want to send to the host computer.
Another useful option available from the menu is the ability to transfer your clipboards between machines, thus allowing you to copy from one machine and paste on the other.
The limit is 8 Mbyte in both directions. If the clipboard is larger, you will be notified that clipboard cannot be transferred. It also works with bitmaps.
Below is the example usage of the function:
|
|
Note: Available when opening a Remote Control session on any operating systems with Terminal Server Sessions support. |
The Terminal Server Sessions option lets the user switch between the active Terminal Server sessions.
Select Open Chat to initiate a chat session with the remote computer.
Select View Connection Status dialog to view the status of the connection with the remote computer.
Figure 6: The View Connection Status dialog.

The option detaches the remote window allowing you greater flexibility.
To switch back to the standard ExpertAssist frame:
Select Exit Full Screen from the menu.
Select this menu option to end the Remote Control session.
You can modify the remote screen’s display properties via the menu as well. There are drop-down lists for color quality and screen resolution, as well as a zoom option that allows you to view the screen all the way up to 300% of its original size.
For the best performance during remote control you should set the remote machine’s screen resolution down to the lowest, still convenient value.
It is also recommended that you do not use 16-bit (hi-color, 65536 colors) for the remote host’s display. Use either 256 colors or true color. Converting 16-bit color bitmaps down to the internal format is rather slow, and has an impact on performance.
Click 


Pressing Ctrl-Alt-Delete cannot be captured by the applet, but you can still send the combination via this menu item. Selecting this menu item will immediately send the Ctrl-Alt-Del key sequence to the host computer.
Click Network to select the network type from the given drop-down button list. Select from Modem (56 Kbps), DSL (384 Kbps), WAN (2 Mbps), LAN (10 Mbps) or Auto. Select the network type to optimize the remote control session for the type of network chosen.
Select the Number of Displays for host computers that are using multiple monitors. This will allow the client to switch between the monitors on the host computer during the Remote session.
Click Blank Display to blank the display on the host computer. This is useful for preventing user interaction while remote work is in process.
When you initiate a remote control session, a notification message will appear on the remote screen. If you do not have full administrative rights on the remote machine, a user sitting there would be invited to decline or accept the remote session, with a default time of 10 seconds before you would be connected automatically. You can configure both the message displayed and the amount of time given to make a decision under the Preferences object. Select Remote Control when a remote session is in progress, a small window in the top right corner of the remote screen is displayed stating who is currently remotely connected to the machine. This message can also be configured under the Preferences object. Select Remote Control.
If the user locked his computer, ExpertAssist can also display the confirmation window over the Windows logon screen, allowing the remote user to accept the remote control session without having to unlock his computer.
ExpertAssist automatically determines if there is an interactive user logged in on the remote computer. If no users are logged in or the remote user has just logged off of the computer, ExpertAssist will determine that nobody is available to answer the Remote Control session confirmation message and skip displaying it. If so, you will be automatically entered the remote control session. This is useful for unassisted remote troubleshooting or resolving remote users’ login problems.
|
|
Note: When the remote control session is started, ExpertAssist will notify the remote user by animating its icon in the notification area of the task bar. |
When connected to the remote machine, and if you have remote printing enabled under Preferences > Remote Control, that machine’s default printer will temporarily become that of your local machine. This means that should you choose to print anything from the remote machine, you will receive it on your local printer.
A user sitting at the remote machine would be notified of this change.
There are a number of special features you can use to configure your remote control sessions under preferences. These are detailed in the Preferences section towards the end of this chapter under the Preferences object. Select Remote Control.

