Benchmark Factory allows you to capture SQL Server workloads, then replay those workloads to view real-time transactions and response results.
In Benchmark Factory, use one of the following workflows to capture a SQL Server workload:
Note: This feature is not available in the freeware edition of Benchmark Factory.
To capture a SQL Server workload
 .
.
 .
.
On the Replay Workload page, click Perform New Capture. The Capture Scenario Wizard opens and the New Job Wizard closes.
Tip: You can also create a new capture using the same settings as an existing capture project. In the Captures tab of the Benchmark Factory console, right-click a capture and select Repeat Capture.
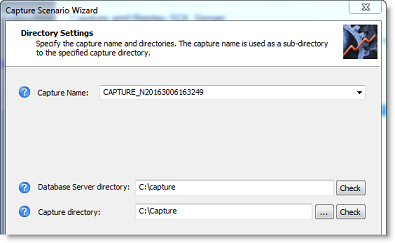
Directory Settings. On the Directory Settings page, specify a SQL Server server-side directory in which to place the capture files. Also, specify the capture directory from which Benchmark Factory will replay the files. Review the following for additional information:
Click Next when finished.
| Capture Name |
Enter a name for the capture, or use the default. This name is used for the sub-directory where the capture files are stored in the Capture Directory you specify. Note: Only alpha and numeric characters and the underscore (_) are permitted. The name must begin with a letter. |
| Database Server Directory |
Specify a server-side directory where Benchmark Factory should place the capture files. Specify the path as the server sees it. Note: You can specify a network directory here. Enter the full network path to the network directory. The database service must be able to access the network directory. |
| Capture Directory |
Specify a directory where Benchmark Factory will look for the capture files to replay. Do one of the following:
Selecting a shared directory: The shared capture directory can be on the database server as a local directory or on a network file server as a local directory. Either location must be accessible by the Benchmark Factory client computer (Windows network share, Samba, or NFS). A network file server is the preferred location for the following reasons:
|
Capture Scope. In the Capture Scope page, select one or more databases from which to capture activity. Review the options below. Click Next when finished.
| Capture activity for entire database | Select to capture all activity for the entire database. |
| Capture only activity for selected databases |
Select to capture activity only for the selected databases. Then select the databases from which to capture activity. |
Backup Scope. Benchmark Factory can export/backup the database objects and data required to replay the workload on the same data snapshot. Review the description below. Click Next when finished.
| Perform backup as part of the Capture Process |
Select this option to instruct Benchmark Factory to export/backup the databases selected on the previous page (Capture Scope). The backup is performed during the capture procedure. Note: If you selected to capture activity for the entire database, exporting the entire database can require significant time and space. |
Filter Settings. (Optional) The Filtered Settings page allows you to add filters to exclude activity from the capture.
Capture Thresholds. Benchmark Factory allows you to specify limits for CPU usage and free space during a capture. If levels exceed the values you specify, the capture process is stopped.
Benchmark Factory displays the current values to help you determine the best thresholds to specify. Review the options below. Click Next when finished.
| Stop capture if ... | Description |
|---|---|
| host CPU percentage of database server exceeds | Enter a percentage. If CPU usage exceeds this value, Benchmark Factory stops the capture process. |
| trace file disk free space falls below | Enter a value for free space in GB. If the amount of free space falls below this level, Benchmark Factory stops the capture process. |
Note: The Capture Thresholds feature is not available for SQL Server running in a Linux environment.
Schedule Job. You can schedule a capture or start it immediately. Review the options below. Click Next when finished.
| Start Capture/Export |
Immediately—Select to start the capture process immediately. Later—Select to schedule the capture process. Then specify a date and time based on the server time. |
|
Capture Automatically |
Stop After—Use the sliders to specify a duration for the capture process. The default is 30 minutes. |
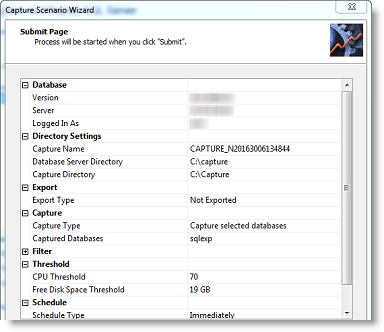
Start the capture. The Submit page provides capture specifications. To start the capture (or enable the schedule), click Submit.
Capture Status. The Capture Status window opens providing export and/or capture status and details of the process.
Immediate capture: If you selected to start the capture immediately, the Capture Status window displays information about the capture process, such as the status of the export process and the number of sessions captured.
To replay a SQL Server workload
.
.
Select a capture. On the Replay Workload page, select a capture from the Capture to Replay field using one of the following methods:
Benchmark Factory loads the capture details into Capture Properties fields.
Import Test. Click 
To jump to the Test Options tab, click Test Options at the bottom of the Summary page. Review the following for more information:
| Tab | Description |
|---|---|
| Transactions tab |
Modify the transactions and the transaction mix for the test. For a custom test, add transactions. |
| Options tab | Enable scaling for the user scenario. See Options Tab (Capture/Replay) for more information. |
| Timing tab |
User Startup—Select one of the following options:
|
| Advanced tab |
Specify Repository options, error handling, and connect/disconnect options for the test. See Advanced Tab for more information. |
After specifying options for this test, you can add another test to the job, configure job setup options, save and close the job, run the job, or schedule the job. For more information about each of these steps, see Quickstart: Create a New Job.
Notes:
You can run the Capture Scenario Wizard as a standalone application to capture an Oracle or SQL Server workload. Then replay the workload in Benchmark Factory. This utility provides an easy way for you to capture your database workloads without requiring the installation of Benchmark Factory.
After a workload is captured, the capture files can be distributed to others to replay and test in Benchmark Factory.
This utility is the same Capture Scenario Wizard that opens from the New Job Wizard in Benchmark Factory and it produces the same type of capture and export files.
Oracle or SQL Server Capture. The following is required to run the Capture Scenario Wizard to capture any workload:
Oracle Capture. The following is required to run the Capture Scenario Wizard to capture an Oracle workload:
To run the Capture Scenario Wizard standalone application
Navigate to the Benchmark Factory application directory where Benchmark Factory is installed and open the bin directory.
For example, C:\Program Files (x86)\Quest Software\Benchmark Factory 7.5.0\bin
To start the Capture Scenario Wizard from the command line, see Run the Capture Wizard from the Command Line.
You can use the command line to start and run the Capture Scenario Wizard.
When running the Capture Scenario Wizard from the command line, you can specify the following parameters:
| Parameter | Description |
|---|---|
| -? | Displays Help |
| -O | -S |
Specifies the database type for the capture. -O performs an Oracle capture.
-S performs a Microsoft SQL Server capture.
These parameters are ignored when used with another parameter. If you do not specify a capture database type (Oracle or SQL Server), the Capture Scenario Wizard prompts you to select one. |
| -V |
View the status of the capture for the capture project file specified (*.mse or *.cpj).
|
| -D |
Deletes a capture. Specify the capture project file to delete (*.mse or *.cpj). Deletes the project file and the capture files. You cannot delete a running capture.
|
| -C |
Starts a new capture using the values in the specified capture project file (*.mse or *.cpj). Does not overwrite the specified capture.
|
Note: The parameters -V, -D, and -C cannot be used at the same time and must have a capture project file location specified.
Benchmark Factory allows you to import the SQL contained within an Oracle trace file. The resulting workload contains a user scenario consisting of the timed event sequence of captured SQL transactions.
Importing an Oracle Trace file allows you to replay your database activity with the same timing as was originally captured on an existing in-house Oracle database application.
Note: To create an Oracle trace file which includes bind parameters, a level number of 4 must be used. For example, to start an Oracle trace for a user session, use the following command:
ALTER SESSION SET EVENTS '10046 trace name context forever, level 4'
To import an Oracle trace file
When you finish inputting files, click Next. The Oracle Trace Activity dialog opens.
Include system activity—Select to include system activity (SYS USER).
Note: It is not recommended to include system activity (SYS USER). This imports Oracle SQL statements routinely run by Oracle for maintenance reasons and is not required for the load testing process.
If the trace import file exceeds the Benchmark Factory limit for displaying individual transaction, the following dialog displays:
If you click Yes, the trace file import continues. Individual SQL is converted to .xml files. You can then edit the .xml files in the Benchmark Factory Session Editor.
To jump to the Test Options tab, click Test Options at the bottom of the Summary page. Review the following for more information:
| Tab | Description |
|---|---|
| Transactions tab |
Modify the transactions and the transaction mix for the test. For a custom test, add transactions. |
| Options tab | Enable scaling for the user scenario. See Options Tab (Capture/Replay) for more information. |
| Timing tab |
User Startup—Select one of the following options:
|
| Advanced tab |
Specify Repository options, error handling, and connect/disconnect options for the test. See Advanced Tab for more information. |
After specifying options for this test, you can add another test to the job, configure job setup options, save and close the job, run the job, or schedule the job. For more information about each of these steps, see Quickstart: Create a New Job.
