Chat now with support
Chat with Support

NetVault 12.4 - Administration Guide for Managed Service Providers

Introduction Getting started Configuring clients Managing catalog search Configuring storage devices
About storage devices SAN considerations Quest DR Series systems Quest QoreStor NetVault SmartDisk EMC Data Domain Systems Snapshot Array Manager Virtual Tape Libraries Virtual standalone drives Shared Virtual Tape Libraries Physical tape devices Storage tiers
Backing up data Managing policies Restoring data Managing NetVault Backup dashboard Managing jobs Monitoring logs Managing storage devices
Role-based access to manage storage devices Monitoring device activity Managing disk-based storage devices in list view Managing disk-based storage devices in tree view Managing the Snapshot Array Manager Managing tape libraries in list view Managing tape libraries in tree view Managing tape drives in list view Managing tape drives in tree view Adding shared devices
Managing storage media Managing user and group accounts Managing Tenant Monitoring events and configuring notifications Reporting in NetVault Backup Working with client clusters Configuring default settings for NetVault Backup
About configuring default settings Configuring encryption settings Configuring plug-in options Configuring default settings for post-scripts Configuring default settings for Verify Plug-in Configuring Deployment Manager Settings Configuring Job Manager settings Configuring Logging Daemon settings Configuring Media Manager settings Configuring Network Manager settings Configuring Process Manager settings Configuring RAS device settings Configuring Schedule Manager settings Configuring Web Service settings Configuring Auditor Daemon settings Configuring firewall settings Configuring general settings Configuring security settings Synchronizing NetVault Time Configuring the reporting utility Configuring NetVault Backup WebUI default settings Configuring NetVault Backup to use a specific VSS provider Configuring default settings using Txtconfig
Diagnostic tracing Managing diagnostic data Using the deviceconfig utility NetVault Backup processes Environment variables Network ports used by NetVault Backup Troubleshooting
Common errors Safe Mode in NetVault Backup

Adding a Quest DR Series system

To use a Quest DR Series system for backups and restores, you must first add the device to the NetVault Backup Server. You can use the configuration wizard to add and configure this device.

Adding a Quest DR Series appliance

1
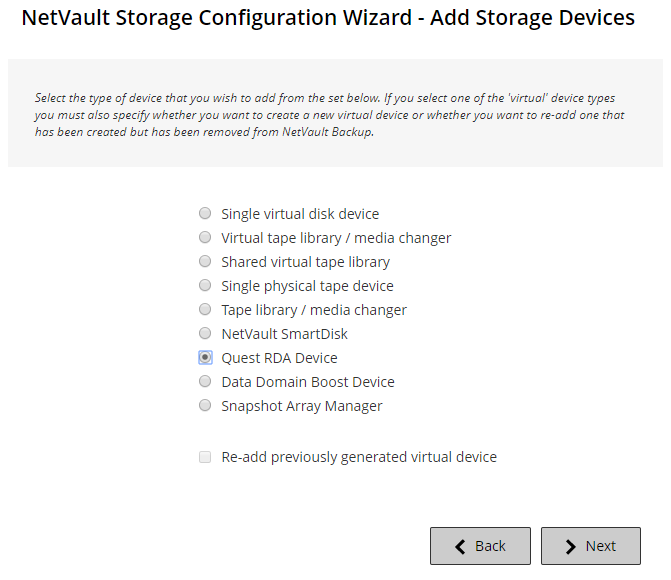
In the Navigation pane, click Guided Configuration, and then on the NetVault Configuration Wizard page, click Add Storage Devices.
In the Navigation pane, click Manage Devices, and then click Add Device.
2
On the Add Storage Devices page, select the Quest RDA Device option, and click Next.
3
On the Add Quest RDA Device page, provide the following details.

Hostname

Type the Fully Qualified Domain Name (FQDN) or IP address of the Quest DR Series system.

If the server is unable to resolve the host name, it fails to add the device.

Username

Specify a user account that can be used to log on to the device.

On the Quest DR Series system, only one user account exists, and the user ID for that account is backup_user.

Password

Type the password for the user account.

4
Click Add RDA Device to add the device.

Creating a container

1
In the Navigation pane, click Manage Devices, and then click the plus icon corresponding to the DR device.
2
On the Quest DR Device page, verify that the Containers option is selected.
3
Click Create Container.
4
In the Create Container dialog box, use the drop-down list to select a storage group.
5
In the Container Name text box, enter a name for the storage container.
6
Click Save.

Adding a container as a media

1
In the Navigation pane, click Manage Devices, and then click the plus icon corresponding to the DR device.
2
On the Quest DR Device page, verify that the Containers option is selected.
4
On the Add Media page, provide the following details:


Container

The name of the selected container appears here.

Block size

The default block size is 512 KiB. The block size cannot be changed for Quest DR Series systems.

Stream Limit

The default value for this setting is 64 streams. This setting applies to all NetVault Backup Servers to which the container is added. If the number of data streams exceeds the defined limit for the container, the Media Manager reports an error (“Device has too many streams”).

You can set the soft stream limit to any value between 1 and 512.

If the container is added to more than one NetVault Backup Server, set the same soft stream limit on all servers.

Force Add

If the device is already added to another NetVault Backup Server with the same name, select the Force Add check box. This option can be useful if you have performed a disaster recovery to rebuild the NetVault Backup Server.

5
Click Add As A Media.

To add a container as a media, see Adding a container as a media.

Passthrough: When this mode is selected, deduplication processing occurs on the Quest DR Series system. The passthrough mode requires at least 200 MB of free memory on the NetVault Backup Client.
Optimized: When this mode is selected, deduplication processing occurs on the NetVault Backup Client. The Optimized mode requires at least 4 GB of free memory on the NetVault Backup Client.
Auto: When this mode is selected, NetVault Backup decides the deduplication mode (Passthrough or Optimized) based on the criteria for Passthrough and Optimized.
Related Documents

The document was helpful.

Select Rating

I easily found the information I needed.

Select Rating