Benchmark Factory provides a Benchmark Factory Agent that you can deploy and use on a Linux platform.
Supported Operating Systems
The Benchmark Factory Agent for Linux supports the following platforms only:
Supported Databases
The Benchmark Factory Agent for Linux can be used to test workloads against the following database types:
See the Benchmark Factory Release Notes for information about database versions supported by Benchmark Factory.
Oracle Client. If you intend to use the Benchmark Factory Agent for Linux when testing against an Oracle database, ensure an Oracle Client is installed on the same Linux machine as the Agent. Review the following details:
(Oracle Instant Client 11g or later) Create symbolic link for Oracle shared library
From this directory, execute the following command:
ln -s libclntsh.so.<version> libclntsh.so.10.1
Where <version> is the version of libclntsh.so for the Oracle client you intend to use.
For example, if you intent to use Oracle Instant Client 11g R2, you would run the following:
ln -s libclntsh.so.11.1 libclntsh.so.10.1
Beginning with Benchmark Factory 8.2, the Agent for Linux is provided as an RPM package. The RPM package can be downloaded or accessed from a quest repository at https://bintray.com/quest/bmfrepo. Benchmark Factory provides the following methods for installing the Agent on Linux:
You can install the Benchmark Factory Agent on a remote Linux machine manually or through the Benchmark Factory Console. To install using the Benchmark Factory Console, you must be able to connect to the remote machine.
Install the agent on each Linux machine you wish to use as an agent machine.
To install a remote agent from the console
This is the recommended method for installing an agent on Linux.
Enter the connection information for the remote machine. Review the following for additional information:
| IP Address / Name | Enter the IP address or name of the remote machine. |
| User Name |
Enter the user name to use to connect. You must use the root user when installing a remote agent on Linux through the Benchmark Factory Console. If you cannot log in as root, install the agent on Linux manually. See the instructions below. |
| Password |
Enter the password to use to connect. |
| # of Agents | Specify the number of agents to deploy on this machine. |
If no agent is found, Benchmark Factory prompts you to install the agent. Click Yes in the prompt window. Benchmark Factory then uses YUM to install the agent.
Download and manually install agent on Linux
Download the Benchmark Factory Agent for Linux RPM package from https://bintray.com/quest/bmfrepo. This RPM package contains the files necessary to set up the Benchmark Factory Agent on a Linux platform and has the following naming format:
bmfagent-<version>-<buildnumber>.el7.x86_64.rpm.
Select the RPM package file with the same <version> and <buildnumber> as your Benchmark Factory Console.
Install the RPM package. For example, install the RPM package using YUM.
sudo yum install <bmfagentpackage>.rpm
Manually install agent from repository
Add the following text to this file:
[bmfrelrepo-el]
name=Benchmark Factory Release Repo
baseurl=https://quest.bintray.com/bmfrepo/7/$basearch
gpgcheck=0
repo_gpgcheck=0
enabled=1
Edit the Hosts File
Benchmark Factory uses the name for the Benchmark Factory Console machine. If your network communication does not include host name resolution, you may need to add the name and IP address of the Benchmark Factory Console host machine to the hosts file on the Linux machine. This will allow the agent machine to communicate with the Benchmark Factory Console machine.
Additional Requirements for Running the Agent on Linux
After you install and set up the remote agent on a Linux platform, the Benchmark Factory Console starts the agent when needed. To successfully run the agent on Linux, ensure the following requirements are met.
Ensure the at package is installed on the Linux Agent machine. The at package is required in order to start the Linux Agent from the Benchmark Factory Console. If the package is not installed, you can install it using your package manager, such as Yum.
yum install at
Ensure the atd service is running on the Linux Agent machine. Use the following commands:
systemctl start atd
systemctl enable atd
You can install agents on multiple agent machines in order to run tests using multiple agents. To configure Benchmark Factory with multiple agents you must:
For best results, install remote agents through your Benchmark Factory console. You can install remote agents from the Settings dialog (Edit | Settings | Agent) or from the Agent page of the New/Edit Job Wizard. See Install Remote Agent on Windows for more information.
You can also install agents manually on the agent machine. If you do, you must configure the agent on the agent machine (see below). Then, in your local Benchmark Factory, you must set up the agent to register it with the console. See Set Up New User Agent for more information.
If you set up an agent machine by installing Benchmark Factory manually, you must configure the agent on the agent machine.
Each Benchmark Factory Agent must be configured with the address of the Benchmark Factory Console. Each Agent sends load testing results back to the Benchmark Factory Console.
If you use only the agent installed locally on the console machine, make sure your local agent is configured with the IP address (name) of your local machine.
To configure Benchmark Factory Agents (Windows)
In Machine Name/IP field, enter the address of the Benchmark Factory console machine. In the Console Port field, enter the port for the Benchmark Factory console.

To run a job using multiple agent machines, after the agents are installed and configured, you must set up (or add) each remote agent to the Benchmark Factory console.
To run a job with multiple agents
Note: When you run a job using one or more local agents, if Agent utilization of resources on the local machine is too high, errors could occur.
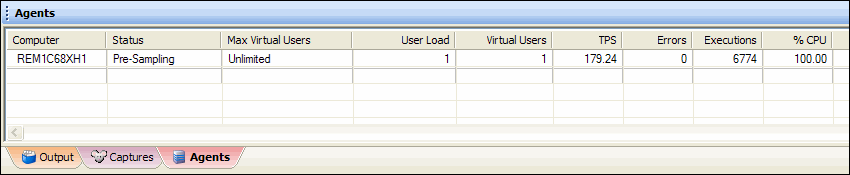
When you run multiple Agents for load testing, you can view the Agents results as they run from the Benchmark Factory Console.
To view the Agents from the Benchmark Factory Console
Select View | Agent to open the Agents pane where you can view information about agents that are currently running. The Agent view displays the status of all connected agents.
The primary agent component installed with Benchmark Factory is Agent.exe. On your local machine, the Benchmark Factory console always attempts to use Agent.exe first. If Agent.exe is not found, the console uses BMFAgent.exe.
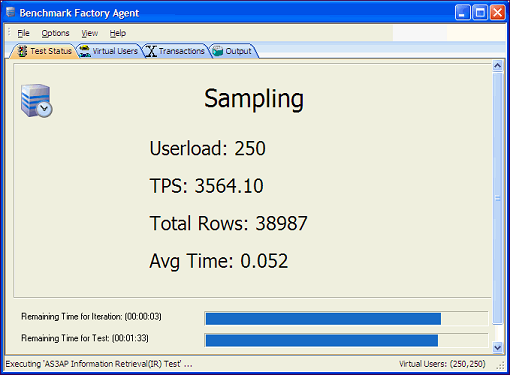
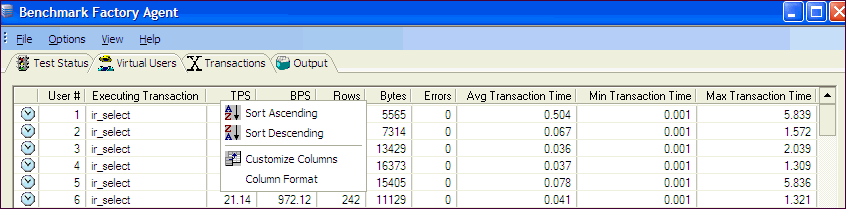
Agent.exe includes a GUI/console. You can use this console to view transaction and virtual user statistics during test execution.
The Benchmark Factory agent starts automatically when a job using the agent is executed. You can also start/open the agent manually.
To start or open Agent.exe
Locate the executable file Agent.exe in the bin sub-directory where Benchmark Factory is installed. The default installation path is
Program Files\Quest Software\Benchmark Factory <version>\bin
Select Options | Settings. Review the following options.
| Machine Name / IP |
This is the name or IP address of the Benchmark Factory Console machine to which this agent connects.
If the agent was installed remotely through the Benchmark Factory console, the agent is automatically configured. If installed manually, you must configure the agent. See Running Benchmark Factory with Multiple Agents for more information. |
| Console Port | Enter the port for the Benchmark Factory Console. |
| Max Virtual Users | Use this field to specify the maximum number of virtual users that this agent is allowed to spawn. |
| Error Logs / Result Files | Use these fields to specify a location for storing error logs and result files generated for this agent. |
When the agent is open, information about virtual user activity is displayed while a job is executing. Review the following for additional information.
Test Status Tab—Displays the current test phase and a summary of test information.
Virtual Users Tab—Displays the raw data from each virtual user. The grid shows each virtual user and its statistics. Right-click a column header to sort by that column.
Transactions Tab—Displays status information, including average, minimum, and maximum times on all active transactions.

