
Submitting Content to Metalogix Sensitive Content Manager
Members of the ControlPoint Compliance Administrators group can use the ControlPoint Analyze Content action to submit content to the Metalogix Sensitive Content Manager where it will be scanned for potentially sensitive content. ControlPoint submits the following types of content for scanning:
·files within Document Libraries with the following extensions:
NOTE: Checked out files are not scanned.
|
§.7z §.arj §.bz2 §.bzip §.doc §.docx §.eml §.gz |
§.log §msg §.odt §.pps §.ppt §.pptx §.rtf |
§.rar §.tar §.tbz2 §.tgz §.txt §.xls §.xlsx §.zip |
·items within most types of lists (with or without attachments that have any of the file extensions listed above).
To submit content to Metalogix Sensitive Content Manager for analysis:
IMPORTANT: If you have upgraded to Metalogix Sensitive Content Manager 2.0 or later from an earlier version, pending content submissions that use the older Profiles may need to be re-created.
1Select the object(s) containing the items that you want to submit for analysis.
2Choose Compliance > Analyze Content.
REMINDER: Sensitive Content Manager must be installed and in your environment and you must be a member of the ControlPoint Compliance Administrators group to use this functionality.
3Enter a name and description for the scan.
4If different from the default (PII - Personal Identification Information), select a Profile for this scan from the drop-down.
See also Managing SCM Profiles.
5If you want to Resubmit files that have not changed since they were previously scanned, check this box.
NOTE: If you leave this box unchecked, previously-scanned files that have not changed will be excluded. You cannot resubmit scan if it is uploading, an action is taken or if profile no longer exists.
6Include one or more list types from the list box. (If you also want to Include attachments, check this box.)
7Now you can:
§run the operation immediately (by clicking [Analyze])
OR
§schedule the operation to run at a later time or on a recurring schedule
OR
§save the operation as XML Instructions that can be run at a later time.
A ControlPoint Task Audit is generated for the submission. You can monitor the progress of the submission via the Sensitive Content Manager Submission Maintenance page.
Compliance Action Severity Levels
When content is analyzed by the Metalogix Sensitive Content Manager, it is evaluated against the following three severity levels, as defined in the Sensitive Content Manager Profile used for the content analysis.
·Severe
·Moderate
·Mild
Compliance Administrators specify the appropriate action to take for each severity level via the ControlPoint Compliance Actions page.
Managing Sensitive Content Manager Submissions
From the Sensitive Content Submission Maintenance page, ControlPoint Compliance Administrators can:
·monitor the progress of jobs that have been submitted to Metalogix Sensitive Content Manager for compliance scanning
·view a detailed analysis of compliance scan results
·manage compliance actions
·resubmit previously scanned jobs
·delete jobs
To launch the Sensitive Content Submission Maintenance page:
From the Manage pane, choose Compliance > Sensitive Content Submission Maintenance.
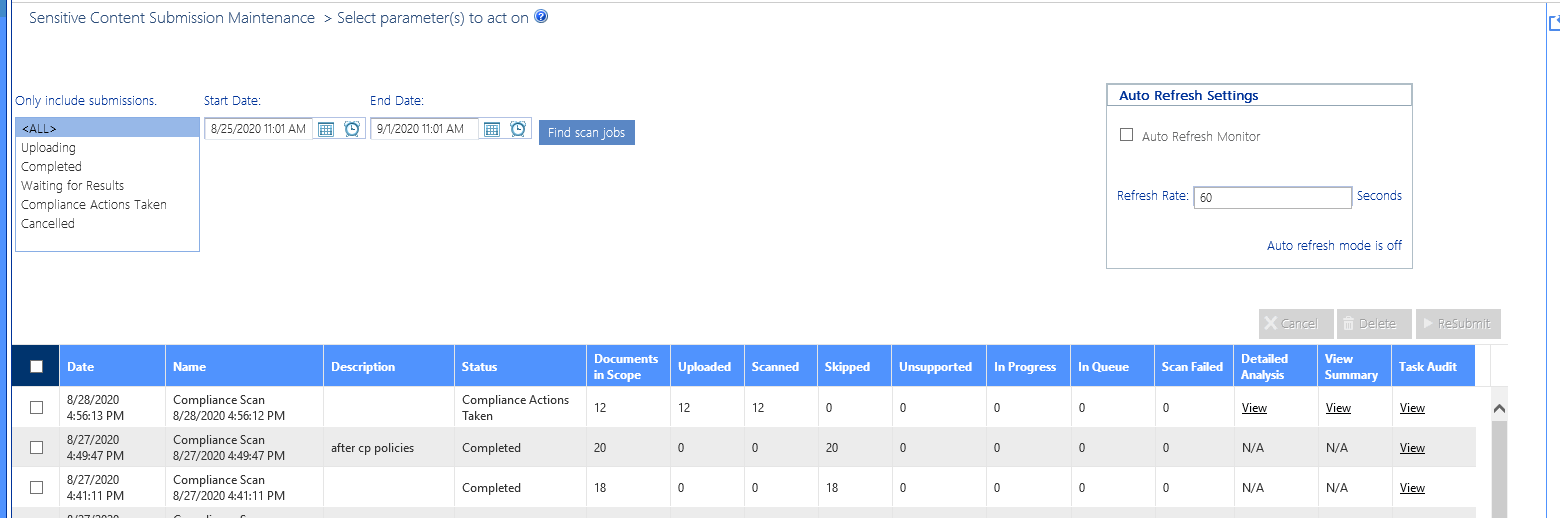
Select the type of scan jobs you want to view/edit. Use the information in the following table for guidance.
In addition the current Status of each job (e.g., Uploading, Waiting for Results, Completed), ControlPoint displays the number of items within each job that are:
·Submitted by ControlPoint to the Sensitive Content Manger service for scanning
·Uploaded to Sensitive Content Manager
·Reviewed (scanned)
·Skipped (omitted from the scan; for example, if Sensitive Content Manager was unable to read an item's contents)
·Unsupported by Sensitive Content Manager
NOTE: For a list of supported file types, see Submitting Content to Sensitive Content Manager.
·In Queue (waiting to be scanned).
You can also link to:
§a Detailed Analysis of compliance scan results
§the Compliance Summary page, where you can manage compliance scan results
§the ControlPoint Task Audit for the job.
Resubmitting Scanned Jobs
When you resubmit a job from this page, it will be submitted exactly as originally defined. (For example, it will not include any files that have been added to a SharePoint list or library since the last scan.) However, any items that have been quarantined since the last scan or have already been flagged "Unsupported" will not be included in the submission.
Jobs that are uploading, have a status of "Compliance Actions Taken," or use a Profile that no longer exists cannot be resubmitted. If you want a set of files for which actions have been taken to be rescanned, create and submit a new job for the same scope.
Deletintg Scanned Jobs
If you attempt to delete one or more scanned jobs, you will be prompted to confirm your selection.
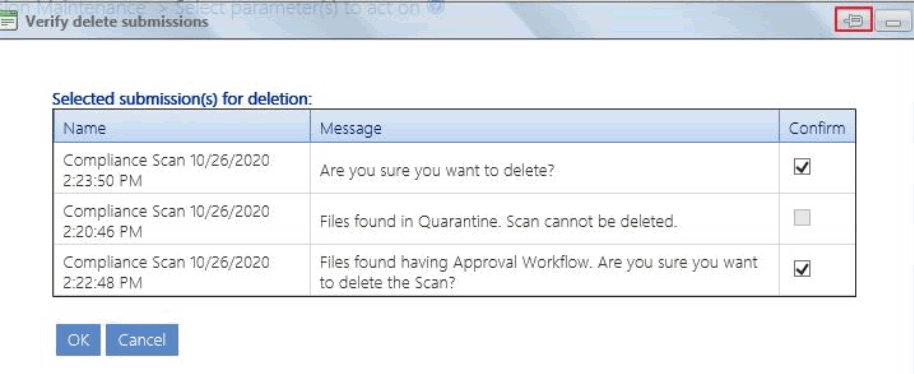
Note that:
·you cannot delete a job that has files in quarantine, and the option will be disabled (you can, however, use the Manage Scanned Files action to remove quarantined files from SharePoint).
AND
·you will have the opportunity to deselect any file that has had an Approval Workflow compliance action applied.
Managing Compliance Action Scan Results
Members of the ControlPoint Compliance Administrators group can view and take action on Content Analysis scan job results returned by the Metalogix Sensitive Content Manager via the Compliance Summary page. You can:
·view the details of a Compliance Action job
·apply Compliance Actions
·view detailed information about scan results for individual items (and reclassify items that returned from Metalogix Sensitive Content Manager with a status of "Unable to Classify")
·manage scanned files (including those that have been quarantined)
·save items of a particular severity level as a selection that can be used to perform ControlPoint operations.
To manage Compliance Action scan results:
1Select the object(s) containing the scan jobs you want to view/edit.
2Choose Compliance > Compliance Summary.
NOTE: You can also access this page for a specific job from the Analyze Content page, via the Page View link.
3If you want to view jobs for a different date range, change the Start and/or End dates and click [Find Scan Jobs].
4Select the type of scan jobs you want to view/edit. Use the information in the following table for guidance.
|
If you want to view ... |
Select ... |
|---|---|
|
all jobs submitted to Metalogix Sensitive Content Manager via the ControlPoint Analyze Content action, regardless of whether Compliance Actions were applied |
Bulk scans. |
|
all jobs for which Compliance Actions have been applied. |
Compliance Action jobs. |
5Click [Find scan jobs].
6Select the job whose details you want to view.
The following details about the selected job display beneath the grid:
·Classification Result Counts - The number of items that fall into each classification
·Scan information - Description of and metrics associated with the job itself
·Scan Results Summary - A pie chart that shows the distribution of items among classifications.
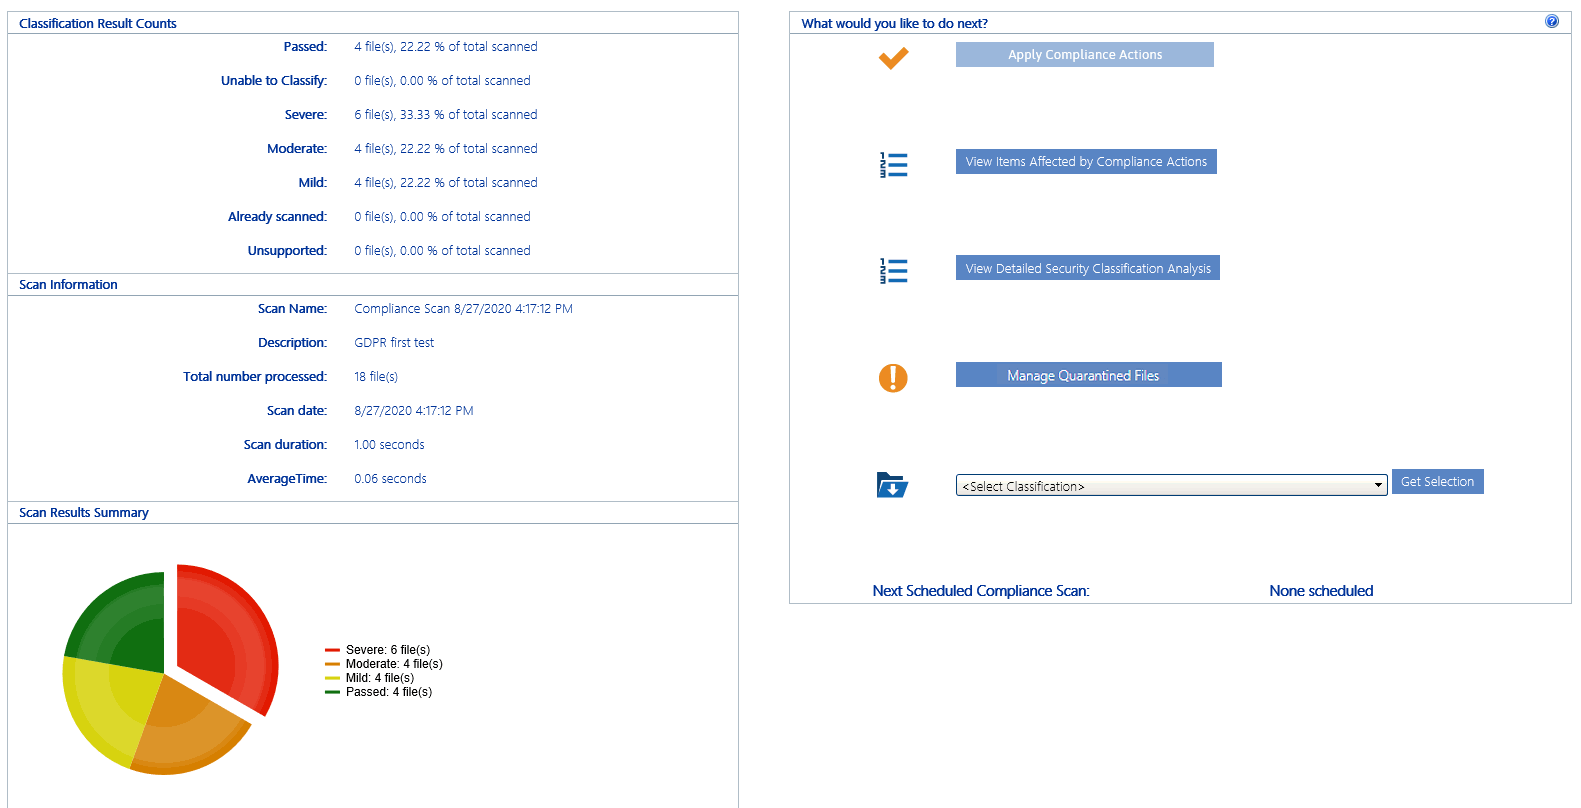
To save items of a selected severity as a ControlPoint selection:
1.Select a classification from the 
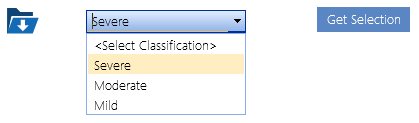
2Follow the procedure for Saving and Re-Using a SharePoint Object Selection.