
Benchmark Scale Factor
When you create an Industry Standard Benchmark test or add a Create Benchmark Objects step, Benchmark Factory allows you to adjust the Benchmark scale factor. The scale factor increases the size of a database during the testing process allowing realistic testing.
By increasing the scale factor, the number of rows added to the tables increases, allowing for the use of larger user loads. This places a greater stress on the system-under-test. During load testing, you can run various tests with different Benchmark Scale factors to ensure your database performs at varying user-load levels.
You can adjust the Benchmark Scale factor when creating a new Industry Standard Benchmark Test or when adding a Create Benchmark Objects step.
To change the Benchmark Scale factor
- In the New Job Wizard or Edit Job Wizard, select the Create Objects step (in the Workload) for which you want to adjust the scale.
- Select the Test Options tab and then the Scale tab.
-
In the Benchmark Scale field, specify a scale factor.
Valid benchmark scales are dependent upon the benchmark selected. For example, the AS3AP benchmark scales by a factor of 10 with valid scales of "1, 10, 20, 30, etc." The TPC-C benchmark scales by a factory of 1, with valid scales of "1, 2, 3, 4, etc." Refer to the specific benchmark standard for more information.
(Replication test only) For a Replication test, each increment in scale factor adds 1000 rows to a table.
- (Optional) Instead of specifying a scale factor, you can specify a Benchmark Size. The Benchmark Scale factor will re-adjust accordingly.
- Finish specifying options for your test, or click Save/Close to save your modifications and close the wizard.
Benchmark Scale Factor and User Load Relationship
The TPC-C and the Scalable Hardware standard benchmark tests have a scale factor / user load relationship.
- For the TPC-C benchmark, the ratio is 10 virtual users per scale factor.
- For the Scalable Hardware benchmark, the scale factor is also the number of users that will return data from their queries.
If you attempt to create a benchmark test using a scale factor / user load ratio outside of these specifications, Benchmark Factory warns you.
Note: You can set a default Benchmark Scale factor to use for each standard benchmark test. Go to Edit | Settings | Benchmarks | benchmark type.
Options (Create Objects)
Use the Options tab to specify how to create benchmark objects and load data for the Create Objects step of a standard benchmark test. You can also specify how to retain/maintain the tables after the test is finished.
You can specify a default setting for Object/Data Retention in Edit | Settings | Benchmarks. See Benchmarks Settings - General for more information.
To specify options for loading benchmark tables
- In the Edit Job or New Job Wizard, under Workload select the Create Objects for benchmark step for the selected benchmark test.
- From the Test Options tab, select the Options tab.
-
Use the Options tab to specify options for creating objects and loading data. Review the following for additional information:
Distribute index creation (one index create per virtual user) Select to use multiple virtual users to create indexes at the same time (one virtual user for each index).
Tip: For IBM DB2 databases, you might encounter deadlock errors if database configuration is incorrect.
If you do not select this option, all indexes are created by a single virtual user.
Note: To specify parallel index creation for indexes, you can customize the SQL used to create indexes. See Customize SQL for Creating Objects for more information.
Distribute Load using Benchmark Factory Agents You can choose to use console or agents to load benchmark data.
- Select to distribute data generation across multiple agent machines to speed up the standard benchmark data load.
-
If you do not select this option, the console is used to load standard benchmark data.
Important Note: Using the console for large data loads could slow down database load times significantly. Use only for small scale factors.
Number of virtual users to perform creation/load Specify the number of virtual users to use to load table data. The number of virtual users used per table will depend on the table size.
Notes:
- Benchmark Factory recommends using a number that is a multiple of the number of tables in the selected standard benchmark test. Refer to benchmark test specifications for the table count.
- You cannot specify a number less than the number of tables in the selected standard benchmark test.
-
Select an Object/Data Retention method. Review the following for additional information:
Create/Load objects if objects don't exist (no backup sets created) If objects do not exist, Benchmark Factory creates the objects and loads data.
If you select this option, Benchmark Factory does not create backup tables.
Delete benchmark objects after completion of job Benchmark Factory deletes objects after a job is finished. Refresh data using backup sets When backup sets exist, Benchmark Factory reloads data and recreates indexes.
If backup sets do not exist, Benchmark Factory creates objects and loads data. Then Benchmark Factory creates the backup tables.
Recreate objects and reload data every execution Benchmark Factory always deletes the existing objects and then recreates/reloads for each job execution.
This allows you to ensure that the dataset is always in initialized status.
Refresh data using inserts If data does not exist, Benchmark Factory uses bulk insert to load data.
If the following Benchmark Settings are selected,
and the Benchmark Scale factor of the existing tables does not match the new requirement, the process of inserting additional data or deleting data my run long, depending on the size of the existing data and number of indexes.
Note: If database does not support bulk insert, insert is used.

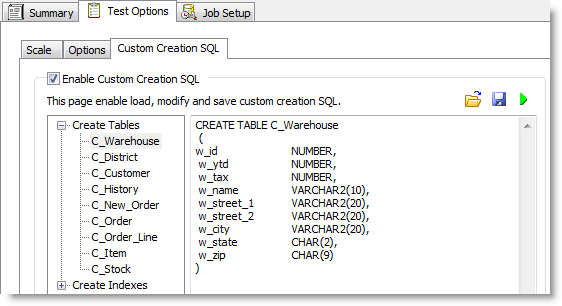
Create Objects Using Custom SQL
Use the Custom Creation SQL tab to customize the SQL used to create objects in an Industry Standard Benchmark test. You can save your modified SQL as a .xml file to reuse the same SQL and settings in multiple tests.
To use custom SQL to create objects
- In the New Job Wizard, after adding an industry standard benchmark test, select the Create Objects step.
- Select the Test Options tab and then open the Custom Creation SQL tab.
-
Select the Enable Custom Creation SQL option.
- To modify the SQL, select an object in the left pane, and then edit the SQL in the right pane.
- To test run the modified SQL, click
.
- To restore the default SQL for the selected object, click Restore SQL.
- To restore the default SQL for all objects, click Restore All.
Your edits are saved automatically if you click Save/Close or run the job.
- To test run the modified SQL, click
-
To save the modified SQL as an .xml file, click
. Specify a file name and click Save. The SQL for the objects you modified is saved to the file.
Note: By default, the .xml file is saved to the Data directory. To change the location of the Data directory, go to Edit | Settings | General.
-
To import custom SQL from a previously-saved .xml file, click
.
Note: When importing SQL from a file, Benchmark Factory uses the default SQL for all objects not in the .xml file.
- To save your changes, click Save/Close or specify the remaining wizard options and run the job.
- To retain but disable the custom SQL in the Custom Creation SQL tab, clear the Enable Custom Creation SQL checkbox.
Note: If you modify an object name, column name, or a data type, this change could prevent data/objects from loading successfully or could cause the standard benchmark test to fail.
Table Options (Create Objects for Replication)
Use the Table Options tab of the Replication benchmark test to design the structure of tables used in this test. You can specify the number of tables, the number of columns per table, column data types, and the proportion of each data type per table.
You can specify default values for these Replication table options at Edit | Settings | Benchmarks | Replication. The default values are applied when you create a new Replication test. See Replication Benchmark Settings for more information.
To specify Replication table options
- In the New/Edit Job wizard, select the Create Objects for Replication step under the Workload section.
- Select the Test Options tab and then the Table Options tab.
-
To define the Replication tables, specify the following options.
Number of Tables Select the number of tables to include in this Create Objects for Replication step. Number of Columns per Table Specify a range. The number of columns in each table will be randomly selected (using Uniform distribution) from this range. -
Then use the grid to specify the data types to include in the tables, as well as the proportion of each data type. The grid initially displays the data type list and default values that are specified in the Replication Table Structure page of the Settings dialog (Edit | Settings).
To define a new data type for this test, click Add. Then specify data type details by entering values in the grid. Review the following for additional information:
DataType column Select a data type from the list (click inside the column to display the drop-down list). Weight column Specify a weight for this data type. This value is used by Benchmark Factory to determine what percentage of the columns will be defined with this type. The weight/percentage is applied to each table (if possible) and to the database as a whole.
The total weight is displayed below the grid.
- Click Add to add another data type. Click Delete to delete the selected data type. Continue this process until you have defined all the data types (columns) you want to include in the Replication tables.
Notes:
- Replication tables will automatically include a primary key column.
- The number of columns per table is determined using a Uniform distribution model.
- Right-click a data type in the grid to perform a copy and paste action.