
Automate Zipping Files
Summary
In this tutorial you will learn how to zip files using Automation. You can zip existing files or files that are created by the script.
In this tutorial you will learn:
- How to zip files using the Zip Files activity in Automation
- How to zip all files in one directory into a zipped folder
You will need:
- A query or query file

Introduction
If you are using Automation to export data to a file or files or to create reports, you may need to email those files to your end-users or store them in a storage location. If you have a number of files, you might want to zip the files into a zip (compressed) folder. Toad Automation allows you to automate this process using the Zip Files activity.
Create a Script to Zip Files
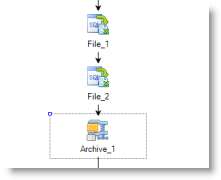
To demonstrate the Zip Files activity, you will need some files. So, the first task in your Automation script will be to create files using the Select to File activity.
- To get started, select Tools | Automation.
- Click the Select to File activity to add it to the design window. You will use this activity to export data to an Excel file.
- In the Activity Input tab, select a database connection from which to export data to Excel.
- Then select a query file or enter a query in the editor box.
-
Select Excel as the file type in the Export to File section. Then click
in the Name field and select a location and file name for your output file, or select an existing file.
- Click the Select to File activity in the Toolbox a second time to add a second Select to File activity to the Automation workflow.
- Specify database connection, query, and export file information for the second Select to File activity.
-
Now click the Zip/UnZip Files activity to add it to the design window. Make sure the activity is added to the Automation workflow below the second Select to File activity.
- In the Activity Input tab for the Zip Files activity, click
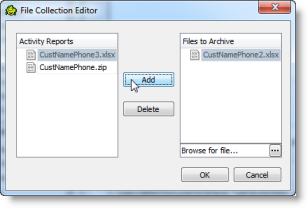
- Now click Add Files to specify the files to zip and include in the zip file.
- The File Collection Editor opens and displays a list of files. These are the files that your current script creates. Use the following options to add files to the zip file:
- Click Add to move a selected file from the Activity Reports list to the Files to Archive list.
- Click
Click OK when finished adding files.
-
Click
-
Click the hyperlink in the execution Log to open the zip file and review the files that were zipped.

Add a File with a Variable Name
What if your current script creates a file with a file name that is based on a variable or a timestamp? A file with a variable in the file name will display in the File Collection Editor even if the name is not known at the time you build your script.
- To demonstrate this, click the first Select to File activity in the Automation workflow.
- Copy (Ctrl + C) the RowCount variable name.
-
Click
For example: Exp_#File_1_RCOUNT#
- In the second Select to File activity, do the same.
- Click the Zip Files activity in the Automation workflow.
- In the Activity Input tab, select the files in the Source files list and click Remove Files to remove the selected files from the list.
- Click Add Files to add the files with the modified file names. The File Collection Editor opens and displays the new list of file names. Each file name includes the variable name. The variable name acts as a placeholder until the dynamic file name is created at run time. Add the files to the zip file and click OK.
-
Click
- After the script executes, click the hyperlink in the Log to open the zip file and review the files that were added. The file names now include the actual row count that was generated at run time.
Specify Additional Options
You can specify additional options in the Zip Files activity, including the following:
- You can zip the entire contents of a directory. In the Zip all files in this directory field, browse to and select a directory.
- Add a suffix to the zip file name by selecting one from the Suffix drop-down list.
- Password-protect the zip file by entering a password in the Password field.
- Increase encryption to AES-128 or AES-256 by selecting from the Encryption drop-down list.
The Zip Files activity is a convenient step that integrates nicely with other file deployment activities, and it is easy to use.
Schedule A Script
See Schedule Your Script to learn how to schedule the Automation script.