Context Help
If you create a Portal Container by choosing Create Dashboard from the General tab of the action pane, the Data tab becomes available in the action pane. All queries appear here. Context help for the query appears as a tooltip when you hover the mouse pointer over the query’s name. Similarly, if you entered text in the Help area of the Create Dashboard dialog box, it appears when you hover the mouse pointer over its entry in My Dashboards in the navigation pane.
Relevant Roles and Allowed Roles
Roles are taken into account when filtering Root Queries by role in the Data Browser when using Create dashboard and Create report.
If a query has no Allowed Roles marked, all roles are allowed to use this query. If some but not all Allowed Roles are set on a query, then only users for whom at least one of their roles is also an Allowed Role on the query can see or in any way interact with that query. This restriction does not apply if the user has CHANGE_SYSTEM_MODULES permission (as determined by the AuthorizationService) or if the query is in the user's personal module.
Roles can be applied globally to all the views and queries in a module by editing its properties.
|
1 |
|
4 |
Sequence of Evaluation
|
1 |
The data objects are restricted based on Where, if specified. |
|
2 |
They are then sorted based on Order By, if specified. |
Creating New Queries
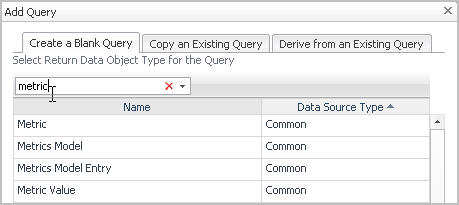
The Add Query dialog box lets you create a new query or a copy of an existing query.
|
1 |
Select Configuration > Definitions in the navigation panel. |
|
2 |
|
3 |
In the Module Contents pane, select the Queries option from the drop-down list. |
|
4 |
On the Create a Blank Query tab, select a Data Source Type that specifies the type of object to be returned by the query. You can use the search box to narrow the choices. |
|
5 |
Click OK. |
|
6 |
|
7 |
By default, the ID field’s value is <auto>. You may want to give it a more descriptive name, which could be useful for troubleshooting. |
|
8 |
Select UI Query if the query is to appear in the data browser. |
|
10 |
Select Public if you want to share the query. |
|
11 |
Ensure that Deprecated is cleared. This check box is used to flag outdated queries. |
|
12 |
Select Relevant and Allowed roles for this query. For more information, see Roles in Query Definitions. |
|
13 |
Add any Required Parameters needed by the query. |
|
14 |
Select a data source in Root Reference from the choices in the From field. Typically, its value is Monitoring, or if you want to have the search start from a required parameter, choose it from the Parameters node. |
|
15 |
Select the Object Type by clicking the drop-down arrow at the right of the Path field. Choose the object from the drop-down list of data objects. If you have chosen the Monitoring data source, this list is a replica of the nodes in the Data browser under Management Server > All Data. For any other data source, it is the list of available entities for that source. |
|
16 |
Objects are grouped at some level down from the root. Choose the object you want from the drop-down list in the with Path field. You might need to set the Max Search Depth field as well. |
|
17 |
|
18 |
You can filter results by specifying a value for N, either by giving it a specific value or by declaring a parameter that returns a value. You can also choose to include Everything except the top N for the case where you want to show the top N somewhere and the rest somewhere else. |
|
20 |
You can use a Where clause to use a condition to limit the returned objects to the ones that match the criterion. |
|
21 |
You can test the query by clicking the Test button at the top of the Edit pane. |
|
22 |
|
23 |
Click Save to save the query. |

