
Automate Creating and Refreshing Snapshots in Local Storage
Summary
In this tutorial you will learn how to create a snapshot in Local Storage and how to use Automation to create and refresh snapshots.
Note: This feature is available in the Toad Data Point Professional Edition only.
In this tutorial you will learn:
- How to create snapshots in Local Storage
- How to create snapshots using an Automation script
- How to refresh snapshots using an Automation script
You will need:
- The Toad Sample Database (or a similar sample database)

Introduction
Local Storage snapshots are a very useful tool. You can use them to temporarily store data for reporting or querying purposes, similar to Local Storage tables. Snapshots however have an additional feature—they can be refreshed at any time to reflect the current data in the source database. This gives you the added flexibility to import and manipulate data, and then easily refresh it from the source data.
For example, create a Local Storage snapshot from data you have manipulated in Transform and Cleanse. Later, when you refresh the snapshot, the data is updated to the current data in the source database, and the transform and cleanse rules are re-applied.
You can save data as a Local Storage snapshot in a variety of different ways in Toad. In addition, you can also create and refresh snapshots using an Automation script.
Create Snapshots in Local Storage
There are several different ways to create a snapshot in Local Storage.
Create a Snapshot from a Table
- To save a table as a Local Storage snapshot, in the Object Explorer, right-click a table and select Local Storage.
-
In the Save to Local Storage dialog, select Snapshot. Then select or create a database, and select or create a snapshot name. If this is the first time you have used your Local Storage, you must first create a new database. Simply enter a name in the Database field.
Note: You can also designate a primary key and modify the data types using this dialog.
- After the data is exported, click the hyperlink in the Success message that displays to open and review your new snapshot.
Refresh a Snapshot
- To refresh the snapshot you just created, in the Object Explorer, right-click the snapshot and select Operations | Refresh Snapshot.
Create a Snapshot from a Result Set
- Connect to the Toad Sample Database.
- Select Tools | Query Builder | Query Builder.
- Build any query you like using the Toad Sample Database. Click Execute SQL to execute the query.
- In the Results tab, right-click within the result set's data grid and select Send To | Local Storage.
-
In the Save to Local Storage dialog, select Snapshot. Then select or create a database, and select or create a snapshot name.
Note: You can also designate a primary key and modify the data types using this dialog.
- After the data is exported, click the hyperlink in the Success message that displays to open and review your new snapshot.
Create a Snapshot from Transformed and Cleansed Data
Note: This section of the tutorial was created using the legacy Transform and Cleanse tool available in Toad Data Point 3.7 and earlier releases. Some steps might not be applicable to the new Transform and Cleanse tool available in Toad Data Point 3.7 or later.
You can use the Transform and Cleanse tool to modify or cleanse data prior to sending it to Local Storage. If you save the transformed and cleansed data as a snapshot in Local Storage, when you refresh the snapshot, Toad updates the snapshot to reflect the current data in the source database and re-applies the transform and cleanse rules.
The following example demonstrates how transformed data saved to Local Storage can be refreshed to reflect the current data with the transform and cleanse rules re-applied.
Create Original Data
- Connect to the Toad Sample Database.
- In the Object Explorer, right-click the ADDRESS table and select Local Storage.
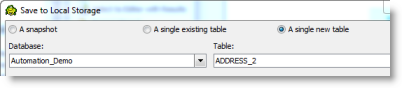
- In the Save to Local Storage dialog, select A single new table to create a new table in Local Storage.
-
Then select a database (or create a new one), and name the new table ADDRESS_2.
Transform Data and Save to Local Storage
- In the Object Explorer, right-click the ADDRESS_2 table and select Transform and Cleanse.
- In the Transform and Cleanse window, in the Find and Replace tab, select COUNTRY from the Column drop-down list.
- In the Find what field, enter US. In the Replace with field, enter USA.
- Click Apply to apply the rule.
- Now click Local Storage in the Wizard bar to send the modified data to Local Storage.
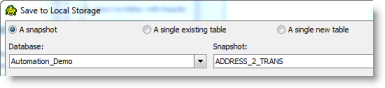
-
In the Save to Local Storage dialog, select Snapshot. Select a database (or create a new one). Name the snapshot ADDRESS_2_TRANS.
- After the data is exported, click the hyperlink in the message that displays to open and review your new snapshot. Notice that the snapshot contains the modified data resulting from the transform and cleanse actions. Close the window.
Modify Original Data and Refresh Snapshot
- In the Object Explorer, right-click the ADDRESS_2 table and select View Details to open it in the Database Explorer. Now modify the data. For example, in one or two of the rows, change US to United States in the COUNTRY column. Save your changes and close the window.
- In the Object Explorer, right-click the ADDRESS_2_TRANS snapshot and select Operations | Refresh Snapshot to refresh the snapshot.
-
Click the hyperlink in the message that displays to open and review the snapshot.
Notice that the snapshot was updated to reflect the current data in the ADDRESS_2 table, including the changes you made, and that the transform and cleanse rule was re-applied to the current data.
View Snapshot Details
- With the snapshot still open in the Database Explorer, select the Information tab. This tab displays information regarding how and when the snapshot was created, including the originating query and any transform and cleanse rules (if the snapshot originated in this manner).
Create a Snapshot from the Import Wizard
You can also save data to Local Storage when you import data using the Import Wizard.
- To demonstrate this feature, connect to the Toad Sample Database.
- Select Tools | Import Export Data | Import Wizard.
- Click Next on the Welcome page.
- Click Add Query on the Import File page. Click Next. On the Enter Query page, enter Select * from ADDRESS. Click Next.
- On the Select Target page, select Snapshot. Then select a database and enter a name for your new snapshot.
- Complete the remaining wizard pages and click Finish to import the data into the snapshot in Local Storage.
Create a Snapshot Using Automation
You can automate the process of saving data to a Local Storage snapshot. These Automation activities allow you to save their output as a Local Storage snapshot: Execute Script and Clean Data (in addition to the Import Wizard).
- To demonstrate how to create a snapshot using Automation, connect to the Toad Sample Database.
- Select Tools | Automation to open an Automation window.
- Click the Execute Script activity in the Toolbox to add it to the Automation design window.
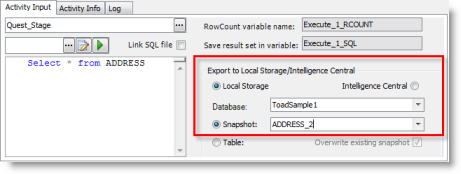
-
In the Activity Input tab, enter the following query: Select * from ADDRESS. Then select Local Storage and Snapshot in export options section.
- Now click the Clean Data activity in the Toolbox to add it to the design window.
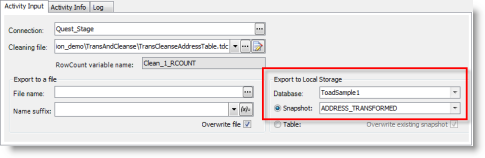
-
In the Activity Input tab, in the Export to Local Storage section, select a database and select Snapshot. This will instruct your script to export the modified data to a snapshot in Local Storage.
- The purpose of this example was to demonstrate which Automation activities allow you to save a snapshot. You can close the Automation window now, with or without saving the script.
Refresh a Snapshot Using Automation
After you create a snapshot in Local Storage, you can automate the process of refreshing the snapshot.
- Select Tools | Automation to open a new Automation window.
- Click the Refresh a Snapshot activity in the Toolbox to add it to the Automation design window.
- In the Activity Input tab, select Local Storage.
- In the Database field, select the Local Storage database containing the snapshot you want to refresh.
- In the Snapshot field, select the snapshot you want to refresh.
Schedule A Script
See Schedule Your Script to learn how to schedule the Automation script.