
Step 1: Make sure prerequisites are met
-
You are logged on as a member of the Schema Admins group.
-
Write operations to the schema are allowed.
Step 2: Modify the searchFlags attribute value
To preserve SID History in tombstones, you need to modify the searchFlags attribute value for the SID-History (sIDHistory) schema object.
To preserve passwords in tombstones, you need to modify the searchFlags attribute value for the following password-related schema objects:
-
Unicode-Pwd (unicodePwd)
-
DBCS-Pwd (dBCSPwd)
-
Supplemental-Credentials (supplementalCredentials)
-
Lm-Pwd-History (lmPwdHistory)
-
Nt-Pwd-History (nTPwdHistory)
| IMPORTANT |
The Lm-Pwd-History and Nt-Pwd-History attributes are used to store password history. For security reasons, it is recommended to restore them along with the password. |
To determine the new searchFlags attribute value to be set, use the following formula:
8 + current searchFlags attribute value = new searchFlags attribute value
To modify the searchFlags attribute value
-
Use the ADSI Edit tool (Adsiedit.msc) to connect to the Schema naming context using the domain controller that holds the Schema Master FSMO role:
a. Start the ADSI Edit tool (Adsiedit.msc).
b. In the left pane of the console, right-click the ADSI Edit console tree root, and then on the shortcut menu click Connect to.
c. In the dialog box that opens, do the following:
-
Click Select a well known Naming Context option, and then select Schema from the list below.
-
Click Select or type a domain controller or server option, and then type the name of the domain controller that holds the Schema Master FSMO role.
d. Click OK to connect.
-
-
In the left pane of the console, expand the Schema container to select the container that includes the schema objects you want to modify.
-
Right-click the object you want to modify in the right pane, and then click Properties.
-
Enter the new searchFlags attribute value you determined earlier:
a. On the Attribute Editor tab, select searchFlags from the Attributes list, and then click the Edit button.
b. In the Attribute Editor box, enter the new value and click OK.
Full Replication
Recovery Manager for Active Directory provides an ability to switch from the initial Recovery Manager Console to the alternate instance of the console in case of any system failure, e.g. hardware failure. The Full replication feature lets you create a full copy of the initial console settings on the console that is used as a replication target, so that the target console can fully take over the initial console and perform exactly the same operations.
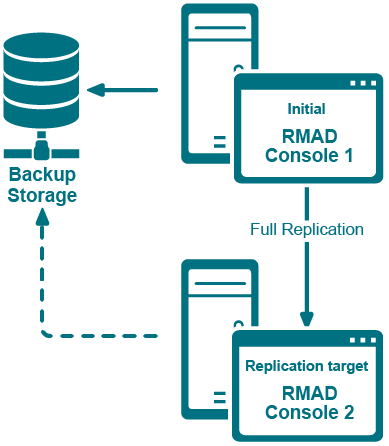
This functionality is based on the Recovery Manager Remote API Access service and PowerShell commands. The Recovery Manager Remote API Access service is an optional feature and must be selected when installing Recovery Manager for Active Directory version 10.1. When the Full replication feature is enabled, the current console connects to the Recovery Manager Remote API Access service on the remote RMAD console, then imports the data , e.g. collection information, backup schedule task information, backup information, etc.
| NOTE |
The TCP port 52132 is required for Recovery Manager Remote API Access service. |
Which settings are replicated?
-
Global settings
-
Computer collection settings, including the retention policy setting
-
Computer collections
-
Secure Storage servers
-
Backup schedule task
-
Backup information
- Backup information only, not the backup files.
- If the path of backup is an absolute path ( e.g. "C:\backups\b1.bkf", it will be changed to the UNC path (e.g. "\CurrentConsoleName\C$\ backups\b1.bkf").
- Secure Storage backup information.
NOTE:
-
You can specify a fallback account which will be used for replacing accounts in backup schedule tasks if these accounts cannot be replicated to the local console. It is recommended to specify a fallback account if backup schedule tasks use a regular Active Directory account, a local account or a gMSA account that cannot be resolved on the local console. Otherwise, the replication will fail.
-
If the backup schedule account is a domain user or local user, it will be changed to "SYSTEM".
-
If the user account is Managed Service Account (in Windows Server 2008 or higher) or Group Managed Service Account (in Windows Server 2012 or higher), make sure that the account works in the current console. Otherwise, it will be changed to "SYSTEM" too.
-
All backups schedules are disabled after the replication.
For details on how to create a gMSA account, see Using Managed Service Accounts.
Configure the full replication in Recovery Manager Console
This section describes how to create a full copy of the initial console settings on the local instance of Recovery Manager Console and switch to the local console in case of the initial console failure.
IMPORTANT:
-
It is recommended to use the full replication between consoles in the same datacenter to quickly switch to the target console in case of the initial console goes down.
-
Single replication source mode: you can add several remote consoles to the replication list, but only one remote (initial) console can be used for replication.
-
All discovered Backup Agent instances on the local console are deleted during the Full replication. The data from the initial console completely rewrite all other local data (collections, collection properties, etc).
-
After the replication, data on the target console is read-only, but you can perform the compare and restore operations using this console.
-
It is recommended that you schedule the backup tasks and the replication task so that they do not overlap.
To add a remote (initial) console to the local (replication target) console and force the replication
-
Open the local Recovery Manager for Active Directory console.
-
Right-click Remote Consoles under the Replication node and select Add Console.
-
In the Add Replication Console dialog, specify a host name where the RMAD console that will be used as a replication source is installed.
-
Select Replicate backup information, collections, global settings and schedule (Full mode).
-
Supply the credentials for the replication task. These credentials will be used to connect the source console that you have just added.
-
The account used for the replication task must be a member of the local Administrators group on the local and remote RMAD consoles.
-
The account must be a member of the Domain Users group on each target domain.
-
The account must be a member of the local Administrators group on the computer hosting the AD LDS (ADAM) instances.
-
-
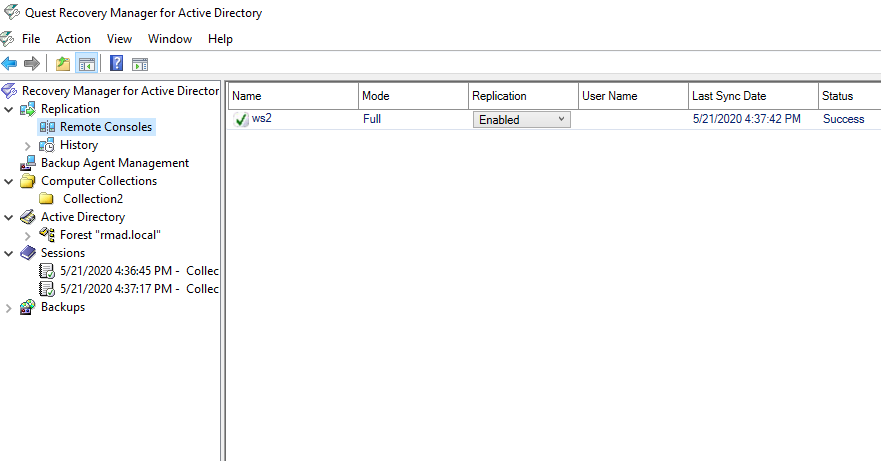
Now the source console instance is added and shown in the right pane.
-
Set the console replication status to Enabled in the right pane.
-
To start the replication, right-click Remote Consoles and press Replicate.
-
To change the console properties, right-click the console instance from the list in the right pane and select Properties.
-
To remove the console instance from the replication console list, right-click the instance and click Remove.
| IMPORTANT |
To activate the target console in case of the initial console failure, go to the Remote Consoles node and set the replication status of the initial console to Disabled in the right pane.This action turns off the read-only mode on the target console and the console completely takes over the functions of the initial one. |
Replication status
-
If the data replication is finished successfully, the status in the console instances list is changed to "Success".
-
The replication may fail with the error "Cannot connect to Recovery Manager for Active Directory on the specified computer." in the following cases:
-
If the target computer does not exist or Recovery Manager for Active Directory is not installed on the specified host.
-
If the Recovery Manager Remote API Access service is not installed or stopped
-
If you experience network connection problems
-
If the account that is used for the replication task is blocked, etc.
-
To view the replication history
-
Open the local Recovery Manager for Active Directory console.
-
Click History under the Replication node to view the list of replication sessions.
-
If you click a replication session, the right pane shows all remote consoles that are involved in the specified replication session.
-
To remove one or more replication sessions from the list, right-click the session node and select Delete. Multi-select is possible.
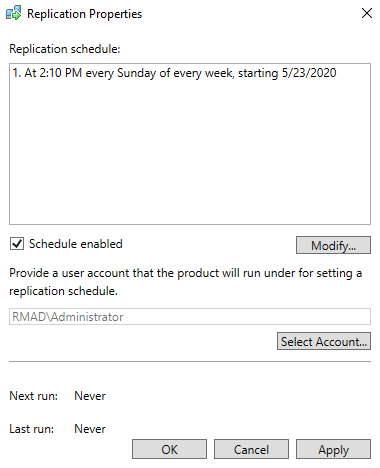
To create a replication schedule
-
In the Recovery Manager for Active Directory console, right-click the Remote Consoles node under the Replication node and select Properties.
-
In the Replication Properties dialog, you can create the replication schedule. For that, click Modify…, then click New… in the Recovery Manager Replication Job dialog to create a trigger for the schedule.
-
Make sure that the Schedule enabled option is selected in the Replication Properties dialog.
-
Provide a user account that will be used to start the replication schedule task using Select Account… in the Replication Properties dialog. Minimum requirements for the account are listed above depending on the replication mode.
-
Click OK.
| Note |
You can specify Managed Service Account (in Windows Server 2008 or higher) or Group Managed Service Account (in Windows Server 2012 or higher) to run the replication schedule task. Note that you must add the dollar character at the end of the account name (e.g. domain\computername$) and leave the Password field blank. This account must be a member of the local Administrator group on the Recovery Manager for Active Directory machine. |
Consolidating backup registration data
When there are two or more instances of the Recovery Manager Console deployed in your environment, each of these instances has its own dedicated backup registration database that stores information about created backups. Recovery Manager for Active Directory allows you to consolidate backup information from multiple backup registration databases on a single Recovery Manager for Active Directory computer. The main user scenario for using this functionality is to make this data available to Forest Recovery Console. So, Forest Recovery Console must be installed together with Recovery Manager Console on the computer that hosts consolidated backup database to access and use the backup files created by all other Recovery Manager for Active Directory instances installed in your environment.
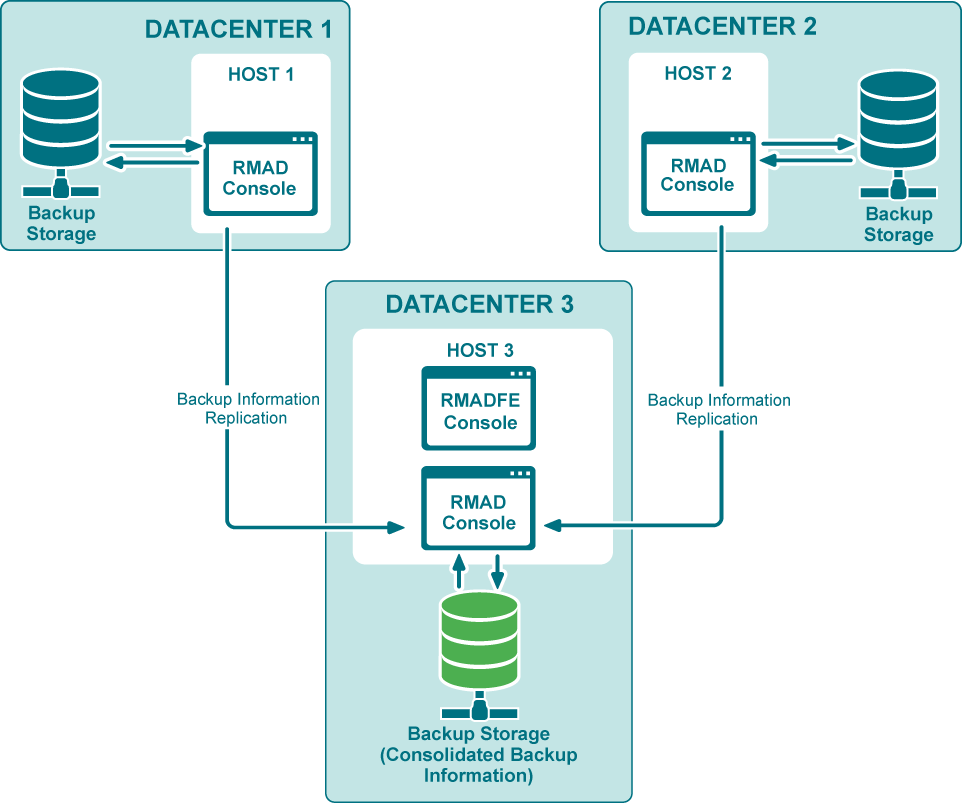
This functionality as well as the Full replication feature is based on the Recovery Manager Remote API Access service and PowerShell commands. The Recovery Manager Remote API Access service is an optional feature and must be selected when installing Recovery Manager for Active Directory version 10.1. When the backup replication is enabled, the current console connects to the Recovery Manager Remote API Access service on the remote RMAD console, then imports the data.
| NOTE |
The TCP port 52132 is required for Recovery Manager Remote API Access service. |
Configure replication of backup information in Recovery Manager Console
This section describes how to configure replication of backup information from remote consoles to the local backup storage.
IMPORTANT:
-
It is recommended to use this option for consoles that reside in geographically remote datacenters.
-
Consolidating backups does not affect the backup files.
-
Replication of backup information is one way. If you need to configure two-way replication, you should configure it explicitly in both instances of Recovery Manager Console.
-
Several remote consoles can be used simultaneously as replication sources.
-
In this mode, the local console is fully functional during the backup replication.
-
Local backups are consolidated with the backups from remote consoles.
-
It is recommended that you schedule the backup tasks and the replication task so that they do not overlap.
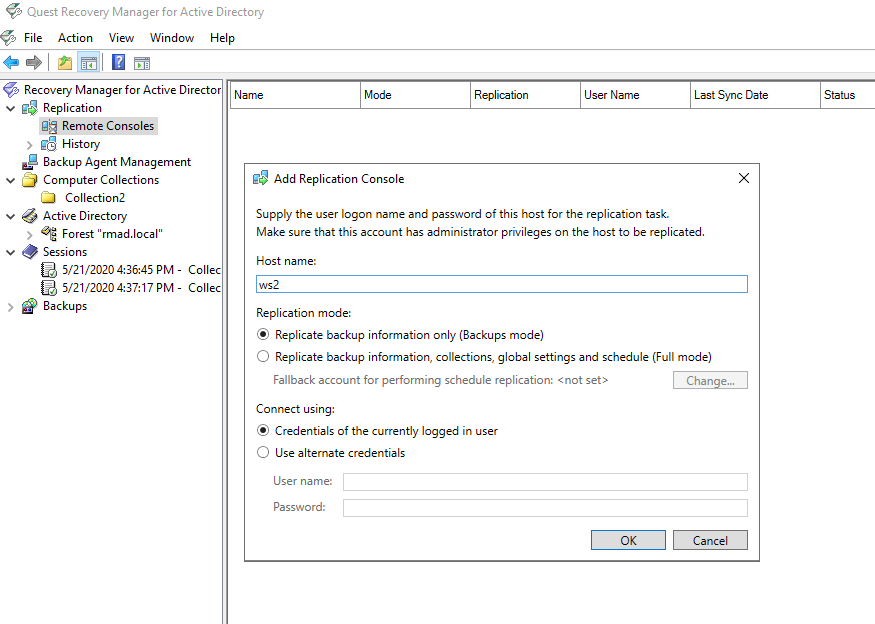
To add a remote console to the local console and force the replication of backup information
-
Open the local Recovery Manager for Active Directory console.
-
Right-click Remote Consoles under the Replication node and select Add Console.
-
In the Add Replication Console dialog, specify a host name where the RMAD console that will be used as a replication source is installed.
-
Select Replicate backup information only** (Backups mode)**. This option lets you replicate backup information from the replication source.
-
Supply the credentials for the replication task. These credentials will be used to connect the source console that you have just added.
-
Now the source console instance is added and shown in the right pane.
-
Set the console replication status to Enabled in the right pane.
-
To start the replication, right-click Remote Consoles and press Replicate. This option forces the replication for all consoles in the list, not only for the selected one .
-
To change the console properties, right-click the console instance from the list in the right pane and select Properties.
-
To remove the console instance from the replication console list, right-click the instance and click Remove.
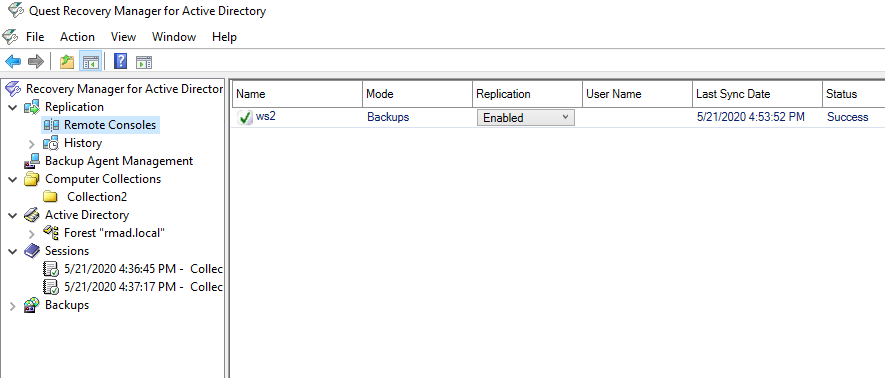
Replication status
-
If the data replication is finished successfully, the status in the console instances list is changed to "Success".
-
The replication may fail with the error "Cannot connect to Recovery Manager for Active Directory on the specified computer." in the following cases:
-
If the target computer does not exist or Recovery Manager for Active Directory is not installed on the specified host.
-
If the Recovery Manager Remote API Access service is not installed or stopped
-
If you experience network connection problems
-
If the account that is used for the replication task is blocked, etc.
-
To view the replication history
-
Open the local Recovery Manager for Active Directory console.
-
Click History under the Replication node to view the list of replication sessions.
The list shows the replication sessions for the past 10 days by default. To change the default number of days, edit the value of the registry HKEY_LOCAL_MACHINE\SOFTWARE\WOW6432Node\Quest\Recovery Manager for Active Directory\Synchronization\ReplicationSessionLimitedDays -
If you click a replication session, the right pane shows all remote consoles that are involved in the specified replication session.
-
To remove one or more replication sessions from the list, right-click the session node and select Delete. Multi-select is possible.
To create a replication schedule
-
In the Recovery Manager for Active Directory console, right-click Remote Consoles under the Replication node and select Properties.
-
In the Replication Properties dialog, you can create the replication schedule. For that, click Modify…, then click New… in the Recovery Manager Replication Job dialog to create a trigger for the schedule.
-
Make sure that the Schedule enabled option is selected in the Replication Properties dialog.
-
Provide a user account that will be used to start the replication schedule task using Select Account… in the Replication Properties dialog. Minimum requirements for the account are listed above depending on the replication mode.
-
Click OK.
| Note |
You can specify Managed Service Account (in Windows Server 2008 or higher) or Group Managed Service Account (in Windows Server 2012 or higher) to run the replication schedule task. Note that you must add the dollar character at the end of the account name (e.g. domain\computername$) and leave the Password field blank. This account must be a member of the local Administrator group on the Recovery Manager for Active Directory machine. |