Upgrading from Evolve Web Platform 2018 or older
If you are upgrading to the latest Evolve 2020 from any previous version 2018 or older and you have CWSuite installed on the same machine.
|
|
When uninstalling any version of Evolve from 4.0 upwards, it is also necessary to uninstall "Evolve Services" / "CWS Services" - the service that operates the Global Search, and Web Modeler. The Evolve Web Platform uninstaller does NOT remove Evolve Services (or CWS Services) when uninstalling. |
The following steps ensure compatibility between Evolve Web Platform and Evolve Suite (CW Suite) when run on the same machine.
1. First BACKUP your SQL Database, to ensure any updates can be reverted should there be a problem.
2. Now uninstall CWS Services for 2018 and older
To do this you my need to first stop the CWS Services from running
3. Then uninstall your previous version of Evolve 2018 or Evolve 2016
A restart may be required.
4. Now uninstall your previous version of CWSuite 2018 or CWSuite 2016
A restart may be required.
5. Go to your previous Evolve installation folder (defaults to C:\Casewise\Evolve) and rename it to "Evolve_OLD")
This folder is not removed by the installer, as it contains files that were not part of the installation.
Keeping this folder can be useful, if you have customizations that you need to copy across.
Once you are sure you have all you need from this directory, it can be removed.
6. Install the latest Evolve Suite release (aka CWSuite) * If only the Web Platform is required, this step can be skipped. *
(The Suite should be installed first, if both Desktop and Web components are to co-exist on a single machine)
7. Install Evolve Web Platform 2020
And copy any custom files back to their respective folders (nb: only copy files customized by your organization)
8. ** ENSURE YOU HAVE BACKED UP YOUR DATABASE **
Follow the instructions to upgrade your database.
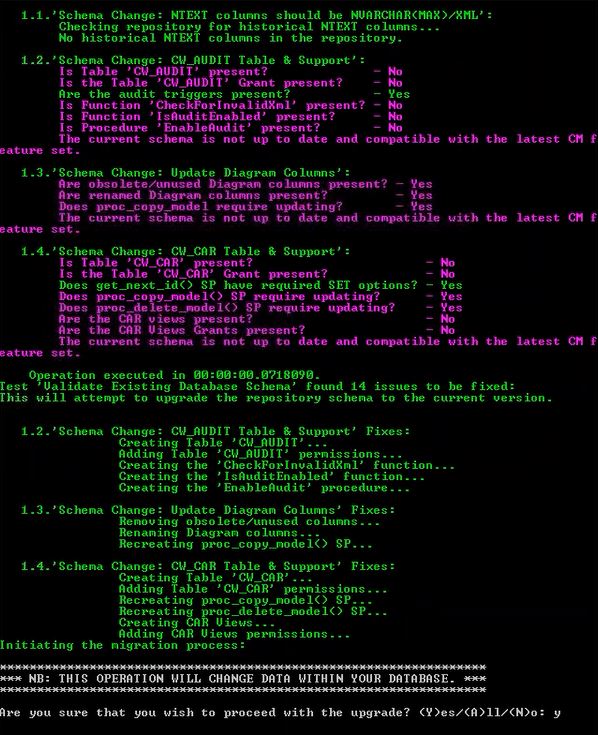
9. Continuing on from the database upgrade instructions, also run the following command
ValidateRepository.exe -connection:YourConnectionName -username:YourUserName password:YourPassword -applyfixes
When prompted to apply fixes, review the changes (there may be other faults that need fixing, check you are happy with them) then press 'a' for all.
10. Your upgrade is complete - continue to configure Evolve Web Platform and re-publish the sites.
If you are upgrading from a version earlier than Evolve 4.0, please first ensure you have completed the steps in the Database Migration Guide, and then follow the appropriate steps listed below in order to complete the migration process and have your Sites running the new version.
|
|
If you have any custom themes, you must copy all of the lines below and paste it in all theme files for every Evolve site that you are deploying. @cwDiagramEditorIconColor: #b7b7b7; //v4.0 Adding this text to the end of the theme files will upgrade the theme files for the new version If you are using a custom logo, it is important to note that the new dimensions for the top left logo are 146px x 30px. |
Upgrading Custom Themes / Less Variables
This section applies to users that have customised their Evolve theme. You can skip this section if you are using the default Evolve theme and have not made any changes of your own.
Failure to Update – Theme Errors
Failure to update your custom theme with Evolve 4’s new LESS variables will result in an error.
Merging Changes Into Custom Theme
To ensure that Evolve 4.0’s pages appear as they should, you must copy the new variables into your custom theme files. These variables are listed on the next page.
New Variables in 4.0
The following variables are new to Evolve 4.0:
Global search
|
Variable |
Default Value |
|
@cwGlobalSearchFocusColor |
@cwMenuLeftMainNavigationBackgroundColorActive |
|
@cwGlobalSearchTextColor |
@cwMenuLeftMainNavigationTextColor |
|
@cwGlobalSearchBackgroundColor |
@cwMenuLeftMainNavigationBackgroundColor |
|
@cwGlobalSearchResultsTextColor |
@cwFontTextColor |
|
@cwGlobalSearchResultsBackgroundColor |
whitesmoke |
Top Bar
|
Variable |
Default Value |
|
@cwTopBarHeight |
40px |
|
@cwTopBarBackgroundColor |
#ECEFF1 |
|
@cwTopBarProfileLinkColor |
@cwColor2 |
|
@cwTopBarProfileLinkHoverColor |
@cwColor2Shade |
|
|
|
Login Page
|
Variable |
Default Value |
|
@cwLoginTextColor |
@cwTextColor |
|
@cwLoginLabelColor |
@cwColor2 |
|
@cwLoginTextBoxBorderColor |
#CFD8DC |
|
@cwLoginTextBoxFocusBorderColor |
@cwColor2 |
|
@cwSiteSelectionTextBackground |
@cwColor2 |
|
@cwLoadingIconColor |
@cwAccentColor |
Theme File Labelling Convention
Evolve’s LESS variables are named using camelCase whereby the first letter of each word is capitalized – except for the first letter of the whole string. Evolve version numbers are commented out next to any variables that relate to specific Evolve versions. I.e: //v4.0
Custom Logos
The dimensions of custom logos have been changed, they are now:
Image 1
logo.png
146 x 30 px
Image 2
logo-m.png
112 x 30px
Upgrading from Evolve 2.2, 2.3, 2.3.1, 3.0 or 3.1
There are no changed configuration options required for your upgrade, but you must still do the following:
• Run the Server Configurator to complete the upgrade.
•Upgrade Your Database so it works with the new version.
•Update each of your Sites so they work with the new version.
Evolve eModeler
Evolve 3.1 introduces eModeler. To ensure that this new feature is enabled for use across your Sites, see Enable BP modeler.
Upgrading from Evolve 2.1
If you are upgrading from Evolve 2.1, quite a lot has changed in terms of Site configuration and setup.
As such, there are a series of steps you should follow in order to complete the upgrade process.
Instructions for upgrading from Evolve 2.1
|
|
These instructions assume you have already upgraded the Evolve application on the web server in accordance with the Installation Guide. |
Upgrading your database to support CW Suite / Evolve 2016 and above
These instructions explain how to update your database for new releases of CWSuite and Evolve.
|
|
IMPORTANT: Before beginning the upgrade process you must make sure that your database user has DBA permissions. |
Step 1 - Backup and Preparation
•It is recommended that you back up your database prior to following these steps.
Step 2 - Ensure you have installed your new version of CW Suite
•Follow the install guide for CW Suite until the step to upgrade your database.
Step 3 - Upgrade the Database
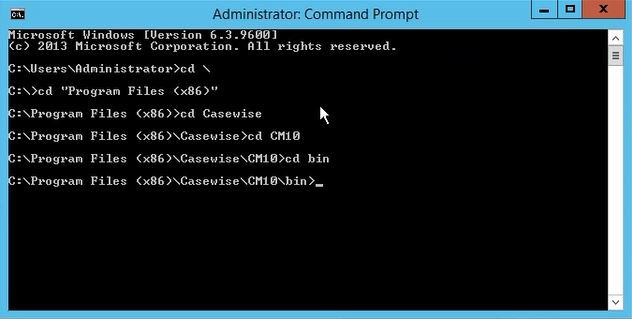
1. Run Command Prompt as an administrator and navigate to the 'bin' directory where CW Suite is installed.
2. Type the following: ValidateRepository.exe -connection:YourConnectionName -username:YourUserName password:YourPassword -upgradedb
3.The Validate Repository tool will do various checks and will display the results of these checks as well as a prompt to commence the upgrade.
If your user does not have DBA permissions you will see the following message:
If you see this message you should not proceed with the database upgrade.
Step 4 - Continue with you install instructions for Evolve as required
•Install Evolve following the information detailed in the installation guide.
Upgrading to Evolve 2.3 from Evolve 2.1
If you are upgrading from Evolve 2.1 there are several steps you must follow to ensure your Sites are updated to run with the new version.
There are also some changes to file paths and the URLs your Sites can be accessed via that you should understand.
If you previously used Workflow in Evolve, please read this important message:
Important message for Workflow users
The mechanism for providing workflow capabilities within Evolve has changed completely in this release.
While any workflows you may have previously configured will still work in Evolve 2.3, all existing Tasks and Notifications will be lost.
If you need assistance preserving existing Tasks and Notifications, please contact the erwin Support Team.
Steps for Updating Sites
|
|
These instructions assume you have already upgraded the Evolve application on the web server machine in accordance with the Installation Guide. |
To ensure a smooth transition to the new version, follow the steps below:
1. Understand multiple Sites, the new URLs, file paths and directories
Learn about the URLs, file paths and directories used in Evolve 2.3.
2. Run the Server Configuration utility
Use the Server Configuration utility to ensure your Evolve IIS Site is configured correctly.
3. Update and publish existing Sites
For each existing Site you want to use in Evolve 2.3, ensure you follow the instructions for Updating an existing Site.
4. Learn how to create and configure a new Site
Now Evolve supports multiple Sites, learn how to Create a Site.