Configure Active Directory Authentication and SSO
Active Directory is a commonly used Microsoft standard approach to securing logon to Windows and Web systems. The following section will describe both the pre-requisites and the Evolve configuration required to enable Active Directory (AD) as your authentication provider. It is largely assumed that you are knowledgeable about the configuration of Active Directory.
The instructions below explain how to configure your Evolve Server so that you can use AD as an authentication method to access your sites.
|
|
Changes to these settings will require the re-publication of the site. |
Pre-requisites for AD authentication:
Before proceeding with the connection, there are some preparatory steps you need to complete, in Modeler, Evolve and in the client’s Active Directory configuration in order for the synchronisation to work.
First let's setup the CW Roles:
1. Launch Model Explorer and create two (2) distinct objects within the CW Role object.
You can create as many roles as you want, but make sure that two of them can be used as generic roles for all incoming users. For example, you can create a role named “Read-Only Users” (which will ultimately contain all Social Users) and another called “Administrators” (or “Contributors”) (which will ultimately contain all Normal Users).
2. Connecting Roles to CW Views.
At this point, you should connect those default roles to the appropriate views to define which pages each user group will be able to access once logged in. To do this please refer to the appropriate section of the Evolve user guide (here).
If you choose not to connect any views to the roles, then both roles will be able to view the exact same pages.
Next configure the Client Active Directory:
1. Creating new AD Groups:
You need to arrange with your customer’s system administrator to create two (2) distinct groups within their Active Directory. They can choose to name them anything they want, but should keep those names distinct and recognizable so they can then be connected to Evolve.
2. Adding users to the AD Groups:
The client system administrator should then, in conjunction with your main contact within the client, ensure that the appropriate number of users is added in each group.
Configure the Active Directory Connection:
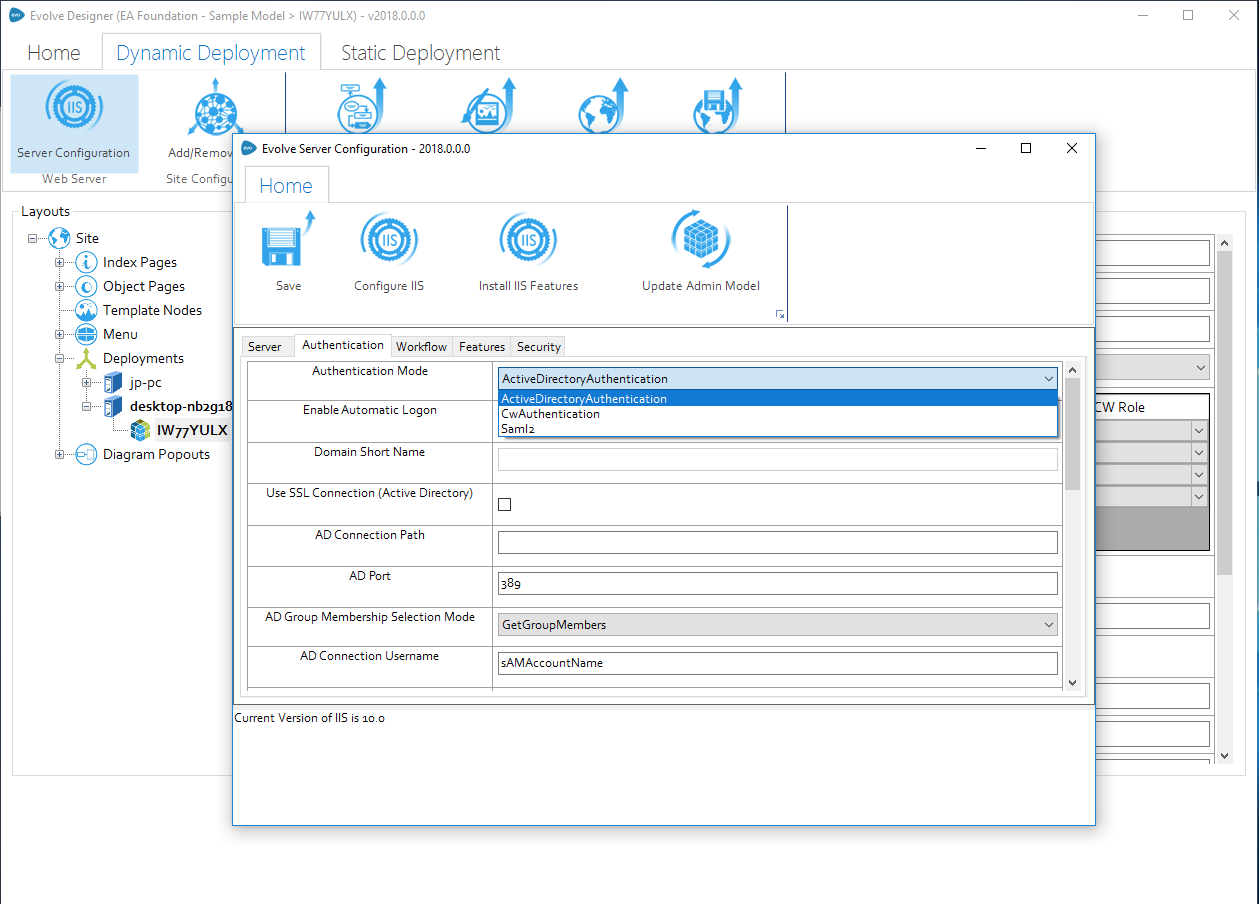
1. Change Authentication Mode:
Launch Evolve Designer (in Administrator mode) and choose "Server Configuration". Navigate to the "Authentication" tab. In the Authentication Mode drop-down list, switch the default value (CwAuthentication) to ActiveDirectoryAuthentication.
Configuring the AD Connection Path:
1. If you have not done so already, import the domain SSL certificate into Windows
2. Export the certificate to a new *.PFX file
3. Use the following password to secure the certificate :
LQMrnsuLpVAZ9ePd
Note that it is not currently possible to choose an alternative password. However the certificate is stored securely on your server, and is not made available externally, so this should not pose a concern.
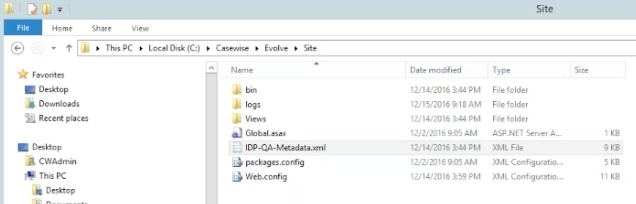
4. Save the filename: CasewiseAuth.pfx
in the folder: c:\Casewise\Evolve\Site\bin
To configure SAML2 on your Evolve server:
1. Run Evolve Designer.
2. On the Evolve Designer Models launcher dialog, click the Server Configuration button.
The Server Configuration dialog opens.
3. Configure the settings according to the table below:
Authentication
|
Authentication Mode |
Choose how you want Users to be logged on to Evolve: Use Saml2 to make Evolve expect a SAML2 authentication |
|
Enable Automatic Logon |
Leave un-checked |
|
Domain Short Name |
Leave this setting blank. |
|
Use SSL Connection (Active Directory) |
Leave un-checked. |
|
AD Connection Path |
Leave this setting blank. |
|
AD Port |
Leave this setting blank. |
|
AD Group Membership Selection Mode |
Leave this setting blank. |
|
AD Connection Username |
Leave this setting blank. |
|
Connect to Active Directory Forest |
Leave this setting blank. |
|
Domain Exclusion List |
Leave this setting blank. |
|
SAML2 Entity ID |
This is often found in the metadata.xml file, and consists of the URL that Evolve needs to check authentication. |
|
SAML2 Meta Url |
This could be a public URL, a private URL or a local file path. The meta data consists of an XML file that contains the settings for the SAML2 configuration. where the metadata file should be stored in the Site folder |
|
Evolve's Url |
Enter the URL to the Evolve home page - e.g. |
4. Click Save to save your configuration.
|
|
If you make any further changes to the server configuration in this dialog, you must Save again. |
At this point it will no longer be possible to logon to Evolve, as the final steps are to configure the permissions based on Claims configured on the Authentication Server, and their mapping to groups on the Evolve server.
To configure Groups and Roles on your Evolve server:
Groups and Roles for SAML2 are configured in exactly the same way as they are for Active Directory. Take a look at this to see how they work. You will find this detail in the "AD Mapping" details of the "Site Level Settings" - "Deployment Node Settings".
Further instructions for specific Identity Providers:
See here for help on Integrating with Okta Identity Provider.
Sites Explained
There are two types of Evolve Site - Static Sites and Dynamic Sites. Which type of Site you can deploy depends on the type of license you have for Evolve and what you want your users to be able to do on the Site.
A Static Site is a read-only deployment which displays data from your repository taken at a fixed point in time and is therefore is a great way to communicate your approved model data to a wide audience.

Static Sites have the following features:
•Read-only data - users cannot edit any data they see.
•Fixed data taken at the time of publication - no live connection to the repository.
•Open access - no user login required.
•Portability - can be accessed via URL on a web server, or directly as files.
A Dynamic Site shows live data from the repository and requires users to log in to access it. It can be configured to allow users to edit data, and you can control data visibility and permissions with Role-based access.
Dynamic Sites can enjoy all the features offered by Evolve - such as Workflow, Comments, Questionnaires, and Favorites.
In summary, Dynamic Sites offer the following features:
•Live data - the Site connects directly to your CW repository showing current data from your model.
•Restricted access - Users are required to log in to access the Site, with Active Directory and Windows Authentication supported.
•Access Rights - Roles and Access Rights can be used to restrict a User's view of the data and also whether they can edit data using the Site.
•Workflow - The Workflow component can be used to implement an Approval procedure for editing data, as well as a Review procedure for validating data.
•Social features - Dynamic Sites have the Evolve social features built-in as standard, enabling your users to collaborate using Comments, provide feedback with Questionnaires, and create their own quick links to important pages using Favorites.
For a table comparing the features of Static and Dynamic Sites, see the Site Comparison Chart.
|
|
Creating a Site makes changes to your Model's meta model, resulting in new Object Types and Associations being added to the Model. If you are using Evolve for the first time and want to experiment with creating a Site, we recommend that you create a copy of an existing Model and use that as the basis of your Site. |
Deployment
Evolve Sites should be deployed to a web server machine running Microsoft Internet Information Services (IIS).
What do you want to do?
The following table shows the differences between Static and Dynamic Sites.
|
Feature |
Description |
Static |
Dynamic |
|
View data |
Users can view data from your repository in Evolve. |
|
|
|
Home page diagram |
Display a diagram on the home page. |
|
|
|
Show live data |
Evolve displays data directly from your live repository. |
|
|
|
Edit data |
Users can edit data where permissions allow. |
|
|
|
User login |
Users must log in to access the Site. |
|
|
|
Access controls |
You can use Role-based access to specify which data users can see and what they can edit. |
|
|
|
Workflow |
The Workflow component can be used to implement Approval and Review workflows. |
|
|
|
Comments |
Users can collaborate using the in-page comment facility. |
|
|
|
Questionnaires |
You can create and publish questionnaires to gather feedback from your users. |
|
|
|
Favorites |
Users can mark pages as Favorites, and then access those pages directly from the Site home page. |
|
|
Change the URL Name of your Site
This page explains how to change the Site URL Name for a model Site in Evolve.
The Site URL Name is the part of the URL which is specific to a particular site.
For Dynamic Sites this is:
http://<server-name>/<evolve-IIS-site-name>/sites/<site-url-name>/
For Static Sites, this is:
http://<server-name>/<evolve-IIS-site-name>/statics/<site-url-name>/
Change the Site URL Name for a Dynamic Site
To change the Site URL Name for a Dynamic Site:
1. In Evolve Designer, navigate to the Deployments > [server-name] > Model node
2. Change the Site URL Name to the new name you want to use, ensuring the text is lower case, and has no spaces or special characters
3. Publish the Site
The Site is Published, is displayed on the Evolve Multi-Sites page, and can be accessed directly at the new URL.
Change the Site URL Name for a Static Site
To change the Site URL Name for a Static Site:
1.In Evolve Designer, navigate to the Deployments > [server-name] > Model node
2.Change the Site URL Name to the new name you want to use, ensuring the text is lower case, and has no spaces or special characters
3.Publish the Site
The Site is Published and can be accessed directly at the new URL.
|
|
When you publish the Site with a changed Site URL Name, the original Site still exists and can still be accessed via the original URL. To completely remove the original Site, you must: 1. On the Evolve server machine, browse to <your-evolve-install-path>\Data\Statics 2. Delete the folder named as your original Site URL Name. |