You cannot scroll past 10,000 items or rows in a view. To see relevant records, you can filter lists based on predefined or custom criteria. The steps to filter a list is the same across all lists.
Quick Filter
These are predefined filters that display the count of items for each value available in the dropdown list. These values take into consideration any other filter that is already applied.
To apply a filter, select a value from the filter dropdown. You can select values from other dropdown filter lists to apply a combined filter. Filters are applied immediately when selected.
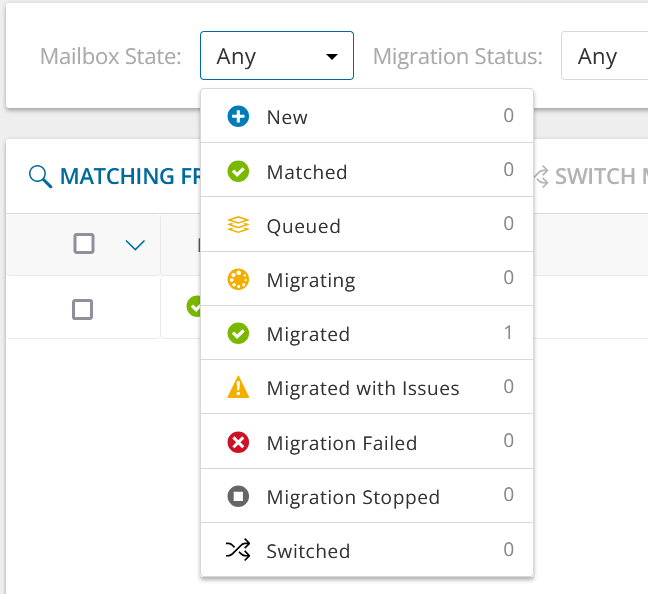
Mailbox State - values indicate various mailbox stages in the migration process of a primary mailbox.
- New - mailbox-enabled account has been found in the source tenant, and migration has not started.
- Matched - mailbox in source matched to mailbox in target tenant.
- Queued - mailbox migration task is waiting for migration service resources to be available. For more information, see How Queuing Works.
- Migrating - source and target tenants analyzed and mailbox migration started.
- Migrated - mailbox migrated successfully to the target tenant.
- Migrated with Issues - some content is migrated but errors or warnings were encountered during migration. Use a reporting task to look for missing files or other errors.
- Migration Failed - critical error occurred during migration and nothing has been migrated. See task event details for more information.
- Migration Stopped - mailbox migration task has been stopped by the user.
- Switched - mailbox is switched between source and target.
Migration Status - status of the most recent task that was run for this mailbox. Valid values are New, Stopped, In Progress, Failed and Completed.
To clear a filter, click the ✖ icon in each filter that was applied, or click Clear All to clear all filters.

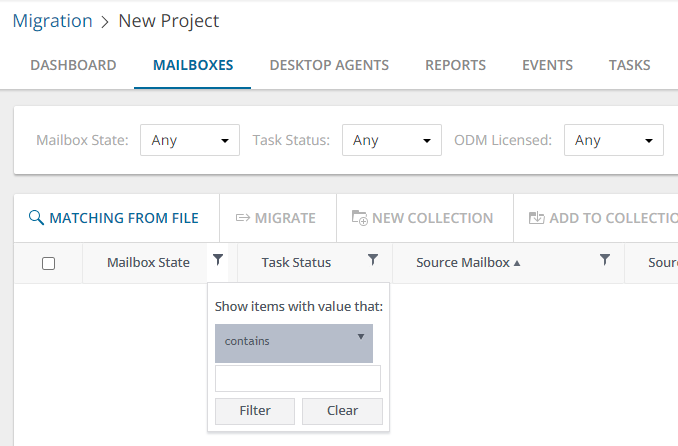
Column Filter
You can apply filters to one or more columns by clicking the filter icon in the column header.
To apply a filter, select a comparison operator from the dropdown and enter a valid value in the search field. Then click Filter.
To clear a filter, click the filter icon in the column header where a filter was applied. Click Clear to clear the filter.
On Demand Migration for Hybrid Exchangesupports migrating content between Microsoft Exchange 2010 SP2 - SE and Exchange Online. Before you can start the migration, you must prepare the Exchange On-premise server for migration.
In this topic:
Enabling Application Impersonation Rights
To migrate data to or from Exchange 2010 SP2 - SE you must enable Application Impersonation for the migration administrator account. This allows the migration administrator to impersonate all users on all your client access servers.
To enable Application Impersonation rights, use role based access controls, and create a role group that has Application Impersonation rights.
To create a role group for impersonation, use the PowerShell cmdlets from the articles above. The following is a step by step guide for creating the impersonation role and assigning a user to that role.
- Log in to your Exchange server, or to a machine that has the Exchange Administration tools installed on it as an Exchange administrator.
- Run Exchange Management Shell.
- Run the cmdlet to create the management role group and assign the ApplicationImpersonation role to that group, and then assign the user you want to use as a migration administrator.
In the following example, we are using the user migAdmin@example.com.
New-RoleGroup -Name MigrationImpersonation -Roles ApplicationImpersonation -Members migAdmin@example.com
You can add multiple users using commas to separate each user.
Accessing the Mail Server
To migrate data to or from Exchange 2010 SP2 - SE, make sure that Outlook Web Access (OWA) is accessible from the internet. On Demand Migration for Hybrid Exchange uses Exchange Web Services (EWS) to access your mail server from the internet. The OWA server name can be used for accessing your Exchange server with EWS. If you are not using HTTPS for OWA, you will need to enter the full URL for your EWS service which follows the format http://servername/EWS/Exchange.asmx.
You can find the URL for your EWS server using PowerShell. From the Exchange Management Shell, execute the following command:
Get-WebServicesVirtualDirectory | Select name, *url* | fl
The EWS server URL will be returned in the ExternalUrl value. To access the mailboxes slated for migration, the migrator needs to have an account with the ApplicationImpersonation role.
Specifying Administrator Credentials
When specifying the administrator credentials in the Migration settings screen, the Admin value is the account's UPN or Windows domain login (domain\samAccountName). Click https://technet.microsoft.com/en-us/library/cc756018(WS.10).aspx for more information about adding additional domains for UPNs.
Upgrading Throttling Policies
To minimize migration throttling and raise the overall migration throughput, we highly recommend that you upgrade the throttling policies. Please raise the limits for the following throttling parameters to 'Unlimited':
Microsoft Exchange 2013/2016/2019/SE
- EwsMaxConcurrency
- EwsMaxBurst
- EwsRechargeRate
- EwsCutoffBalance
Microsoft Exchange 2010 SP2
- EWSPercentTimeInMailboxRPC
- EWSPercentTimeInCAS
- EWSPercentTimeInAD
We also recommend creating a custom throttling policy and assigning it to all the admin accounts used for your migration.
The upgrade can be done for the time of your migration only.
Setting Up Mail Routing
Before migrating or creating mailboxes, you must implement a mail routing strategy that will enable users to send and receive mail from both internal and external sources. There are different strategies to do this depending on how you want mail directed to and from the internet.
During the co-existence period of on-premises mail and hosted mail, you must decide which system will initially receive the email traffic for your organization. To make the best decision for your organization, please review the Microsoft documentation associated with your target email service:
The next task in migrating mailboxes from a source or target email service is to create the mailboxes in the recipient tenant or Exchange server. On Demand Migration for Hybrid Exchange does not create them for you. The procedure for creating mailboxes varies between email systems, and you should refer to the documentation provided with your system for particular instructions.
