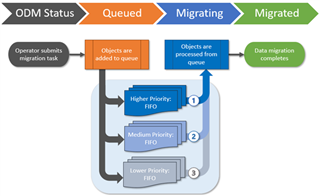
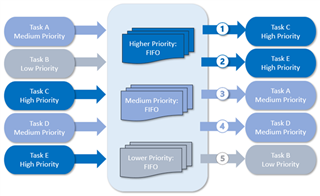
To support the customer preferences related to mail forwarding, the following behavior is now supported for mail migration task in case forwarding is not set using On Demand Migration (Mail Flow column is empty) and for mailbox switch (standard and reverse scenarios) tasks:
| Before | After | |||
|---|---|---|---|---|
| Task Type | Source. ForwardingSMTPAddress |
Target. ForwardingSMTPAddress |
Source. ForwardingSMTPAddress |
Target. ForwardingSMTPAddress |
|
Mail migration (From target to source option) |
Points to target * | Not set / Set to any SMTP address | Not set (cleared) | Source.PrimarySMTPAddress or one of the existing email addresses from selected custom domain for forwarding, if set. |
| Points to any SMTP address except for target * | Not set / Set to any SMTP address | Remains unchanged | Source.PrimarySMTPAddress or one of the existing email addresses from selected custom domain for forwarding, if set. | |
| Not set | Not set / Set to any SMTP address | Not set | Source.PrimarySMTPAddress or one of the existing email addresses from selected custom domain for forwarding, if set. | |
|
Mail Migration (From source to target option) |
Not set / Set to any SMTP address | Points to source** | Target.PrimarySMTPAddress or one of the existing email addresses from selected custom domain for forwarding, if set | Not set (cleared) |
| Not set / Set to any SMTP address | Points to any SMTP address except for source ** | Target.PrimarySMTPAddress or one of the existing email addresses from selected custom domain for forwarding, if set | Remains unchanged | |
| Not set / Set to any SMTP address | Not set | Target.PrimarySMTPAddress or one of the existing email addresses from selected custom domain for forwarding, if set | Not set | |
| Mail Migration: Remove | Not set / Set to any SMTP address except for target * | Points to source** | Remains unchanged | Not set (cleared) |
| Points to target * | Not set / Set to any SMTP address except for source ** | Not set (cleared) | Remains unchanged | |
| Not set / Set to any SMTP address except for target * | Not set / Set to any SMTP address except for source ** | Remains unchanged | Remains unchanged | |
|
Switch (From source to target option) |
Not set / Set to any SMTP address | Points to source** | Target.PrimarySMTPAddress or one of the existing email addresses from selected custom domain for forwarding, if set | Not set (cleared) |
| Not set / Set to any SMTP address | Points to any SMTP address except for source ** | Target.PrimarySMTPAddress or one of the existing email addresses from selected custom domain for forwarding, if set | Remains unchanged | |
| Not set / Set to any SMTP address | Not set | Target.PrimarySMTPAddress or one of the existing email addresses from selected custom domain for forwarding, if set | Not set | |
|
Unswitch (From target to sourceoption) |
Points to target * | Not set / Set to any SMTP address | Not set (cleared) | Source.PrimarySMTPAddress or one of the existing email addresses from selected custom domain for forwarding, if set |
| Points to any SMTP address except for target * | Not set / Set to any SMTP address | Remains unchanged | Source.PrimarySMTPAddress or one of the existing email addresses from selected custom domain for forwarding, if set | |
| Not set | Not set / Set to any SMTP address | Not set | Source.PrimarySMTPAddress or one of the existing email addresses from selected custom domain for forwarding, if set | |
* Target.PrimarySMTPAddress or any of Target.EmailAddresses
** Source.PrimarySMTPAddress or any of Source.EmailAddresses
Switching Mailboxes
The switch mailbox task allows customers to set up mail forwarding as the final step in the migration and mark the mailbox state as Switched. This task may not be required if forwarding was set during the mail migration task.
To start a Mailbox Switch Task
- Log in to Quest On Demand and choose an organization if you have set up multiple organizations.
- From the navigation pane, click Migration to open the My Projects list.
- Create a new Hybrid Exchange project or open an existing project.
- Click the Mail tile, or click Open from the Mail tile to open the Accounts and User Data dashboard.
- Click the Mailboxes tab. The Mailboxes List opens. Select the mailbox accounts in the list that you want to switch. You can use search, filtering or collections to quickly navigate through the list of mailboxes. You can also select the check box in the table header to select all the mailbox accounts.
- From the actions menu, click Switch Mailboxes. The New Mailbox Switch Task wizard opens.
- Step 1: Mail Flow
- Select options as described below:
- Mail forwarding direction - Set the mail forwarding direction by choosing From target to source or From source to target. From the On Demand Migration table of mailboxes, the forwarding email is in the Source Mailbox / Target Mailbox depending on the mail forwarding direction selected. See the Mail Flow column value (To Source or To Target) which can also be switched as part of a migration task (see Migrating Mailboxes).
- Custom domain for forwarding - Specify the custom domain name for forwarding email addresses. If the domain is omitted or does not exist, the primary SMTP address will be used.
- Mark Mailbox State column as Switched – select this check box to change the Mailbox State from its current value to “Switched”.
- Click Next.
- Select options as described below:
- Step 2: Notification
- Select options as described below:
- Send notification to original mailboxes – select this check box to configure a notification to send to the user’s original mailboxes
- Send notification to new mailboxes – select this check box to configure a notification to send to the user’s new mailboxes
The notification that is sent can be customized for the following attributes:
- Sender’s email address – the value that should be displayed as the Sender’s email address
- Send from – the value that should be displayed as the Sender’s Display Name
- Subject – the text that should be displayed as the message Subject
- Message – the text that should be displayed in the message body
- Click Next.
- Select options as described below:
- Step 3: Schedule
- Choose from one of three options to schedule the task. The scheduler will be activated after you complete the task wizard.
- Run now - task runs immediately.
- Run later - task must be started manually.
- Schedule - task will be started at a future date and time. Enter the start time for the task.
- Click Next.
- Choose from one of three options to schedule the task. The scheduler will be activated after you complete the task wizard.
- Step 4: Summary
- Review the task summary. You can specify a custom task name. The default name is Mailbox Switch Task.
- Click Finish to save or start the task depending on the schedule option selected.


