Viewing a Scheduled Job's History
From the Schedule Monitor, you can view the run history of a scheduled job. In the case of scheduled actions (including alerts), you can generate a ControlPoint Task Audit to view more detail about the job.
To view the history of a scheduled job:
·From the Schedule Monitor or Scheduled Jobs Report, click the job's Last Run link.
·From a scheduled job's detail page, click the [View History] button.
The Schedule History includes the following information:
·Run Start date and time
·Run End date and time
·process Status (Started, Completed, or Failed)
·in the case of a Failed job, a Message citing the reason for the failure.
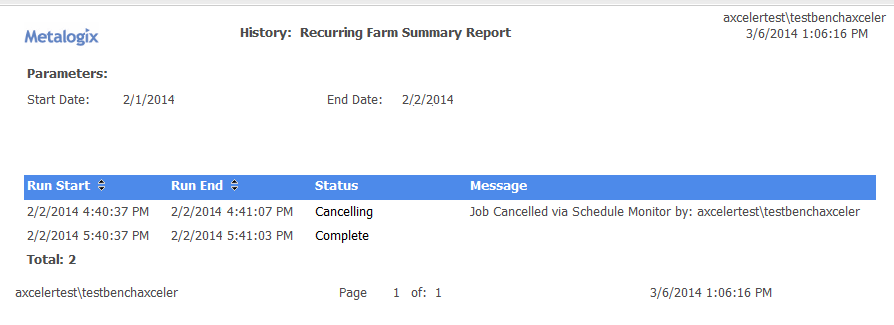
As shown in the example below, a separate entry exists for each run of a recurring job. You can sort by either Run Start or Run End date by clicking the up/down arrows in the column header.

To view a ControlPoint Task Audit for a completed action:
Click the link (Completed or Failed) in the Status column.
See also The ControlPoint Task Audit.
NOTE: This link is valid for actions only (not Discovery or analysis jobs)
Canceling or Deleting a Scheduled Job
From the Schedule Monitor you can:
·cancel a running instance of a scheduled job
OR
·completely delete one or more scheduled jobs.
NOTE: If you delete a job that has already run, any history associated with the job will also be deleted.
REMINDER: Delete and Cancel options are disabled if Auto Refresh is enabled.
To stop a running instance of a scheduled job:
NOTE: You can only stop instances of jobs that are currently running, and this action does not delete either the job itself or any future instances of a recurring job.
1In the In the Select column, check the box beside each running job instance you want to stop.*
2Click [Stop Selected].
To delete one or more scheduled jobs:
1In the Select column, check the box beside each job you want to delete.*
2Click [Delete Selected].
You will be prompted to confirm the deletion before the operation is carried out.
To delete all scheduled jobs:
1Click [Select All].
2Click [Delete Selected].
You will be prompted to confirm the deletion before the operation is carried out.
*NOTE: If you want to de-select currently selected jobs, click [Reset].
Saving, Modifying and Running Instructions for a ControlPoint Operation
All schedulable ControlPoint operations can be saved in an XML file as "instructions" and run at a later time. If an operation has parameters that are modifiable, you can modify them in the XML file before running the job.
NOTE: Currently you cannot run instructions for multi-farm operations.
Saving Instructions
To save Instructions for a ControlPoint operation:
1After specifying the parameters for the operation, click [Save As].
2Click [Download] to display the File Download dialog.
3Click [Save] then save the file to the local machine that is, the machine where the browser is runningor network location of your choice.
TIP: You may want to change the default file name to one that is more unique and descriptive.
4When the file has finished saving, click [Close] to dismiss the open dialogs.


