- How to divide your large model?
- How to work concurrently in two or more places of the same Workspace?
- How to avoid creating the same or similar objects?
- How to display related entities, which are far from each other, close to each other?
- How to transparently display an entity that has a lot of relationships in your ER diagram?
- How to colorfully distinguish entities in your model?
- How to select objects in ERD by schema or category?
- Print large model
- Generating HTML reports
How to divide your large model?
Create new Workspaces!
Workspaces (WS) are similar to submodels. A model can have as many WS as you need. Each WS can display different (or same) parts (objects) of your large model. Each WS can have a different format or display view. On the Workspaces, you can manage your model objects quickly, easily and comfortably.
To create a new WS, simply click on the toolbar.
For more information, see Designer and Workspace.
How to avoid creating the same or similar objects?
Use the Gallery feature. There, you can store frequently used parts of your models - entities, single attributes, stored procedures and other objects. Then simply use the drag-and-drop technique to insert gallery items into your models.
For more information, see Gallery.
How to work concurrently in two or more places on the same Workspace?
Open another Designer for your Workspace (WS)!
Designer displays a Workspace (WS). You can open as many Designers (tabs) for the selected WS as you need. This allows you to display different parts of the same WS and also the same objects of the WS in a different zoom.
For more information, see Designer and Workspace.
|
Scenario Your model has one Workspace WS1. WS 1 represents main model and is large. You need to work with two parts of the model concurrently. |
- Right-click Workspace1 item in the Application View or Model Explorer and select Open Designer. -> Another tab of the same name - Workspace1 will open in the Application Window. It displays the same objects.
Scenario: You're working in the second Designer and need to move fast to find the required part/objects that you need to edit.
- Click
on the toolbar.
In the Overview dialog, use drag&drop techniques to move the small frame in the Overview dialog. -> You will move on the WS at the same time. Change size of the frame at your convenience to zoom in or out the objects on the WS.
- Find the required objects. (You can close the Overview dialog then.)
- Now you can comfortably work in two places of the same WS at the same time.
- You can switch between the two Designers (tabs Workspace1).
- You can undock one of the Designers and see them in one screen, or move it to your second monitor if you have any.
How to display related entities, which are far from each other, close to each other?
Create an entity shortcut!
Entity shortcut is another graphical representative of an entity. It's not a copy but the same object with the same properties. You can create as many shortcuts of an entity as you need (and of course, not only entities...).
For more information, see About Shortcuts of Objects.
|
Scenario Entity1 and Entity42 are related, however each is on a different page. You want to see them closer to each other. |
Scenario: Create a shortcut of the Entity 1 and place it next to the Entity 42. (You can also create a shortcut of the Entity 42 and place it to the Entity 1.):
- Find Entity 1 on the Workspace.
- Find Entity 42 in Model Explorer.
- Click the Entity 42 item and drag it to the WS where you want to add the shortcut, next to the Entity1.
How to transparently display entity that has a lot of relationships?
Create an entity shortcut and move shortcuts of some relationships to it!
|
Scenario Entity Film has five relationships leading from or to it. You want to create a shortcut of this entity, place it next to it, and move two relationships to it. |
Scenario:Create an entity shortcut on the Workspace.
- Click the Film entity on the WS and hold the mouse key down.
- Press CTRL+SHIFT keys and hold them down.
- Drag the Film entity on the WS.
- Release the mouse button and then the keys.
Result: There are two shortcuts of the Film entity on the WS - Film : 1 and Film : 2.
Scenario: Create shortcuts of the two relationships of the Film entity.
- Right-click the WS and select Add Selected Objects to Workspace.
- From the dialog, select the relationships that you want to 'redirect' to the Film : 2 shortcut. (See the object details next to the relationship name in the dialog).
- Confirm your selection.
Result: There are two shortcuts of the two selected relationships connected to the Film : 2 entity shortcut.
Scenario: Remove redundant relationship shortcuts of the Film : 1 shortcut.
- Select the two needless relationship shortcuts on the WS (use SHIFT for multiple selection).
- Press Delete.
Result: The selected shortcuts will be removed from the WS.
How to colorfully distinguish entities in your model?
Assign selected entities to a Category!
Categories allow you to colorfully distinguish entities that logically go together. Each entity can be assigned only to one category.
For more information, see Categories.
|
Scenario You want to distinguish all entities that contain information on your customers on the Workspace. |
- Right-click the Categories item in Model Explorer and click Add Category.
- Double-click the new category.
- Define properties of the category - its name (Customer Info) and select a color (Money Green).
- On tab Objects, select entities that you want to assign to the category.
- Confirm OK.
Result: All the selected entities will have Money Green background color on all Workspaces of the model.
Scenario: As you have many categories in your model, you want to display a caption of categories on the Workspace.
- Click
on the toolbar.
- Click the work area where you want to place the caption.
Scenario: You want to display the entities of the category in Model Explorer (they will be Money Green in Model Explorer).
- Right-click the Model Explorer and select Settings.
- Select the Use Colors of Category to Draw checkbox.
For more information, see Caption of Categories.
How to select objects in ERD by schema or category?
Right-click the Workspace and select Select Objects
Print Large Model
Is Print to PDF Possible?
Yes, you can print your ER diagram to PDF using "PDF printer" (Note: not all PDF printers are supported.) If you print your model on plotter, we recommend to print your ER diagram to PDF format first.
- Install PDF Printer.
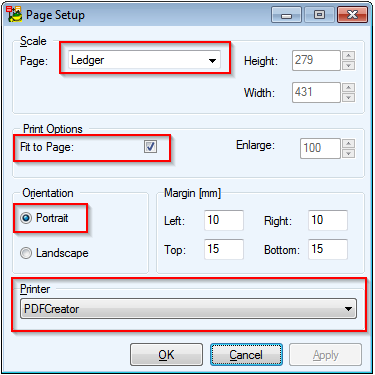
- In Toad Data Modeler select File | Page Setup.
- Select the PDF printer in the Printer box a the bottom of the dialog.
- Define the following options:
- Page: Ledger
- Print Options: Fit to Page
- Orientation: Portrait
- Confirm OK.
- Select File | Print.
- On page Settings | uncheck checkboxes Print Page Number and Print Frame.
- Print the output.
Can I print whole ER diagram on one page?
Yes. In the Page Format dialog, select the Fit to Page checkbox.
Is there a way to speed up the printing process?
Yes. Disable graphical options. Either select Settings | Options | General, uncheck the Print Gradients checkbox (it is disabled by default) or disable the graphical options Gradient Effect, Graphical Display of Keys etc. in the Workspace Format dialog.
Generating HTML reports
With especially large models, it is possible to run out of memory while generating HTML report. In such situation, try the following suggestions:
- Change Report Layout
In Select Layout section of Report Wizard, try choosing Frames - top/left menu instead of Frameless layout. Frameless layout is not recommended for large models as it uses Javascript, which means more RAM is used. Additionally, navigating a Frameless HTML report for a large model might feel sluggish on lower-spec machines.
- Close other models and restart Toad Data Modeler
This will free some more RAM that can be used for report generation, so you're less likely to run into an Out of Memory error.
- Generate report one workspace at a time
In Select Workspaces section of Report Wizard, you can choose to generate report for specific workspaces only. The fewer workspaces, the less RAM will be needed for the generation process.


 to fit your entire ERD to screen.
