Best Practices for Partitioning Key Values
Before specifying partitioning key values, you might want to review these best practices.
- For all partitioned objects, specify key values so that rows are distributed evenly among partitions or subpartitions. Performance is best when rows are equally distributed.
- For range-partitioned tables, specify high values in increasing order from first partition to last partition for at least one partitioning key column. If values do not increase for at least one column, the wizard alerts you that range partition boundaries are inconsistent and identifies the objects in question. Use MAXVALUE for the last partition to ensure that there is a partition for rows with values too high for other partitions.
- For range partitioned global indexes, MAXVALUE must be used as the high value for all key columns for the last partition. The wizard automatically enters this value and prevents use of another value.
- For list partitioned tables and partitions, specify values so that the list for each partition or subpartition is unique. When you try to assign values that
are used for other segments, the wizard identifies duplicate values and the other segments. Use DEFAULT for the last partition or subpartition to ensure that there is a segment for rows that do not match the value lists for other segments.
- For range partitions, specify values that exist in a table. Enter them so that they match table values exactly. Also, use the correct syntax for column datatypes and observe any limits, such as maximum length.
- For numeric values, do not exceed the precision or scale defined for partitioning key columns that use the NUMBER datatype. Precision is the maximum number of digits allowed in numeric values. Scale is the number of digits to the right of the decimal point allowed for numeric values.
-
For date values, use the following format and do not use quotes:
YYYY-MM-DD HH24:MI:SS
Y=Year; M=Month; D=Day; H=Hour; MI=Minute; S=Second
Related Topics
Specify Partitioning Key Values
Key Value Grids for Range-Partitioned Objects
There are two key value grids for range-partitioned objects. One is for all partitions in an object. The other grid is for individual partitions. You can use either grid to enter or adjust partitioning key values. Both are designed to let you see partitioning key values in relation to each other. This helps you avoid entering high values that fall in the range for another partition.
Tip: As you specify partitioning values, you can see lists of the values contained in key columns by running SELECT statements from Space Manager’s SQL Editor.
Key Value Grids for All Partitions
The grid for all partitions is displayed when a parent partitioned object is selected in the Object list. It allows you to enter boundary values for all partitions in the object.
All columns in the partitioning key are displayed on the right side of the grid. This lets you see what types of values can be entered in high-value fields. For each partition, there is one high-value field per key column.
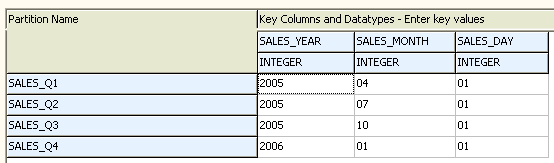
The advantage of this grid is that it lets you view all partitions and their partitioning key values in relation to each other.
Key Value Grids for Individual Partitions
The grid for individual partitions is displayed when a partition is selected in the Object list. It allows you to enter boundary values for just that partition.
All columns in the partitioning key are listed on the left side of the grid. These are presented vertically in the order they were specified. Their datatypes are listed beside them. This lets you see what types of values can be entered in high-value fields. There is one high-value field for each key column.
The advantage of this grid is that it allows you to focus on a certain partition. Because partitioning key columns are presented in a vertical list, the grid for individual partitions makes it possible to see all columns in a partitioning key without scrolling.
Related Topics
Specify Partitioning Key Values
Key Value Lists for List Partitioned Objects
Fields for list values are displayed when a list partition or subpartition is selected in the Object list. These consist of two list fields and a Get existing values button. All provide an easy way to specify list of partitioning key values.
Click Get existing values to retrieve a list of values in the partitioning key column. These are displayed in the Existing Values in Table list field:
- If an object is a partition, all values in the column are retrieved.
- If an object is subpartition, column values for rows that belong to the parent partition are retrieved.
After values have been retrieved for one partition or subpartition, they remain displayed in the existing values field for all of its associated partitions or subpartitions. The field is cleared when you select another table.
To select values for a partition or subpartition, select one or more values in the Existing Values list and click the DOWN arrow to move the value to the Partitioning Key Values list.
To delete a value from the list, select it and press the DELETE key.
To refresh the Existing Values list, click Get existing values.
Related Topics
Specify Partitioning Key Values
Respond to Checks for a Posting Index
The wizard checks for indexes that can be used as posting indexes. A posting index is needed when live transactions are copied to a reorganized copy table. The index guarantees uniqueness of rows in the copy and speeds up the posting process. Each table in a script has its own posting index.
In most cases, Space Manager automatically chooses a posting index. Normally, the most selective index available for a table is selected. However, in some cases, Space Manager prompts you to make choices regarding the posting index. This happens when the only candidate for a table’s posting index has a PRIMARY KEY constraint or UNIQUE KEY constraint in the ENABLE NOVALIDATE state.
The message prompts you to validate constraints so that they can be used for posting. If you do not want to do this, you can exclude a table from a reorganization or select one of the two posting methods that are designed for tables that do not have selective indexes. These are the “all columns” posting method and the ROWID posting index. See Posting Indexes for more information.
Important: If you choose to validate a UNIQUE KEY constraint, posting may be slow if the leading column of the constraint is nullable.
To respond to checks for a posting index
-
From the Unsupported Objects message with two options, select one option:
- Exclude these objects from the reorganization—Select this option to exclude tables whose only candidates for a posting index have PRIMARY KEY or UNIQUE KEY constraints that are ENABLE NOVALIDATE.
- Generate a script to validate these constraints—Select this option to generate a script for validating constraints. The script is displayed in the SQL Editor. Whether you should run the script depends on the following:
- If you want to validate PRIMARY KEY or UNIQUE KEY constraints for use in posting, run the script by pressing F9 from the SQL Editor. Then close the SQL Editor and skip the rest of this procedure.
- If you want to use the “all columns” posting method or ROWID posting index, close the SQL Editor. Then proceed to the next window in Reorg Manager. A second Unsupported Objects message displays with additional options.
-
From the Unsupported Objects message with four options, select one option:
- Exclude these objects from the reorganization—Select this option to exclude tables whose only candidates for a posting index have PRIMARY KEY or UNIQUE KEY constraints that are ENABLE NOVALIDATE.
- Generate a script to validate these constraints— Select this option to generate a script for validating constraints. The script is displayed in the SQL Editor. Run the script by pressing F9. Then close the SQL Editor.
- Use all columns of these tables for posting—Select this option to use “all columns” posting for tables in the message. This method checks all columns in a table to guarantee row uniqueness in its reorganized copy. However, it does not check columns with LONG, LOB, XMLType, object type, REF, and VARRAY datatypes. By default, tables with those datatypes are excluded from a reorganization when this option is selected. It you want to include the tables and are sure that rows can be identified uniquely based on columns with other datatypes, set Space Manager’s ALLOW_LONG_WO_UNIQUE parameter to YES. See All Columns Posting Method for more information.
- Use a temporary rowid column on the new tables—Select this option to use ROWID indexes for tables in the message. These indexes check the ROWIDs of all rows in a table to guarantee row uniqueness in its reorganized copy. Unlike the “all columns” method, ROWID indexes guarantee row uniqueness for tables with LONG, LOB, XMLType, object type, REF, and VARRAY datatypes. However, they require DDL during script execution and do not support the online switch or FastCopy/DBMS_DataPump. Also, ROWID indexes are only used for partitions or subpartitions when a Space Manager parameter is set. If that parameter is not set, you are prompted to reorganize a partition’s parent table. See ROWID Posting Indexes for more information.
