When you select the Synchronization node under the domain pair in the migration project tree, you can see synchronization state, progress, and statistics for the selected pair of domains on the screen in the right-hand pane.
The following information is provided on the Synchronization Statistics screen:
Synchronized objects—Displays the number of object pairs that were matched and synchronized.
Source objects per minute—Shows the approximate speed of the source-to-target synchronization process
Target objects per minute—Shows the approximate speed of the target-to-source synchronization process
Directory errors—Shows the number of errors that occurred during synchronization, such as connection errors, invalid credentials errors, and server unavailability errors. Click View next to the counter to see the list of errors.
|
|
NOTE: The Directory errors queue is not dynamic and errors put in this queue are not removed from the queue even after they are resolved. |
You also can view the queues of conflicts found during synchronization, failed objects, and unresolved objects. Click the corresponding View link for detailed information.
Conflicts—This queue contains the object-matching conflicts.
Failed objects—This queue contains issues that occurred to the synchronized objects and their attributes, such as if an object could not be created due to insufficient rights.
Unresolved objects—All unresolved linked attributes, such as unresolved membership, are put in this queue.
|
|
NOTE: The Conflicts, Failed objects and Unresolved objects queues are dynamic, so if, for example, a conflict is resolved, it is thrown out of the queue. |
Agent Statistics
Name—The name of the server running the agent.
Last operation—The last operation description the agent was instructed to perform (such as start or stop).
Last operation progress—The last operation’s progress (in percent).
Last operation error code—If the last operation completed successfully, this field is blank. If the operation failed, the error code is displayed.
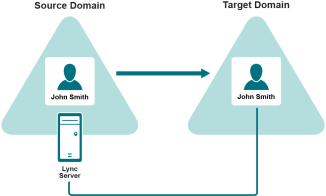
Migration Manager for Active Directory supports migration scenarios where Microsoft Lync Server is installed in either source or target domain and you want to provide users access to existing Lync infrastructure.
Before implementing any of the below scenarios, check the following pre-requisites:
If you use Lync Server in the source domain for communicating, users can still communicate with other users through that Lync Server even after they are migrated to the target domain.

To achieve that, when configuring migration session or directory synchronization job, change settings in the wizard as follows:
Migration Session: On the Specify Object Processing Options step select Use custom add-in and specify add-in located at <Migration Manager installation folder>\Active Directory\SourceLyncSupport.xml.
After migration session or initial synchronization completes, migrated user may log on to his or her target account and start communicating with other users through the source Lync Server.
|
|
Caution: Corresponding source user must not be removed. Otherwise, target user will lose access to the source Lync Server. |
If you have Lync Server deployed in the target domain, you may want to provide users that have been previously migrated ability to communicate with other users through that Lync Server.

For that you need to take the following steps:
After migration session completes, migrated user may log on to the source account and start communicating with other users through the target Lync Server.
|
|
Caution: Corresponding target user must not be removed. Otherwise, source user will lose access to the target Lync Server. |
SID History adding allows target accounts to access source domain resources during the coexistence period.
To add SID History, select Add SIDHistory option at Set Security Settings step when configuring account migration or directory synchronization.
Migration Manager for Active Directory offers two methods of SID History adding:
Both methods have their own benefits and require different permissions and preparation steps.
|
|
TIP: To take advantage of SID history, ensure that trusts are established and that SID filtering is turned off between the source and target domains. |
The easiest adding method that requires no preparation steps or special configuration. SIDHistory Agent is automatically installed on the target domain controller and then controlled by the Directory Synchronization Agent.
This method requires the following:
|
|
TIP: This adding method is the easiest way to go if you want to synchronize passwords. |
This adding method doesn’t require an agent to be installed on the domain controller and doesn’t require target DSA account to be a member of the Administrators group in the target domain. SID history is added with native DsAddSidHistory function.
This method requires the following:
|
|
NOTE: Agentless adding requires both source and target domains to run at Windows Server 2003 domain functional level or higher. |
Configuring the environment for agentless adding:
|
|
NOTE: This permission must be applied to This object only. |
|
|
Important: Do not add members to this group or adding SID history will fail. |
You should turn on auditing of Success and Failure attempts for Audit account management and Success attempts for Audit directory service access. This can be done in Computer Configuration | Policies | Windows Settings | Security Settings | Local Policies | Audit Policy on the source and target domain controllers (Windows Server 2008 or later.)
|
|
TIP: For immediately applying the policy changes, open an elevated command prompt on the domain controller and execute gpupdate /force. |
Enabling / reverting agentless SID history adding for the project
The agentless SID history adding is manually enabled for the project with UseAgentlessSIDHistoryMigration.ps1 script provided on the Migration Manager for Active Directory installation disk. Open 32-bit (x86) version of the PowerShell prompt on the computer where Migration Manager is installed and execute the following commands:
cd "<Drive with product CD>:\QMM ResKit\Scripts"
.\UseAgentlessSIDHistoryMigration.ps1 $true
To revert to SIDHistory Agent, execute the following command:
.\UseAgentlessSIDHistoryMigration.ps1 $false