Chat now with support
Chat mit Support

Stat 6.2 - System Administration Guide

Overview of Stat Administration Administrative Utilities Stat Security General Maintenance Tables
System Maintenance Service Domain Maintenance Department Maintenance Issue Tracking Maintenance Country Maintenance Customer Maintenance Object Type Maintenance PeopleSoft Environment Connection Maintenance Pre/Post Migration Steps Parameters Oracle Applications Configuration Oracle Applications Connection Maintenance Generic Application Connection Maintenance Schema Object Parameters Maintenance Data Object Maintenance PeopleSoft Search Configurations Stat Report Definition Maintenance Version Control Management Connection Maintenance
Service Domain-Specific Maintenance Configuring the Stat Central Agent Email Configuration Object Security Appendix: Sample Service Domain Configuration Appendix: User Class Rights Appendix: Creating a Staging Database Appendix: Database Tuning Appendix: Oracle Applications File Type Directory Appendix: Ports and Firewalls Appendix: REST Web Services API Appendix: SOAP-Based Web Services API Appendix: Troubleshooting Chart Appendix: stat.conf Configuration Appendix: Custom Report Files

Testing Environment Connections

After defining an environment in the maintenance table, you can make sure that you have entered all the information correctly by clicking Test Connection. This makes Stat establish a connection to the newly defined environment. If successful, Stat immediately disconnects from the environment and displays a “Connection Successful” message. If Stat is unable to connect, it displays an error message.

You can also test connections to multiple databases simultaneously. To test multiple connections, hold the <Ctrl> or <Shift> keys and select the databases you want to test. Then click Test Selected. Stat attempts to establish a connection to each database and reports its results in the Database Test Connect window

Note that when you test a single environment, Stat does not validate the values specified in the fields Host Name, Service Name, or DB Listener Port. If any of these fields are not configured properly, the Stat Central Agent will log an error when the user attempts to migrate an object to or from the environment. When you test multiple connections, however, Stat does test both client and agent connections, including Host Name, Service Name, DB Listener Port or (in the case of Oracle-based environments) TNS Entry.

Inactivating Generic Application Environments

To inactivate an environment, de-select Active. Stat displays a warning message if the environment is currently part of a migration path.

Managing Source File Locations by Environment

After defining an environment, the next step is to specify the source file locations for the file types defined for that environment. For each file type, you can specify an unlimited number of source file locations. When Stat creates an archive set that includes a file object from that environment, it searches for the file in the first location you specified (Path ID = 1). If the file is not there, Stat searches in the second location, and so on. For each type of file that you plan to archive from or migrate to a particular environment, you must define at least one source file location.

To define source file locations by environment, select the environment in the Generic Application Environment Connection Maintenance window and click File Locations. This opens the Stat File Locations window, which displays a list of all the active generic application file types defined in Stat. For each file type, you can specify as many source file locations as you want. Source files can be located on different servers, or they can be on the same server but in different directories.

1
Click New.
2
In the File Type field, select the file type for which you want to define a location.
Stat assigns a unique ID number to each file location you define per file type and displays the number in the Path ID field. This number determines the order that the file location is searched during the file archive process. The path with the ID 1 is searched first, and so on.
3
In the File Server field, select the server that the file directory is on.
4
In the File Path field enter the path of the file location starting after the predefined server's root or home path.
5
(Optional) Select Default Path if you want this to be the file type’s default source file location.
6
Click Test Connections.

Setting Up Migration Approval Lists

If an environment requires the approval of certain users before an archive set can be migrated into it, you can specify who these users are in the Migration Approval List tab. To open this window, select the environment and click App Options in the Generic Application Connection Maintenance table. Stat activates this tab only if the Req. Migr. Approval option has been selected for the environment.

When setting up a migration approval list, you can include different approver groups, including individual users and entire user classes or a combination of the two. The approval of any user or user class that you add to a list can be either required or optional.

Approval requirements that involve multiple approver groups or that can be satisfied in more than one way are defined using AND and OR operators. As you add approver groups using AND and OR operators, Stat displays the list as a tree structure and in the form of a SQL statement at the bottom of the window.

For example, let’s say a migration to a particular environment in the Financial Services service domain can be approved in one of two ways:

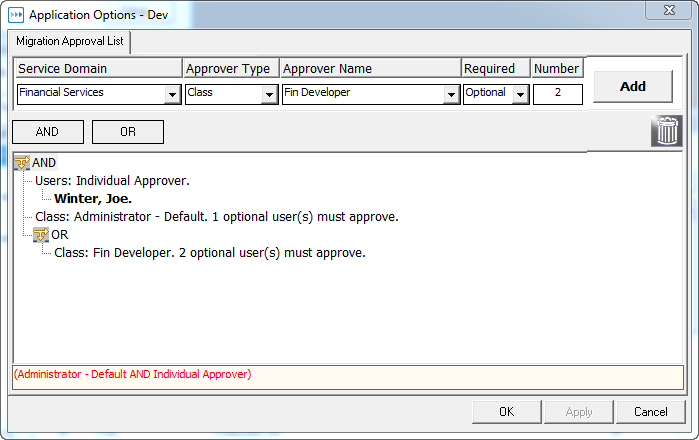
In this case, your approval list would look like this:

To further illustrate, let’s say that the migration must be approved by:

In this case, the approval list would look like this:

It is recommended that before setting up a migration approval list, you have a basic idea of what approver groups (users and user classes) you want involved in the approval process as well as the relationships between these groups, which you define using AND and OR operators. For example, if the approval of one or more approver groups are required, you would begin the approval list with the AND operator. If, however, the approval of only one of two or more approver groups are required, you would begin the list with the OR operator.

Click AND if the approval of one or more approver groups are required
Click OR if the approval of one of two or more approver groups are required
3
In the Service Domain field, select the service domain that you plan to associate the environment with in the Generic Application Migration Path Maintenance table.
4
In the Approver Type field, select the approver group you want to add to the list.
Options include User and User Class.
5
In the Approver Name field, select the name of the user or user class you want to add.
6
In the Required field, select Required if the approval is required or Optional if it is not required.
The Required option means that the individual user and every member of the user class must approve the migration. Optional means that the individual user’s approval is not required, whereas for user classes, it means that the approval of only a specified minimum number of users within that class is required.
7
If you selected User Class in the Approver Type field and Optional in the Required field, specify the minimum number of users in that class who must approve the migration in the Number field.
8
Click Add.
b
Click AND or OR.
13
Click OK or Apply.
Verwandte Dokumente

The document was helpful.

Bewertung auswählen

I easily found the information I needed.

Bewertung auswählen