Chat now with support
Chat mit Support

On Demand Migration Current - Active Directory User Guide

Planning the Migration Project

A typical migration project using Active Directory can be broken up into six (6) phases.

  • Phase 1: Install Directory Sync agents and create the Workflow
  • Phase 2: Identify Devices and their related Users and Groups to migrate (Concurrent with Phase 3)
  • Phase 3: Install Active Directory agents and Register Devices (Concurrent with Phase 2)
  • Phase 4: ReACL Devices
  • Phase 5: Cutover Devices
  • Phase 6: Cleanup

    Note: The Cleanup process typically occurs several months after the completion of the project.

This user guide walks you through the steps required to complete each phase, which can also be used to migrate devices from AD environments to Entra environments. The Active Directory Entra-Join Quick Start Guide walks you through the process of configuring and performing migrations for AD to Entra migrations.

Best practices for each phase of the migration project are presented below:

Phase 1: Install Directory Sync agents and create the Workflow  

  • Directory Sync is used to synchronize objects and must be configured before using Active Directory.

  • Only those Devices which are in scope of the synchronization Workflow and the filters on its Environments will be available in Active Directory.

  • At a minimum the Read From and Match To steps of the synchronization Workflow must be present for Devices.

Phase 2: Identify Devices and their related Users and Groups to migrate (Concurrent with Phase 3)  

  • Before migrating Devices do some analysis and planning to see what Users and Groups may need to be migrated, what groups need to be consolidated, how duplicates will be handled, etc.

  • More than one Workflow can be used to control the target destinations of Users and Groups.

  • Identifying Devices, Users, and groups to migrate can be accomplished concurrently with installing Active Directory agents and Registering Devices in Phase 3.

Phase 3: Install Active Directory agents and Register Devices (Concurrent with Phase 2)  

  • The Active Directory agent should be installed on the Devices to be migrated or pushed out via third party tool.

  • Sufficient time should be allowed to address any issues with Device registration with the server. Correcting registration issues can take more time than expected. A typical large company with a large number of Devices may need a couple of weeks of off and on work to resolve registration issues with all Devices.

  • Resolving Device registration issues can be accomplished concurrently with identifying Users and groups to migrate in Phase 2.

Phase 4: ReACL Devices  

  • Run a ReACL (file level re-permissioning) job on as many Devices as possible early in the process.

  • ReACL is a non-destructive process that can be repeated as often as necessary up until Cutover in Phase 5.

  • Troubleshoot any Devices with ReACL jobs which did not complete successfully.

  • Run a ReACL job again close to the actual Cutover date. This will allow you to complete most of the ReACL process early and provide time to resolve any issues with things such as anti-virus software and Group Policies.

Phase 5: Cutover Devices  

  • Using some test Devices, Users, and Groups, verify a successful Device Cutover.

  • Create any custom Actions that may be required to run as part of the Cutover.

  • Typically, a final ReACL job should be run the weekend before the scheduled Cutover to ensure any new Users and other changes are processed.

  • Optionally, use the Auto-Pilot Cleanup option to prepare the AutoPilot-provisioned device for migation. This must be done before the cutover if the source Entra ID Joined device is Autopilot-provisioned and the Entra ID Join Profile has the Auto-Pilot Cleanup option selected.

  • A workstation reboot is required after the target account is enabled, the source account is disabled, and the Cutover is complete. This is usually completed in the evening when fewer end-users are impacted. Any impacted end-users should be alerted that this reboot is necessary.

    Disabling SID Filter Quarantining on External Trusts

    To disable SID filter quarantining for the trusting domain, type a command using the following syntax at a command-prompt:

    Netdom trust TrustingDomainName /domain: TrustedDomainName /quarantine:No /usero: domainadministratorAcct /passwordo: domainadminpwd

    To re-enable SID filtering, set the /quarantine: command-line option to Yes.

    Allowing SID History to Traverse Forest Trusts

    The default SID filtering applied to forest trusts prevents user resource access requests from traversing the trusts with the credentials of the original domain. If you want to enable users to use the credentials that were migrated from their original domain, you can allow SID history to traverse forest trusts by using the Netdom command.

    To allow SID history credentials to traverse a trust relationship between two forests, type a command using the following syntax at a command-prompt:

    Netdom trust TrustingDomainName /domain: TrustedDomainName /enablesidhistory:Yes /usero: domainadministratorAcct /passwordo: domainadminpwd

    To re-enable the default SID filtering setting across forest trusts, set the /enablesidhistory: command-line option to No.

    For more information about configuring SID filtering refer to the Microsoft article available at https://technet.microsoft.com/en-us/library/cc755321(v=ws.10).aspx.

Phase 6: Cleanup  

  • The Cleanup phase typically takes place about two months after all Device Cutovers are complete. During the Cleanup phase, all permissions should be removed from the source domain and then the Active Directory agent should be removed from the Devices.

  • Before executing the Cleanup job to complete the Cleanup process it is recommended that you disable SID filtering/quarantine to verify that there are no issues with application access.

  • Optionally, use the Set Intune Primary User action after the Device Cutover is completed.

Active Directory Requirements

Directory Sync  

Environments  

Prior to any migration of an Active Directory computer there are a few Directory Sync requirements to inventory your devices (computers). The first of which is your local on-premises environments or endpoints. To gain access to your devices from your on-premises Active Directory you must create and securely connect your Environments.

How do I add an Environment?

For complete details on how to add an environment, click here.

Workflows  

The next required configuration for Directory Sync is to create a workflow that will inventory (read) your local on-premises Active Directory computers.

Directory Sync Agents  

The final component required is to deploy at least one (1) Directory Sync agents that will be used to secure communicate and execute jobs against your Local Active Directory such a read or write.

How do I install a Directory Sync Agent?  

For complete details on how to install an agent, click here.


Networking  

Outbound Internet Access  

By default, each computer being migrated will require outbound access to the public Internet to securely communicate with the Power365 services.

Important Tip: If your organization requires computers communicate externally using a web proxy see our web proxy configuration requirements.

Application Ports  

Each computer being migrated will require the Active Directory device agent and this agent will communicate to the Power365 services, outbound over ports:

  • 80
  • 443
  • 3030

Domain Controller Ports  

Active Directory migrations also require a variety of Microsoft defined ports for communication between domain controllers. For a complete list of required ports, click here.

Important Tip: For complete port information, review the Service overview and network port requirements for Windows documentation from Microsoft Support.


Devices  

The following is required for any Active Directory Computer(s) (devices) that will be migrated.

Device Agents  

Each Active Directory Computer that will be migrated must have an agent installed on the workstation to orchestrate local jobs that must occur to prepare and execute the workstation’s domain move.

Operating Systems  

All computers or servers being migrated to the new domain must run one of the following operating systems:

  • Windows 10
  • Windows 11
  • Windows Server 2016
  • Windows Server 2019
  • Windows Server 2022

Please Note: Entra ID Device Join is only supported for Windows 10 and 11.

PowerShell  

  • All client operating systems must have at least PowerShell 2.0 installed.

.NET Framework  

  • All Devices must have .NET Framework 4.7.2 or newer installed. This will appear as ".NET 4.7.2 Extended" in the add/remove programs list.
  • If not present, an appropriate version of .NET Framework will be installed during agent installation if an internet connection is available.


Remote Devices  

To successfully migrate a remote employee’s remote device using the Offline Domain Join (ODJ) feature the Cache Credential action must be run to collect the user’s target credentials, so later you may cutover the device, while it is disconnected from the network.

The following is required:

Cached Credentials Action  

  • One-way external trust must be configured from the source domain to the target domain when the Cache Credential activity is processed

For more information about AD Trusts, check out this MS Press article about configuring trusts.

Network  

• Network connectivity to both the source and target environments (Active Directory Domain Controllers) when the Cache Credential activity is processed

Important Tip: Offline domain join files must be created prior to running the Offline Domain Join process. A full explanation of Microsoft’s Djoin.exe utility and how to create these files can be found here.

How do I set up Offline Domain Join (ODJ)?  

For complete details on how to set up ODJ, click here.


Web Proxy  

Some organizations may require all computers communicating externally direct their traffic through a web proxy to centralize communications. Active Directory agents can be configured to use a web proxy for communication to the Power365 cloud services.

Proxy Server  

  • At least one (1) standard web proxy that supports http/TCP traffic.

Proxy Address  

  • The associated web proxy URL must be defined during configuration of the device agent.

Security  

  • If accessing the web proxy requires an additional username and password this will be required during configuration of the device agent.

Ports  

All agents configured to use a web proxy will utilize the following outbound TCP ports:

  • 80
  • 443

Please Note: Agents configured to use a web proxy will not require UDP port 3030. For more information, see the Web Proxy Configuration under Architecture.

Important Tip: Additional bandwidth overhead may occur when a web proxy is utilized to centralize all traffic.


Repositories  

The following four Device Actions, when used, will require a defined storage share accessible from the device being migrated:

  1. Upload Logs
  2. Device Download
  3. Offline Domain Join
  4. Microsoft Entra ID Cutover


How do I configure repositories?  

For complete details on how to configure repositories, click here.


Additional Information  

Directory Sync Requirements: Password Synchronization

Directory Sync Requirements: SID History

Setup

Environments

How do I set up environments?

To begin set up of Active Directory you must first configure an environment. Environments are managed in Directory Sync.

Please visit the Environments topic for more information.

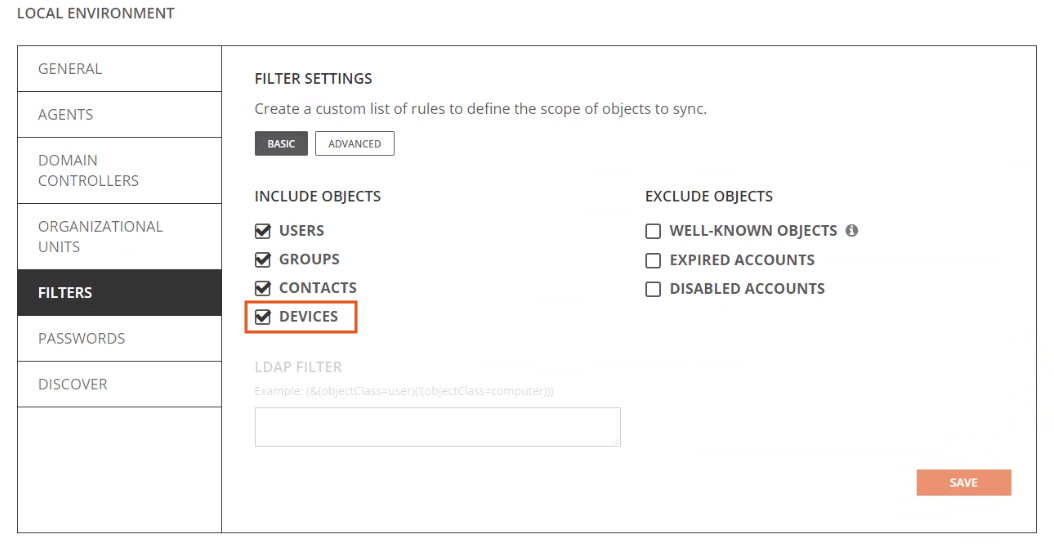
Important Tip: There are two key settings which pertain to Device objects that you must enable when configuring Source and Target Environments for Device migrations.

  1. Define Scope: Under the Environment Settings, Organizational Units section, be sure you have included the OUs which contain the Device (computer) Objects you want discovered for migration.

  2. Include Devices: Under the Environment Settings, in the Filters section be sure to check the checkbox next to Devices under the Include Objects header.

Verwandte Dokumente

The document was helpful.

Bewertung auswählen

I easily found the information I needed.

Bewertung auswählen