Setting Up a New Public Folder Synchronization Job
To create a new public folder synchronization job, right-click the Public Folders Synchronization node of the console management tree and select the Add Public Folders Synchronization Job option from the shortcut menu.

This will start the Add Public Folders Synchronization Job Wizard that will help you to install the public folder synchronization agents and configure the job.
This section guides you through each step of the wizard and explains the available public folder synchronization options. For more details, see the related topics.
Step 1. Select Exchange Servers
The public folder synchronization job is set up between the source and target servers that you select in this step of the wizard. If you want to synchronize public folders with Microsoft Office 365, the choice of server is unavailable. Selecting your Office 365 tenant as the target organization is enough. For details about synchronizing public folders with Office 365, see theMigrating to Microsoft Office 365 document.
For both the source and the target server, you should specify a mailbox that will be used by the public folder synchronization agents.
The account under which the public folder synchronization agents are running must have full access to the administrator mailboxes so that they can get administrative access to the synchronized folders.
|

|
NOTE:To learn how to configure public folder migration administrator mailboxes, refer to the dedicated Exchange environment preparation documents. |
|

|
Caution: It is not recommended to change the agent's administrator mailbox after the public folder synchronization has been started. This will lead to resynchronization of public folder contents.
If you are synchronizing public folders with Microsoft Office 365, the administrator mailbox cannot be specified here. This kind of synchronization uses the Office 365 credentials specified in the properties of your Office 365 organization. |
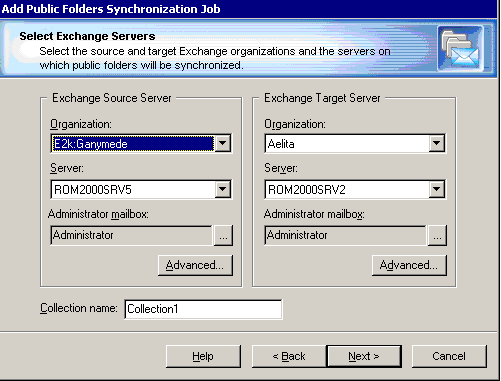
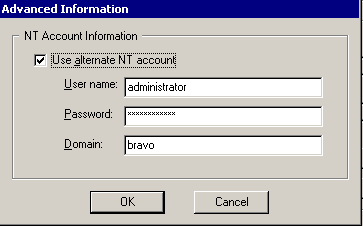
Migration Manager will retrieve the public folder hierarchy using the mailboxes you specify. If you are logged on under an account that does not have access to these mailboxes, click Advanced to use an alternate NT account to retrieve the hierarchy.
The wizard will also create the first collection for the job. This first step prompts you for the collection name.
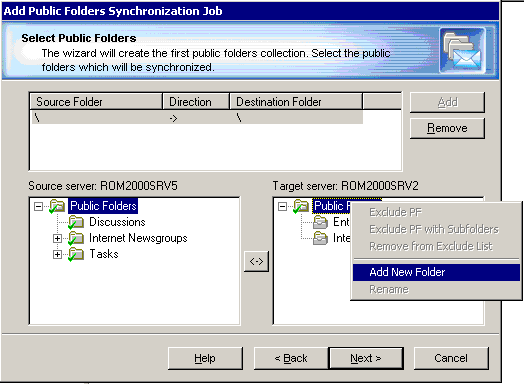
Step 2. Select Public Folders
The next step allows you to configure the public folder synchronization collection. Select the root folders to be synchronized. If you don’t want to change the folder hierarchy, the easiest way is to select All Public Folders on both the source and target servers as the synchronization root. Simply select Public Folders in both the Source server box and the Target server box. The wizard will ask if you want to create a Public Folders folder on the target server and synchronize all the source public folders to this folder. Select Yes or No as appropriate.
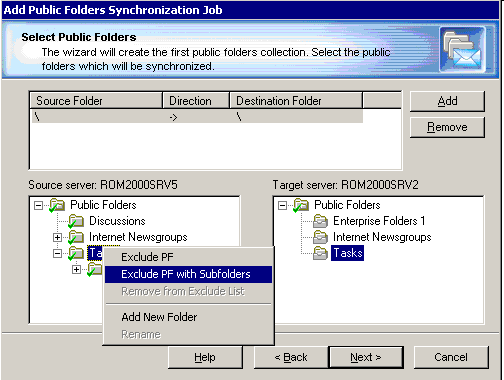
Alternatively, you can select an existing Exchange folder as a target root folder. If the target root folder does not exist, you can create it by selecting the Add New Folder option from the shortcut menu as shown below.
|
|
NOTE: Migration Manager for Exchange does not actually create the public folders. The public folder root will be created by the Public Folder Target Agent when the first PUB file comes from the corresponding source or target public folder. |
To add a pair of folders to the collection, select the folders in both lists, set the synchronization direction, and click Add. The folders and all their subfolders will be marked as included to the collection.
You can also select the synchronization direction. Click the <->button to change the initial source -> target direction of synchronization if necessary.
|
|
Caution: Once you start the public folder synchronization process, do not change the synchronization roots for any jobs or collections. Changing the selected folder pairs after the synchronization has started might result in duplicate folders in one of the environments. |
To exclude a folder from synchronization, right-click the folder in the tree and click Exclude. The public folder synchronization agents will not synchronize the content of the folder, but will create it on the corresponding server and synchronize its subfolders, if any.
Click Exclude PF with subfolders to exclude from synchronization a folder itself and all its subfolders.
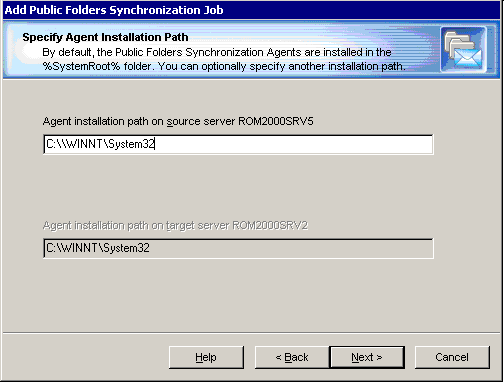
Step 3. Specify Agent Installation Path
The wizard will install the public folder synchronization agents on the source and target Exchange servers. If no Migration Manager for Exchange component has been yet installed on these servers, you will be able to specify the installation path for the agents. As soon as the agents are installed, the QMMEx$ServerName$ shared folder will be created in the path you specified. All the agents or components you install later will be installed in the same location. However, if by the time you install the public folder agents, any other agents or components have already been installed, you will not be allowed to specify the installation path for the agents, and they will be installed in the location where the QMMEx$ServerName$ shared folder has been created.
By default the shared folder is created in the Windows %SystemRoot%\System32 folder. On Microsoft Exchange x64 the default shared folder is created in the %SystemRoot%\SysWOW64 folder.
Step 4. Completing the Wizard
After the agents are installed, the wizard will inform you that you can start the public folder synchronization job. It is strongly recommended that you verify all the agents and collection settings before starting the public folder synchronization. The available options are discussed in theChanging the Settings of a Public Folder Collection and Changing the Settings of Public Folder Synchronization Agentstopics in this guide.
Step 5. Commit Changes
After a new job is created, it is marked with an exclamation mark. This means that you need to update the public folder synchronization agents’ databases before starting the job. Right-click the job in the management tree and click Commit Changes on the shortcut menu to update the agents’ task lists on the remote servers.
You can also commit changes for all the public folder synchronization jobs you have created. To do that, right-click the Public Folder Synchronization node in the management tree and select Commit All Public Folder Jobs from the shortcut menu.
Adding a Public Folder Collection
To create a new collection for an existing public folder synchronization job, right-click the job in the management tree and select Add Collection from the shortcut menu.
This will start the Add Public Folder Collection Wizard, which will help you to set up and configure a new collection for the job. Each of the wizard’s steps is described in the related topics.
Step 1. General Options
Specify a name for the collection and set its priority. Optionally, you can provide a text description for the collection.
You can temporarily disable the collection and it will not be involved in the synchronization process until you enable it.

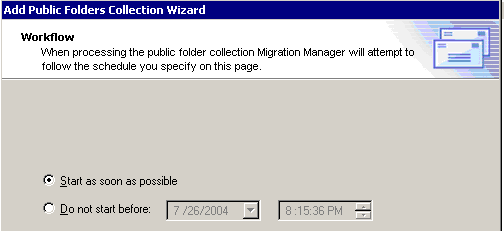
Step 2. Workflow
Set the preferred date to start migrating the collection. By default, the option to Start as soon as possible is selected.
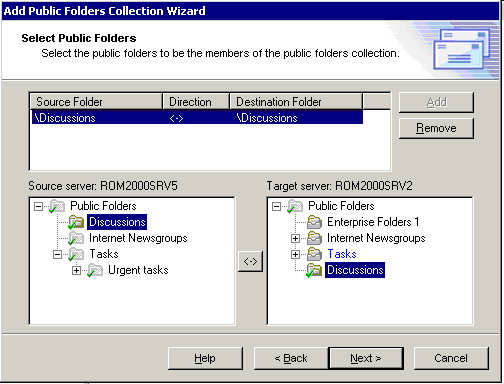
Step 3. Select Public Folders
Populate the collection with public folder pairs. Note that folders that are already synchronized within other collections of the job are marked in the folder lists and cannot be included in the collection.]
|
|
Caution: Once you start the public folder synchronization process, do not change the synchronization roots for any jobs or collections. Changing the selected folder pairs after the synchronization has started might result in duplicate folders in one of the environments. |
Step 4. Complete the Wizard and Commit Changes
After the new collection is created, the job is marked with an exclamation mark that means that you need to update the public folder synchronization agents’ databases. Right-click the job in the management tree and click Commit Changes on the shortcut menu to update the agents’ task lists on the remote servers.
Changing the Settings of a Public Folder Collection
All the options that you specify in the Add Public Folder Synchronization Job Wizard and the Add Public Folder Collection Wizard are later available in the collection’s properties. Some additional options are available only within the collection's Properties dialog box. These options are described below. To view or modify a collection’s settings, right-click the collection in the management tree and click Properties on the shortcut menu.
Resynchronization
If any errors occurred during the public folder synchronization and you need to fully or partially re-copy the data that has already been sent to the target server, you can select the appropriate options in the public folder collection's Properties dialog box.
Three resynchronization options are available for the public folders of the collection. You can:
- Resynchronize all public folder data previously sent to the target server, including public folder items, folder permissions, etc.
- Resynchronize only public folder contents.
- Resynchronize only public folder permissions, rules, and other folder-associated information.
|
|
NOTE: When you use the Public folder contents only option, then data such as the public folder type and mail-enabled status is not synchronized, even though it may differ in the source and target organization. This data is first synchronized when the public folders are created in the target organization, and later when you use the All or Only folders permissions, rules, and folder-associated information option.
If such differences exist between the source and target public folders and are intentional, use the Public folder contents only option to avoid changes to that data during resynchronization. |
You can also select the resynchronization direction, which may differ from the original synchronization direction.
This page also allows you to remove the synchronization settings directly from the agents’ databases if for some reasons the resynchronization settings were not cleared after the resynchronization was performed.
After you modify any of the collection’s settings, the job is marked with an exclamation mark that means that you need to update the public folder synchronization agents’ databases. Right-click the job in the management tree and click the Commit Changes on the shortcut menu to update the agent’s task lists on the remote servers.
Changing the Settings of Public Folder Synchronization Agents
You can set scheduling, logging, and other options for each public folder synchronization agent. The Source Server Properties and the Target Server Properties dialog boxes allow you to configure the Public Folder Source Agent, Transmission Agent, and Public Folder Target Agent on every server involved in the migration. To open the dialog box, right-click the appropriate server in the management tree and select Properties from the shortcut menu. For more details, see the related topics.
It is strongly recommended that you set all the options before you begin the migration.
General Options
A number of options are available for the Public Folder Source Agent and the Public Folder Target Agent. The General pages of the source and target agents’ properties allow you to view and modify the following synchronization settings:
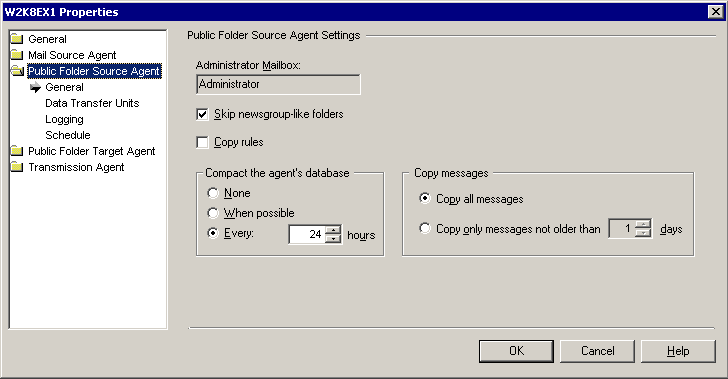
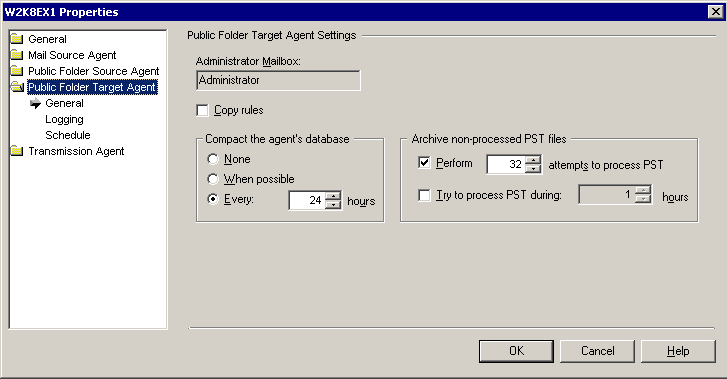
- The Administrator Mailbox is used to get administrative access to the server’s public folders. It is the same mailbox that you select when setting up a public folder synchronization job. This mailbox does not need any rights on the public folders for the synchronization. The account that is used by the agent should have full access to the mailbox that is specified here.
- The Copy rules check box allows you to select whether the folder rules should be synchronized. Select this check box for both the Public Folder Source Agent running on the source server and the Public Folder Target Agent running on the corresponding target server.
|
|
NOTE: To avoid possible conflicts, it is not recommended to select this check box for the Public Folder Target Agent running on the same server (if any). |
- The agents store their configuration and statistics in separate database files. For each agent, you can specify how frequently the database should be compacted.
For the Public Folder Source Agent (but not the Public Folder Target Agent), you can also specify the following options:
- Whether the folders belonging to newsgroup hierarchies should be skipped
- Whether only messages that have been modified recently should be copied to the target
|
|
Caution: If you change the value of the Copy message not older than option, the new value is applied only after the agent is restarted. In addition, if the new value is greater than the old value, you need to perform full resynchronization. If the new value is less, then resynchronization is not needed. |
For the Public Folder Target Agent, you can also specify the following:
- Whether the agent should archive an incoming PST file that cannot be processed
- How long the agent should try to process each PST file
Compression
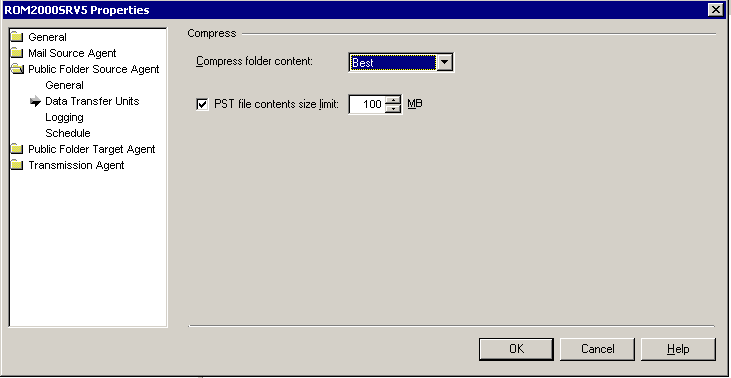
The Public Folder Source Agent compresses the PST files before putting them into service PUB files and sending them to the destination servers. The Data Transfer Units page of the source server properties allows you to select whether the agent should compress public folder data and to specify the compression rate. If the agent does not compress data, it works faster; however, the network traffic increases because larger files are transferred to the target servers.
You can also specify the maximum size of public folder data put to each PST file.
Logging
Every Migration Manager agent saves its logs to the server on which the agent is installed.

For each agent, you can specify whether the log file will be overwritten or appended during each session. You can also select which events will be written to the text log and to the Exchange server application log files.
Scheduling Options
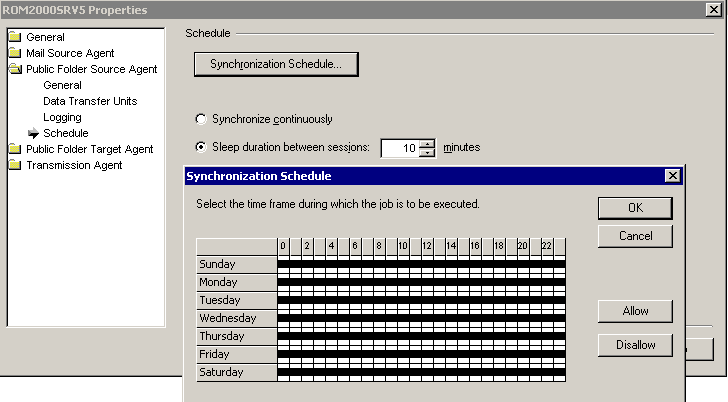
Each public folder synchronization agent has its own scheduling options. This lets you define separately when the agents are allowed to put additional stress on the Exchange servers and on the network.
For each agent you can specify:
- The hours during which each agent is allowed to run. On the agent’s Schedule page of the Server Properties, click Synchronization Schedule. Then select the time frame during which the agent should perform synchronization jobs.
- Whether there should be a sleep period between the agent’s sessions and the duration of that sleep period.