Using Nested Content Reports
Metalogix Content Matrix has an eRoom-specific feature that performs Nested Content Reports on eRoom content. The nested contents report identifies eRoom content that is nested in a way that may not be supported in a migration to SharePoint.
Metalogix Content Matrix can use a generated nested contents report (saved as a CSV file) to identify how to paste eRoom rooms as SharePoint Site Collections.
NOTE: By default, Nested Content Report options are disabled.
These Nested Content Report functions are also available using PowerShell.
To enable Nested Content Report options:
1.Close Metalogix Content Matrix if it is not already closed.
2.Navigate to ApplicationSettings.xml and open the file in a text editor.
By default, this file is located in the directory: C:\Users\[User name]\AppData\Roaming\Metalogix\Metalogix Content Matrix Console - eRoom Edition.
3.Navigate to the EnableNestedContentsReportActions entry and change its value to True.
4.Save and close ApplicationSettings.xml and reopen Metalogix Content Matrix.
Report Contents
A Nested Content Report contains the following information:
·The facility ID
·The room ID
·Each root item's ID
·Each root item's name
·Each root item's type
·Whether or not each root item has nested content
If debugging is enabled, the report will contain additional information. To enable debugging, open the ApplicationSettings.xml file and insert the following XML:
<XmlableEntry>
<Key>EnableDebug</Key>
<Value>True</Value>
</XmlableEntry>
The additional debugging information includes:
·The room ID
·The root item
·Each item's name
·Each item's URL
·Whether or not each item is nested content
Running a Nested Content Report
If Nested Content Reporting is enabled, you can run two types of reports:
·the "standard" Nested Contents Report identifies eRoom content that is nested in a way that may not be supported in a migration to SharePoint. For example, consider a four-level nesting of folders and databases - a top-level folder with a database child, which itself has a folder child, and so on. Because such a structure may not be supported in a SharePoint migration, the report would flag these items.
NOTE: Standard Nested Contents Reports can be run on eRoom root nodes, facilities, and rooms. It is recommended to run the report on the lowest-level item possible; the report may be very time-consuming if run on high-level nodes with large numbers of nested items. In addition, a nested contents report of a room item can be used to migrate that room into SharePoint as a Site Collection. For more information
·the Nested Contents URL Length Report identifies issues that may arise when migrating deeply nested eRoom content with URLs that may exceed SharePoint's maximum URL length.
NOTE: Nested Contents URL Length Reports can only be run on eRoom facilities and rooms.
These reports can also be run through PowerShell.
To run a Nested Contents Report:
1.In Explorer View, select the eRoom root node, facility, or room for which you want to find nested content URL lengths.
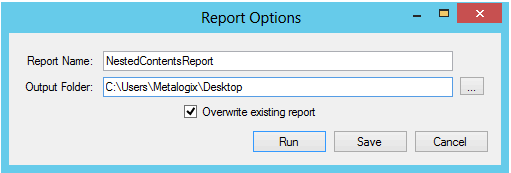
2.Right-click and choose Reporting > Nested Contents URL Length Report to display the Report Options dialog.
3.Enter a Report Name, which will be used as the output CSV file name.
4.For Output Folder, enter or select the file path of the directory in which the report will be saved.
5.If you want to Overwrite existing report in the target file path, check this box.
Now you can Run the report immediately or Save and run it at a later time from the Job List.
When the action starts, a Job log will be created. The logs can be viewed (in progress or after the action is finished) by clicking [Details>>]. After the action has completed a note will be displayed in the bottom left corner of the dialog stating the number of completions, as well as any warnings or errors that may have been encountered (if there were any).
Once the action is complete, the CSV file will be available from the specified Output Folder.
To run a Nested Contents URL Length Report:
1.In Explorer View, select the eRoom root node, facility, or room for which you want to find nested content.
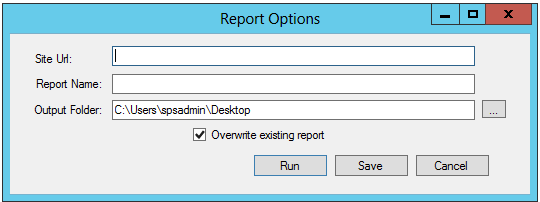
2.Right-click and choose Reporting > Nested Contents Report to display the Report Options dialog.
3.For Site URL, enter a valid site collection URL.
4.Enter a Report Name, which will be used as the output CSV file name.
5.For Output Folder, enter or select the file path of the directory in which the report will be saved.
6.If you want to Overwrite existing report in the target file path, check this box.
Now you can Run the report immediately or Save and run it at a later time from the Job List.
When the action starts, a Job log will be created. The logs can be viewed (in progress or after the action is finished) by clicking [Details>>]. After the action has completed a note will be displayed in the bottom left corner of the dialog stating the number of completions, as well as any warnings or errors that may have been encountered (if there were any).
Once the action is complete, the CSV file will be available from the specified Output Folder.
Creating a SharePoint Object
You can create new SharePoint site collections, sites, folders, and lists via the Metalogix Content Matrix Console.
Creating a SharePoint Site
You can create a new SharePoint site via Metalogix Content Matrix under an existing site collection or site except for Database connections and the new site can use any site template that is installed on the SharePoint environment.
To create a new SharePoint site:
1.In the Explorer View, select the site collection or site under which you want to create the new site.
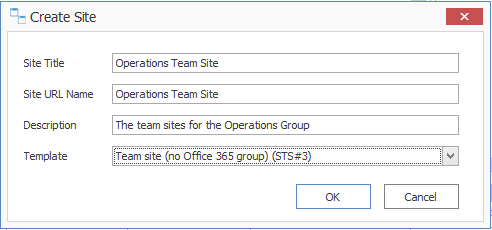
2.Right-click and choose Create Site.
The Create Site dialog displays, prompting you to enter the Site Title, Site URL Name, Description, and Template for the new site.
NOTE: For Site URL Name, it is only necessary to enter the name of the site as you want it to appear in the URL, not the entire URL path.
Note that if you are migrating to SharePoint Online or SharePoint 2019, the default template is (modern) Team Site (no Office 365 group). For SharePoint Online, Content Matrix does not support connections to tenant-level groups.
3.When you have completed the fields on the Create Site dialog, click [OK].
The new site will now display in Explorer View.


