Changing Legacy Mailbox Collection Settings
All the options that you specify in the Add Mailbox Synchronization Job Wizard and the Add Mailbox Collection Wizard are later available in the collection’s properties. Some additional options are available only within the collection Properties dialog box; these options are described below. To view or modify any of a collection’s settings, right-click the collection in the management tree and click Properties on the shortcut menu.
In addition to the options you specify in the Add Mailbox Collection Wizard, you can specify the target mailbox store for the mailboxes of this collection. The Mail Target Agent will create the Exchange mailboxes in the mailbox store you specify.
Please note that if a mailbox already exists, it will be moved to the mailbox store specified for the collection.
Synchronization
If any errors occurred during the mailbox synchronization and you need to fully or partially re-copy the data that has already been sent to the target server, select the appropriate resynchronization options.
Three resynchronization options are available for the mailboxes of the collection. You can:
- Resynchronize all mailboxes previously copied to the target server, including mailbox items, mailbox folder permissions, etc.
- Resynchronize only mailbox contents.
- Resynchronize only mailbox folder permissions and folder-associated information.
You can also remove the synchronization settings directly from the agents’ databases if for some reasons the resynchronization settings were not cleared after the resynchronization was performed.

After you modify any of the collection’s settings, the job is marked with an exclamation mark, which means that you need to update the mailbox synchronization agents’ databases. Right-click the job in the management tree and click the Commit Changes on the shortcut menu to update the agent’s task lists on the remote servers.
Changing Mailbox Synchronization Agents’ Settings
You can set the scheduling, logging and other options for each mailbox synchronization agent. The Source Server Properties allow you to configure the Mail Source Agent and the Transmission Agent, and the Target Server Properties allow you to configure the Mail Target Agent. To open the dialog box, right-click the desired server in the management tree and select Properties from the shortcut menu.
It is strongly recommended that you set all the options before you start the migration.
General Options
A number of options are available for the Mail Source Agent and the Mail Target Agent.
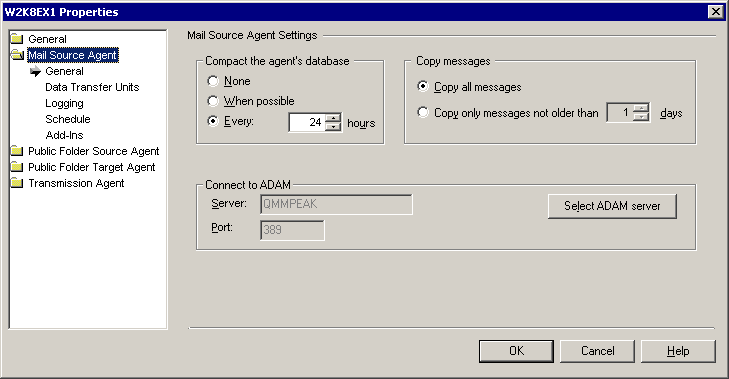
The General pages of the source and target agents’ properties allow you to view and modify the following synchronization setting:
- The Mail Source Agent and the Mail Target Agent store their configuration and statistics in separate database files. You can specify how frequently each database should be compacted.
In addition, for the Mail Source Agent you can specify:
- Whether only the messages modified recently should be copied to the target.
|

|
Caution: If you change the value of the Copy message not older than option, the new value is applied only after the agent is restarted. In addition, if the new value is greater than the old value, you need to perform full resynchronization. If the new value is less, then resynchronization is not needed. |
- The account under which the agent will connect to the AD LDS or ADAM server and the AD LDS or ADAM replica. Since the domain migration and directory synchronization data is stored in the AD LDS or ADAM partition, the agent needs access to the AD LDS or ADAM server and partition where the directory synchronization database is stored.
|
|
Caution: Please note that when the Mail Source Agent is processing the mailboxes of a Remote Users Collections, it will ignore the above settings except the database compaction frequency setting. For more information about Remote Users Collections, refer to the Changing Legacy Mailbox Collection Settings topic of this guide. |
For the Mail Target Agent, you can also specify whether the agent should archive an incoming PST file that cannot be processed and how long the agent should try to process each PST file.
Data Transfer Units
The Mail Source Agent compresses the PST files before putting them into service PRV files and sending them to the destination servers. The Data Transfer Units page of the source server properties allows you to select whether the agent should compress mail data and to specify the compression rate. If the agent does not compress data, it works faster; however, the network traffic increases because larger files are transferred to the target servers.
You can also specify the maximum size of data put to each PST file.
Logging
Every Migration Manager agent saves its logs on the server on which the agent is installed.
For each agent you can specify whether the log file will be overwritten or appended during each session, and select which events will be written to the text log and Exchange server application log files.

Scheduling Options
Each mailbox synchronization agent has its own scheduling options. This lets you define separately when the agents are allowed to put additional stress on the Exchange servers and on the network.
For each agent you can specify:
- The hours during which each agent is allowed to run. On the agent’s Schedule page of Server Properties, click Synchronization Schedule. Then select the time frame during which the agent should perform synchronization jobs.
- Whether there should be a sleep period between the agent’s sessions, and the length of that period.
Starting Mailbox Synchronization
We recommend that the first legacy mailbox synchronization job be started after the domain and directory migration are completed, after the public folders are replicated to the target Exchange server, and together with all the calendar and free/busy synchronization jobs for all servers. This will ensure that the first user switched to the target mailbox will:
- See the full Global Address List (GAL)
- Have access to the public folders
- Have access to other users’ free/busy information and (if needed) detailed calendar data
To start the mailbox synchronization agents, perform the following:
- Select the legacy mailbox synchronization job in the navigation tree, and then click the Agent Manager toolbar button.
- After that in the agent host pane select all necessary agent hosts.
- Finally, in the Actions pane click Start Agents.
You can get track the mailbox migration using the Statistics dashboard. For information on how to do that, see Tracking the Migration Progress.
Setting Up a New Native Move Job
A native move job requires the following:
-
Exchange 2010 Client Access server or Exchange 2013 Client Access server (if applicable) must be deployed in source or target Exchange organization. Also the Mailbox Replication Service Proxy (MRS Proxy) endpoint may need to be enabled for that Client Access server according to your migration plan. For details, see the Enable the MRS Proxy endpoint for remote moves TechNet article.
|

|
NOTE: For the list of Microsoft Exchange organization pairs currently supported by the native move job, see the Mailbox Migration Process. |
-
The target users must be mail-enabled and have the specific attributes that are required for native mailbox move, not mailbox-enabled. For more information, see Specify Exchange Options in the Migration Manager for Active Directory User Guide.
Step 1. Select the Source Exchange Organization
Specify the source organization that mailboxes will be moved from and the credentials to use for performing the move operations.
|
|
NOTE: For the list of Microsoft Exchange organization pairs currently supported by the native move job, see the Mailbox Migration Process. |
You can specify a single set of credentials for working with both Active Directory and Exchange, or two distinct sets of credentials.
Step 2. Select the Target Exchange Organization
Specify the target organization that mailboxes will be moved to and the credentials to use for performing the move operations.
|
|
NOTE: For the list of Microsoft Exchange organization pairs currently supported by the native move job, see the Mailbox Migration Process. |
You can specify a single set of credentials for working with both Active Directory and Exchange, or two distinct sets of credentials.
Step 3. Set Up Migration Agent for Exchange
The Migration Agent for Exchange is used for performing native mailbox move operations. This step lets you set up the agent on an agent host that you select.
The default installation path is in the hierarchy of the Program Files system folder. You can customize the path, but your custom path will be used only if there are no previously installed instances of the Migration Agent for Exchange on the computer. Otherwise, the agent will be installed to the same location as the other existing instances regardless of the path you specify.
You can also override the default credentials that the agent will use. However, note that in this case you will be changing the credentials not only for the agent instance you are installing, but also for any existing agent instances on the agent host.
