Configuring access to Web Interface
The Web Interface is only accessible to the intranet users who have Read permission on the virtual directory where the Web Interface is installed. By default, such a permission is granted to the members of the local Administrators group and/or the Users group on the Recovery Manager for Exchange computer. You can restrict access to the Web Interface by ensuring that only specific user accounts have Read permission granted for the virtual directory where the Web Interface is installed.
To configure access to the Web Interface
- On the computer where the Web Interface is installed, start Internet Information Services (IIS) Manager.
- In the IIS Manager console tree, expand the appropriate nodes to select the virtual directory where the Web Interface is installed.
In IIS 7.0 or later, the default Web Interface virtual directory is <RecoveryManagerComputer>/Sites/Default Web Site/RME
In IIS 6.0, the default Web Interface virtual directory is <RecoveryManagerComputer>/Web Sites/Default Web Site/RME
- Right-click the Web Interface virtual directory, then do one of the following:
- In IIS 7.0 or later, click Edit Permissions.
- In IIS 6.0, click Permissions.
- On the Security tab, make sure the users or groups you want to provide with access to the Web Interface are listed under Group or user names and have Read permission granted.
Configuring the Web browser
Before connecting to the Web Interface, check to make sure the Web browser you will be using to connect is configured properly.
To configure Internet Explorer
- In Control Panel, open Internet Options
- On the Security tab, click Local intranet, and then click the Custom level button.
- Under Settings, make sure that the Enable option is selected for the following:
- Downloads | File download
- Scripting | Active scripting
- Click OK to close the Security Settings dialog box.
Connecting to Web Interface
To start using the Web Interface, connect to it with your Web browser.
To connect to the Web Interface
- Start your Web browser, and then go to the following URL:
http://<WebSite>/<VirtualDirectory>/
Substitute the Web site and virtual directory names specified during the Web Interface installation for the <WebSite> and <VirtualDirectory> placeholders.
For example, you might go to http://Comp/RME if the Web Interface site is installed to the default Web site on the computer named Comp in the virtual directory RME.
You may be prompted to download and install Microsoft Silverlight, as it is required to access the Web Interface.
Using Web Interface
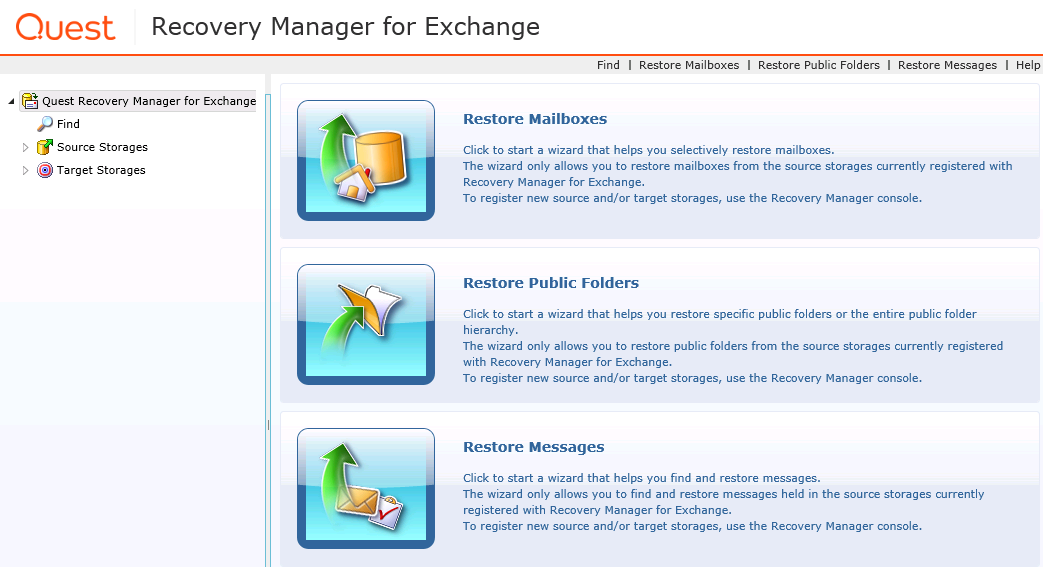
The Web Interface look resembles the Recovery Manager Console and has the following elements:

Note that in the Web Interface you can only use storages previously registered with the Recovery Manager Console.
Menu Bar
- Find. Allows you to search registered source storages for specific messages.
- Restore Mailboxes. Allows you to start a wizard that helps you selectively restore mailboxes from registered source storages.
- Restore Public Folders. Allows you to start a wizard that helps you selectively restore public folders from registered source storages.
- Restore Messages. Allows you start a wizard that helps you selectively restore messages from registered source storages.
- Help. Displays Help for the Web Interface.
Tree View
- Quest Recovery Manager for Exchange. When you select this node, the Details View displays the Task Pad View you can use to perform a data restore task. When this node is expanded, you can use the Find, Source Storages, and Target Storages nodes described below.
- Find. When you select this node, the right pane displays the Find View you can use to search source storages registered with Recovery Manager for Exchange.
- Source Storages. When you expand this node, you can browse source storages registered with Recovery Manager for Exchange to view their contents and select items to restore.
- Target Storages. When you expand this node, you can browse target storages registered with Recovery Manager for Exchange to view their contents.
Details View
Displays the contents of an item (such as storage, folder, or mailbox) currently selected in the Tree View.
In this section:

