This step appears only if Delegate resource processing task mode was selected in Step 2. If you selected the Configure resource processing task option, proceed to step 5.
This step lets you specify one or more trusted accounts and delegate the rights to perform the task to those accounts.
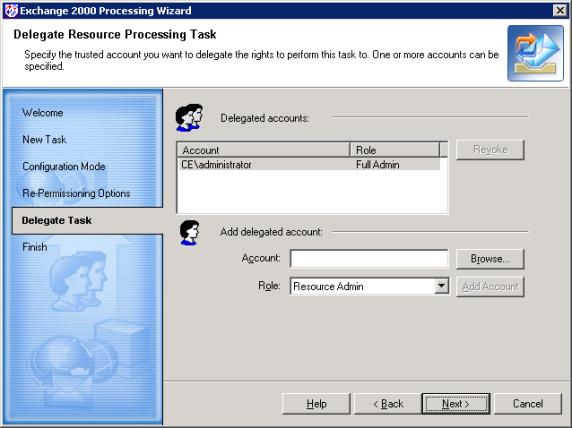
To delegate the rights to a trusted account, complete the following steps:
Click Next to proceed to the Complete the Exchange Processing Wizard step.
In this step, add at least one Exchange server for each organization you want to update.
When you run the Exchange Processing Wizard for the first time, it automatically displays the Add Exchange Servers dialog box before letting you select the Exchange objects to be processed, as shown below:
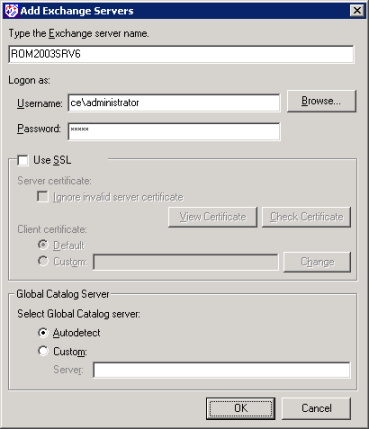
Specify the Exchange server name and the credentials to be used for connecting to the server.
|
|
NOTE: If the account you specify does not have enough privileges to modify some of the Exchange objects, they will remain unchanged. No error or warning messages will be displayed—all messages will be written to the log file. See the Prerequisites (Exchange Server Processing) section above for details. |
Select the Use SSL check box in the Add Exchange Servers dialog box if you want to connect to the server using a secure connection. Note that to use a secure connection, the Web server installed on the computer running Exchange Server must be configured to support SSL. For the server to be successfully processed via the secured connection, the security certificate must be issued by a trusted company, the security certificate date must be valid, and the security certificate must have a valid name matching the specified Exchange server name. See the Web server and Exchange Server documentation for details.
In this step, you also select the Global Catalog server (GC). The GC stores information about all mailboxes in the organization and is used for mailbox enumeration. If you select the Autodetect option, the nearest GC is used. To select a specific catalog server, select the Custom option and specify the server name. This is recommended if the organization contains a large number of mailboxes, because it allows you to specify a GC that serves fewer queries and is less likely to become overloaded.
If you are not running the wizard for the first time, it displays the Exchange organizations added previously. The wizard displays the object tree with all servers you have added. The name of a tree consists of the organization name, followed by the site name and the processing server name.
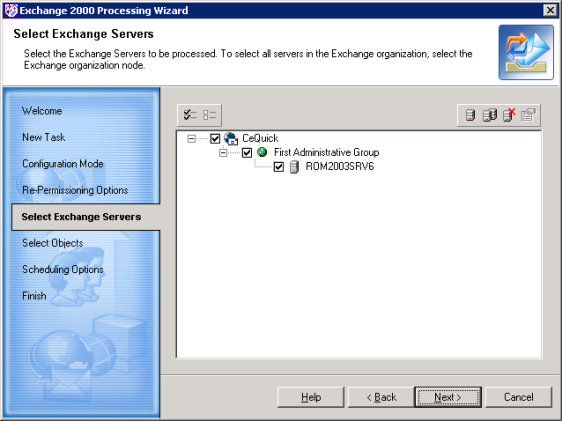
To add new Exchange organizations and servers for processing, use the Add Exchange server and Add all servers from Exchange organization buttons on the toolbar.
To change the credentials and connection settings for an Exchange server in the list, right-click the server object and select Properties. This will open the Add Exchange Servers dialog box.
Select the servers to be processed by selecting the check boxes. When you select a check box, all nodes at the lower levels will be selected. To select all servers in the Exchange organization, simply select the organization node. To exclude some servers of the organization from processing, clear their check boxes.
|
|
NOTE: You must select at least one check box at the lowest level. If no server is selected, you cannot proceed. |
If you want to process public folders on an Exchange server in an organization that has a combination of Exchange 2003, Exchange 2007 and Exchange 2010 servers, then some additional requirements apply. The user you specify in the Add Exchange Servers dialog box must have the following:
If the server does not host the specified user's mailbox, you may encounter errors when trying to select public folders for processing.
This step lets you specify the objects for processing.
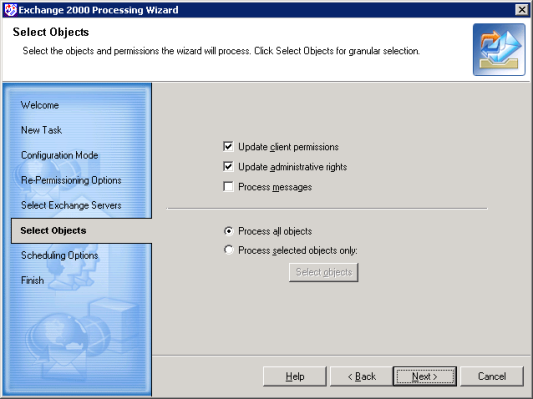
You can choose whether to update client permissions, administrative permissions, permissions on messages, or any combination. You can also specify whether to make these changes on all Exchange objects or only on the objects you specify.
|
|
NOTE: For successful message processing, ensure the following:
It is recommended to create a backup of the mailbox and public stores before processing messages. |
To select objects for processing explicitly, select the Process selected objects only and then click the Select objects button. The Select Objects to Process window will be displayed, showing the Exchange directory hierarchy.
The wizard shows the servers you have specified for processing and the organizations to which these servers belong. These objects are selected and unavailable because you have already selected them on the previous step. The lower levels present the organization hierarchy for each server in the organization. You can select or clear only the objects at the lower levels.
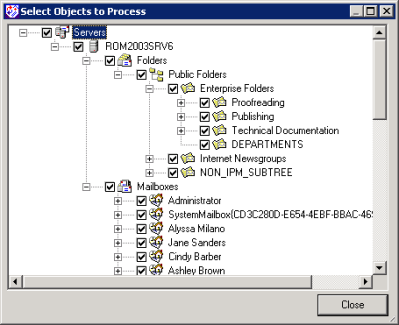
You can select individual mailboxes and public folders to process. If you select or clear an object, the objects below it will also be selected or cleared.
After you select the objects, click Close.
This step allows you to specify whether the task should be started immediately or scheduled.


