
Setting up labels for user accounts
Setting up labels for user accounts
You can use labels to group user accounts the same way you use labels to group devices and software in the Inventory section. In addition, you can use Smart Labels to grant levels of access to users. For example, you could use labels to designate who can submit, accept, reject, work on, and resolve Service Desk tickets.
Additionally, any labels you create in the Inventory section can work as user labels in Service Desk, provided that you created those labels without restrictions. If the labels were created with restrictions, you can modify them, or create labels in the Inventory sections without restrictions.
Add an All Ticket Owners label
|
1. |
|
a. |
Log in to the appliance Administrator Console, https://appliance_hostname/admin. Or, if the Show organization menu in admin header option is enabled in the appliance General Settings, select an organization in the drop-down list in the top-right corner of the page next to the login information. |
|
b. |
|
c. |
|
d. |
|
The name of the label. This name appears on the Labels list. Type a name such as All Ticket Owners. | |
|
3. |
The new label is available in the Choose Action > Apply Label menu on the Users page. To assign the label to Service Desk staff when you import user data, see Importing users from an LDAP server.
Add an All Ticket Owners label
Setting up labels for user accounts
You can use labels to group user accounts the same way you use labels to group devices and software in the Inventory section. In addition, you can use Smart Labels to grant levels of access to users. For example, you could use labels to designate who can submit, accept, reject, work on, and resolve Service Desk tickets.
Additionally, any labels you create in the Inventory section can work as user labels in Service Desk, provided that you created those labels without restrictions. If the labels were created with restrictions, you can modify them, or create labels in the Inventory sections without restrictions.
Add an All Ticket Owners label
|
1. |
|
a. |
Log in to the appliance Administrator Console, https://appliance_hostname/admin. Or, if the Show organization menu in admin header option is enabled in the appliance General Settings, select an organization in the drop-down list in the top-right corner of the page next to the login information. |
|
b. |
|
c. |
|
d. |
|
The name of the label. This name appears on the Labels list. Type a name such as All Ticket Owners. | |
|
3. |
The new label is available in the Choose Action > Apply Label menu on the Users page. To assign the label to Service Desk staff when you import user data, see Importing users from an LDAP server.
Using Smart Labels for patching
Using Smart Labels for patching
You can create a labeling scheme that organizes patches by operating system and importance, such as P (Patch) Operating System Importance. For example:
|
• |
Add a Smart Label for critical OS patches
You can create a Smart Label to identify critical OS (operating system) patches.
|
1. |
|
a. |
Log in to the appliance Administrator Console, https://appliance_hostname/admin. Or, if the Show organization menu in admin header option is enabled in the appliance General Settings, select an organization in the drop-down list in the top-right corner of the page next to the login information. |
|
b. |
|
c. |
|
2. |
|
b. |
|
c. |
|
d. |
|
4. |
|
6. |
|
◦ |
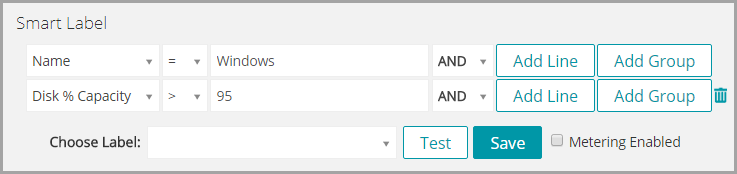
Select an existing label to associate with the Smart Label. Type in the Choose label field to search for existing labels. |
|
◦ |
|
NOTE: Press Enter or Return after you enter a new Smart Label name to move the text from the search field to the label field. |
|
7. |
Subscribe to patches. See Subscribing to and downloading patches.
Add a Smart Label for new patches
You can create a Smart Label to quickly identify new patches that must be deployed.
|
1. |
|
a. |
Log in to the appliance Administrator Console, https://appliance_hostname/admin. Or, if the Show organization menu in admin header option is enabled in the appliance General Settings, select an organization in the drop-down list in the top-right corner of the page next to the login information. |
|
b. |
|
c. |
|
2. |
|
b. |
|
c. |
|
4. |
|
5. |
|
◦ |
Select an existing label to associate with the Smart Label. Type in the Choose label field to search for existing labels. |
|
◦ |
|
NOTE: Press Enter or Return after you enter a new Smart Label name to move the text from the search field to the label field. |
|
6. |
Subscribe to patches. See Subscribing to and downloading patches.
Add a Smart Label for critical OS patches
Using Smart Labels for patching
You can create a labeling scheme that organizes patches by operating system and importance, such as P (Patch) Operating System Importance. For example:
|
• |
Add a Smart Label for critical OS patches
You can create a Smart Label to identify critical OS (operating system) patches.
|
1. |
|
a. |
Log in to the appliance Administrator Console, https://appliance_hostname/admin. Or, if the Show organization menu in admin header option is enabled in the appliance General Settings, select an organization in the drop-down list in the top-right corner of the page next to the login information. |
|
b. |
|
c. |
|
2. |
|
b. |
|
c. |
|
d. |
|
4. |
|
6. |
|
◦ |
Select an existing label to associate with the Smart Label. Type in the Choose label field to search for existing labels. |
|
◦ |
|
NOTE: Press Enter or Return after you enter a new Smart Label name to move the text from the search field to the label field. |
|
7. |
Subscribe to patches. See Subscribing to and downloading patches.
Add a Smart Label for new patches
You can create a Smart Label to quickly identify new patches that must be deployed.
|
1. |
|
a. |
Log in to the appliance Administrator Console, https://appliance_hostname/admin. Or, if the Show organization menu in admin header option is enabled in the appliance General Settings, select an organization in the drop-down list in the top-right corner of the page next to the login information. |
|
b. |
|
c. |
|
2. |
|
b. |
|
c. |
|
4. |
|
5. |
|
◦ |
Select an existing label to associate with the Smart Label. Type in the Choose label field to search for existing labels. |
|
◦ |
|
NOTE: Press Enter or Return after you enter a new Smart Label name to move the text from the search field to the label field. |
|
6. |
Subscribe to patches. See Subscribing to and downloading patches.