立即与支持人员聊天
与支持团队交流

KACE Systems Management Appliance 13.0 Common Documents - KACE Service Desk Administrator Guide

About the KACE Service Desk Getting started
Configuring the appliance
Requirements and specifications Power-on the appliance and log in to the Administrator Console Access the Command Line Console Tracking configuration changes Configuring System-level and Admin-level General Settings Configure appliance date and time settings Managing user notifications Enable Two-Factor Authentication for all users Verifying port settings, NTP service, and website access Configuring network and security settings Configuring Agent settings Configuring session timeout and auto-refresh settings Configuring locale settings Configuring the default theme Configure data sharing preferences About DIACAP compliance requirements Configuring Mobile Device Access Enable fast switching for organizations and linked appliances Linking Quest KACE appliances Configuring history settings
Setting up and using labels to manage groups of items Configuring user accounts, LDAP authentication, and SSO Deploying the KACE Agent to managed devices Using Replication Shares Managing credentials Configuring assets
About the Asset Management component Using the Asset Management Dashboard About managing assets Adding and customizing Asset Types and maintaining asset information Managing Software assets Managing physical and logical assets Maintaining and using manual asset information Managing locations Managing contracts Managing licenses Managing purchase records
Setting up License Compliance Managing License Compliance Setting up Service Desk Configure the Cache Lifetime for Service Desk widgets Creating and managing organizations Importing and exporting appliance resources
Managing inventory
Using the Inventory Dashboard Using Device Discovery Managing device inventory
About managing devices Features available for each device management method About inventory information Tracking changes to inventory settings Managing inventory information Finding and managing devices Registering KACE Agent with the appliance Provisioning the KACE Agent Manually deploying the KACE Agent Using Agentless management Adding devices manually in the Administrator Console or by using the API Forcing inventory updates Managing MIA devices Obtaining Dell warranty information
Managing applications on the Software page Managing Software Catalog inventory
About the Software Catalog Viewing Software Catalog information Adding applications to the Software Catalog Managing License assets for Software Catalog applications Associate Managed Installations with Cataloged Software Using software metering Using Application Control Update or reinstall the Software Catalog
Managing process, startup program, and service inventory Writing custom inventory rules
Deploying packages to managed devices
Distributing software and using Wake-on-LAN Broadcasting alerts to managed devices Running scripts on managed devices Managing Mac profiles Using Task Chains
Patching devices and maintaining security
Using the Security Dashboard About patch management Subscribing to and downloading patches Creating and managing patch schedules Managing patch inventory Managing Windows Feature Updates Managing Dell devices and updates Managing Linux package upgrades Maintaining device and appliance security Manage quarantined file attachments
Using reports and scheduling notifications Monitoring servers
Getting started with server monitoring Working with monitoring profiles Managing monitoring for devices Working with alerts
Using the Service Desk
Configuring Service Desk Using the Service Desk Dashboard Managing Service Desk tickets, processes, and reports
Overview of Service Desk ticket lifecycle Creating tickets from the Administrator Console and User Console Creating and managing tickets by email Viewing tickets and managing comments, work, and attachments Merging tickets Using the ticket escalation process Using Service Desk processes Using Ticket Rules Run Service Desk reports Archiving, restoring, and deleting tickets Managing ticket deletion
Managing Service Desk ticket queues About User Downloads and Knowledge Base articles Customizing Service Desk ticket settings Configuring SMTP email servers
Maintenance and troubleshooting
Maintaining the appliance Troubleshooting the appliance
Appendixes Glossary About us Legal notices

Scheduling notifications

Scheduling notifications

To maintain a watch on your environment, you can schedule the appliance to notify administrators through email when specified criteria are met. This activity is useful for watching system health and device properties.

You can add, edit, and delete notification schedules.

Add notification schedules from the Reporting section

Add notification schedules from the Reporting section

You can add notification schedules for devices, discovery scans, and assets from the Reporting section.

1.
Go to the Notification Schedules list page:
a.
Log in to the appliance Administrator Console, https://appliance_hostname/admin. Or, if the Show organization menu in admin header option is enabled in the appliance General Settings, select an organization in the drop-down list in the top-right corner of the page next to the login information.
b.
On the left navigation bar, click Reporting, then click Notifications.
2.
Select Choose Action and select one of the following:
New > Device Notification
New > Discovery Notification
New > Asset Notification
New > Monitoring Alerts Notification
The Notification panel appears.

The image of the Notification panel shows a series of drop-down menus that permit defining the criteria for a schedule.

b.
With AND selected in the operator drop-down list, click Add Line.

Field

Description

Title

The information that you want to appear in the Subject line of the email. This also appears as the name of the notification on the Notification Schedules page.

Recipient

The email address or addresses of intended recipients. Email addresses must be fully qualified email addresses. To send email to multiple addresses, use commas to separate each address, or use email distribution lists.

Frequency

The interval at which the appliance runs the query to compare the selected criteria with items in inventory. If criteria are met, the notification is sent.

5.
Optional: To verify the criteria, click Test.
6.
Click Save.

The notification is created and it appears on the Notification Schedule page. For information about scheduling the frequency of the notification, see Edit notification schedules.

Add notification schedules from list pages

Add notification schedules from list pages

You can add notification schedules from list pages, such as the Devices, Software, Software Catalog, Discovery, or Assets page.

1.
Log in to the appliance Administrator Console, https://appliance_hostname/admin. Or, if the Show organization menu in admin header option is enabled in the appliance General Settings, select an organization in the drop-down list in the top-right corner of the page next to the login information.
2.
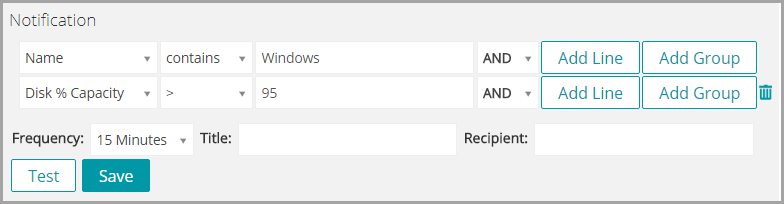
Go to a list page, such as the Devices list, and click the Notification tab above the list on the right.
The Notification panel appears.

The image of the Notification panel shows a series of drop-down menus that permit defining the criteria for a schedule.

Field

Description

Title

The information that you want to appear in the Subject line of the email. This title also appears as the name of the notification on the Notification Schedules page.

Recipient

The email address or addresses of intended recipients. Email addresses must be fully qualified email addresses. To send email to multiple addresses, use commas to separate each address, or use email distribution lists.

Frequency

The interval at which the appliance runs the query to compare the selected criteria with items in inventory. If criteria are met, the notification is sent.

5.
Optional: To verify the criteria, click Test.
6.
Click Save.

The notification is created and it appears on the Notification Schedules page. Notifications are enabled by default. To disable or add a description to the notification, see Edit notification schedules.

Edit notification schedules

Edit notification schedules

You can enable, disable, change the frequency of, or modify notification schedules as needed.

1.
Go to the Notification Schedules list page:
a.
Log in to the appliance Administrator Console, https://appliance_hostname/admin. Or, if the Show organization menu in admin header option is enabled in the appliance General Settings, select an organization in the drop-down list in the top-right corner of the page next to the login information.
b.
On the left navigation bar, click Reporting, then click Notifications.

Field

Description

Enabled

Whether the notification is active or inactive. Select Enabled to permit the appliance to run the query and send the appropriate notifications at the selected frequency. Select Disabled to prevent the appliance from running the query and sending notifications.

Name

The information that you want to appear in the Subject line of the email. When you create notifications on the Notification panel, you enter this information in the Title field.

Recipients

The email address or addresses of intended recipients. Email addresses must be fully qualified email addresses. To send email to multiple addresses, use commas to separate each address, or use email distribution lists.

Description

Any additional information you want to provide.

Frequency

The interval at which the appliance runs the query to compare the selected criteria with items in inventory. If criteria are met, the notification is sent.

3.
Optional: To edit the report using the wizard, select click here next to To re-edit the Notification using the original editor above the Save button.
4.
Optional: To change the SQL criteria that triggers the alert, click the check box labeled To edit the Notification using this editor above the Save button.

MACHINE.ID as TOPIC_ID

For example:

SELECT MACHINE.NAME AS SYSTEM_NAME, SYSTEM_DESCRIPTION, MACHINE.IP, MACHINE.MAC, MACHINE.ID as TOPIC_ID FROM MACHINE WHERE ((SYSTEM_DESCRIPTION = 'Test Computer'))

5.
Click Save.
相关文档

The document was helpful.

选择评级

I easily found the information I needed.

选择评级