The ExpertAssist component is licensed as a part of the overall Desktop Authority licensing framework. Therefore, a valid Desktop Authority license (Standard or Professional) is required in order to use ExpertAssist.
When the ExpertAssist software installation is complete, each workstation may be accessed from any machine using a Java-enabled web browser.
To access the host machine:
Example:
where:
After entering the URL into your browser and pressing enter, the ExpertAssist login screen will be displayed.
Depending upon who is logging in to the system, the SAM database, Active Directory, and ExpertAssist’s own user database are accessed for authentication.
For the first-time logon:
Log on as someone who is a member of the local Administrators group.
This default behavior can be changed later by granting Windows users or groups access to ExpertAssist through the Access Control section of the Security node.
Type in the credentials that can be used to authenticate on the remote computer and click Login.
ExpertAssist will use the current credentials (those entered by you at the Windows logon screen on the computer running the browser) to identify the computer to the remote computer. This is only available on local networks.
To login using your current Windows login credentials:
Click the Login button within the NTLM section.
If available, NTLM requires that the remote computer IP address be added to the Local intranet security zone in your browser.
Typically, the browser will automatically figure out for you if the remote computer is on the local network or not by analyzing the remote computer’s IP address class. If not, make sure to manually add the remote computer’s address to the Local intranet security zone in your browser, otherwise you will be prompted to enter your credentials despite using NTLM. The behavior is by browser design and depends on the Logon radio button setting in the security zone setting. This setting is typically set to Automatic logon only in Intranet zone in zones’ settings.
This logon type will verify your identity based on the credentials stored on a Smart Card. Smart Card support is available on computers running Microsoft Windows 7 or later.
To login using credentials stored on a Smart Card:
Click the Login button within the Smart Card section.
Additional login and access options are detailed below.
To get access to additional login options:
Click on the Show advanced options button in the login window
Figure 1: Login screen with additional options.
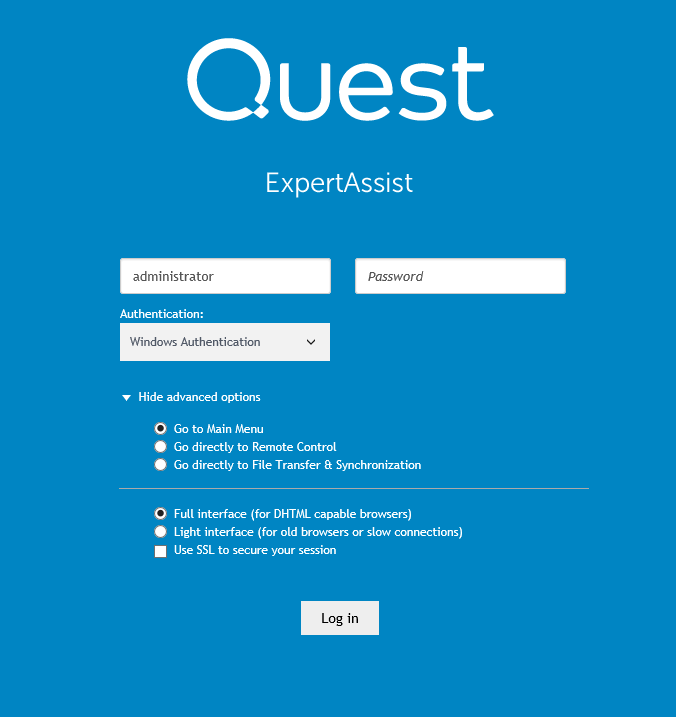
Using any of the first three buttons selects whether to go directly to Remote Control, to File Transfer & Synchronization or to the Main Menu page (default) directly upon login.
Choose between the full and light interfaces. The full interface is for DHTML capable browsers. The light interface is more suitable for old browsers or users with slow connections.
This only works for ExpertAssist users defined within the Access Control page. ExpertAssist administrators always have full interface enabled for them unless specified explicitly. See details in the Access Control section.
Several ExpertAssist functionalities, such as Remote Control, File Transfer, and Performance Viewer, require that you have Java Runtime Environment (JRE) installed on the client computer where you are managing the remote computer from. If you have logged into ExpertAssist using one of the three available authentication options, and you do not have JRE installed on your local computer, you will be prompted by your browser right before you will see the ExpertAssist user interface.
ExpertAssist requires that you have at least JRE version 1.5.0_5 installed on the local computer to work with applets.
Figure 2: The browser prompts for Java update before launching EA.
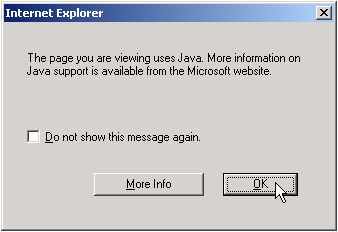
Click OK to close the message box and let the browser to show you the ExpertAssist user interface.
In the topmost frame on the user interface you will see that the Performance Viewer applet is not working and ExpertAssist shows the “Java is not installed” message.
Click on the download link within the frame and ExpertAssist will automatically open the new browser window or tab and redirect you to the JRE download page.
If you are running your browser on a server with Windows Server 2003 or above with Internet Explorer Enhanced Security Configuration (IEESC) mode enabled, please make sure to add the web sites to the Trusted Sites zone when prompted by browser. This behavior is by browser’s design.
You can eliminate these browser web site blocking prompts and difficulties with downloading the JRE by disabling the IEESC on your local operating system.
Download and install the JRE on your local computer. Once installed, Java runtime will enable ExpertAssist to allow you use its applets.
If the automatic installation provided by site does not work for you, either use relaxed browser security settings for the JRE download site, or choose the manual download option.
If prompted by a Java security warning, accept the warning by clicking Yes.
Figure 3: Java security warning.
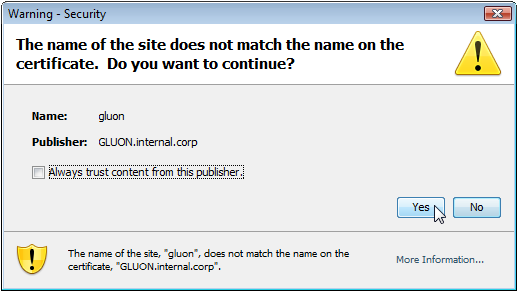
This warning is normal since ExpertAssist is using a self-signed security certificate, which typically gets automatically issued to the DNS name of the remote computer. Thus, if you are connecting to the remote computer by using the IP address or the NetBIOS name in the URL, JRE will locate the mismatch between the “issued to” string in the client certificate and the computer name in the URL and a warn you about this. In the figure above you may see that the JRE warns the user accessing ExpertAssist by using the https://gluon:port/ntlm URL in the browser since the certificate has been issued to gluon.internal.corp. In the example above, you could avoid having the JRE warning message by accessing ExpertAssist using the DNS name of the remote computer in the URL https://gluon.internal.corp:port/ntlm.
