立即与支持人员聊天
与支持团队交流

Foglight for Hyper-V 5.7.7 - User and Reference Guide

About Foglight for Hyper-V Agent administration Performance monitoring with the Hyper-V Environment dashboard Performance investigation with the Hyper-V Explorer Foglight for Hyper-V alarms Appendix: Hyper-V Agent error codes

Accessing the Hyper-V Explorer Administration tab

The Hyper-V Explorer Administration tab provides quick access to common administrative tasks that include server shutdown, virtual machine creation, resource allocation, and others. The range of available tasks depends on whether you are exploring server or virtual machine objects. For example, when exploring server details, use this tab to access server-related workflows, such as rebooting or shutting down servers, or adding virtual machines. Similarly, when you select a virtual machine in the Hyper-V Explorer, use this tab to power off, shut down, save, pause, delete, clone, move, or edit resource allocation for the selected virtual machine. For more information about the administrative tasks, see Hyper-V server and virtual machine administration .

This tab also lists the related workflows and snapshots updated in real time, and allows you to edit and re-run them to simplify your daily administration load quickly and easily.

NOTE: The Hyper-V Explorer Administration tab is only available when the Virtual-HyperV-Admin-<version>.car and Virtual-HyperV-<version>.car are installed. This tab is accessible if your Foglight user account includes the Hyper-V Automation User role, when you are exploring individual servers and virtual machines.
3
On the navigation panel, under Dashboards, choose Hyper-V > Hyper-V Explorer.
Figure 228. Hyper-V Explorer
4
On the navigation panel, under Infrastructure, on the Topology tab, select a server or virtual machine object instance in the navigation tree.
Figure 229. Topology tab
This image illustrates the content of the Administration tab when exploring server details.
TIP: Use the Topology tab to quickly switch between object instances and display their details in the Hyper-V Explorer.
Figure 232. Topology tab

For more information about this tab, see Hyper-V Explorer Topology tab .

Hyper-V Explorer Administration tab

The Hyper-V Explorer Administration tab provides access to common administrative tasks. It also shows configuration details for a server or a virtual machine (depending on the selected object type), and some high-level information about the object’s resource consumption.

NOTE: The Hyper-V Explorer Administration tab is only available when the Virtual-HyperV-Admin and Virtual-HyperV cartridges are installed. It is accessible if your Foglight™ user account includes the Hyper-V Automation User role, while exploring individual servers and virtual machines.

This tab appears in the Hyper-V Explorer when you select a Hyper-V server or a virtual machine on the Hyper-V Explorer Topology tab.
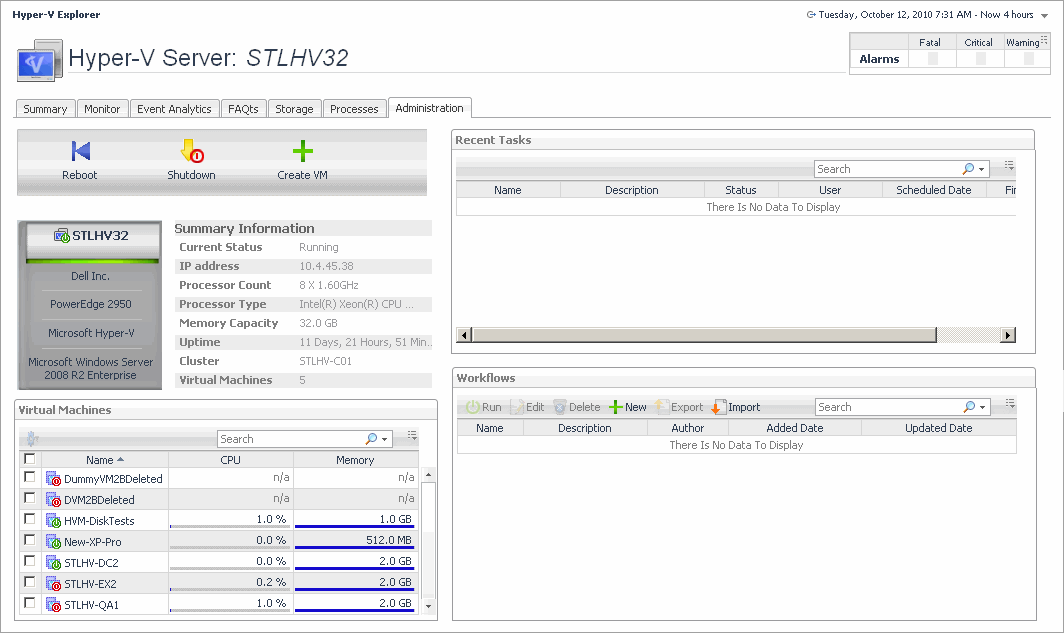
Figure 233. Administration tab

This tab is made up of the following embedded views:

Table 128. Recent Tasks

This table lists the tasks that are performed for the selected server or virtual machine.

Description. The task description.
Finished Date. The date on which the task finished.
Name. The task name.
Scheduled Date. The date on which the task is scheduled to run.
Status. The task status.
User. The Foglight for Hyper-V user who started the task.

Shows the name of the selected server and its basic configuration, including the hardware configuration, virtualization application (Microsoft® Hyper-V®), and the OS.

Shows physical configuration details for the selected server.

Cluster. The name of the cluster to which the selected server belongs, if applicable.
IP Address. The IP address of the selected server.
Memory Capacity. The memory capacity of the selected server.
Processor Count. The number of CPUs used by the selected server.
Processor Type. The processor type of the physical machine.
Uptime. The length of time the selected server is running
Virtual Machines. The number of virtual machines running on the selected server.
Table 131. Server Toolbar

Contains buttons for initiating common administrative tasks. For complete information, see Hyper-V server and virtual machine administration .

Create VM. Creates a virtual machine on the selected server.
Reboot. Reboots the selected server.
Shutdown. Shuts down the selected server.
Table 132. Snapshots

Contains a hierarchical view of the selected virtual machine’s snapshots. It also contains buttons for initiating common administrative tasks. For complete information, see Hyper-V server and virtual machine administration .

Create. Creates a virtual machine snapshot.
Delete. Deletes a selected virtual machine snapshot.
Rename. Renames a selected virtual machine snapshot.
Revert. Reverts to a selected virtual machine snapshot.

Shows the name of the selected virtual machine and its basic configuration, including its status, machine name, configuration, virtualization application (Microsoft Hyper-V), and the guest OS.

Table 134. Virtual Machines

Shows a list of virtual machines associated with the selected server.

CPU. The current percentage of the selected virtual machine’s CPU load, used to execute system code and user programs, based on the total CPU capacity allocated to that virtual machine.
Name. Virtual machine name.
Memory. The total amount of memory that is available to the virtual machine.

Shows physical configuration details for the selected virtual machine.

IP Address. The IP address of the selected virtual machine.
Processor Count. The number of CPUs used by the selected virtual machine.
Network Interfaces. The number of network interface cards used by the selected virtual machine.
Memory Capacity. The amount of memory available to the selected virtual machine.
Storage Capacity. The amount of disk storage available to the selected virtual machine.
Services. The services associated with the selected virtual machine.
Uptime. The length of time the selected virtual machine is running.
Version. The name of the operating system used by the selected virtual machine.

Contains buttons for initiating common administrative tasks. For complete information, see Hyper-V server and virtual machine administration .

Clone. Clones the selected virtual machine.
Delete. Deletes the selected virtual machine.
Edit. Edits the settings of the selected virtual machine.
Move. Moves the selected virtual machine.
Pause. Pauses the selected virtual machine.
Power Off. Powers off the selected virtual machine.
Save. Saves the selected virtual machine’s settings.
Shutdown OS. Shuts down the guest OS on the selected virtual machine.
Table 137. Workflows

Contains a list of the available workflows. It also contains buttons for creating and editing workflows. For complete information, see Hyper-V server and virtual machine administration .

Added. The date on which the workflow was added.
Author. The name of the Foglight for Hyper-V user who created the workflow.
Delete. Deletes a selected workflow.
Description. The workflow description.
Edit. Edits a selected workflow.
Export. Exports a selected workflow to a file.
Import. Imports a workflow from a file.
Name. The workflow name.
New. Creates a new workflow.
Run. Runs a selected workflow.
Updated. The date on which the workflow was updated.

Shutting down and rebooting Hyper-V servers

Use the Reboot and Shutdown buttons on the Hyper-V Administration tab to reboot and shut down servers, as required.

Figure 234. Reboot and Shutdown buttons

2
On the Hyper-V Explorer Administration tab, click Reboot.
The Reboot Hyper-V Server dialog box appears.
Figure 235. Reboot Hyper-V Server dialog box
3
In the Reboot Hyper-V Server dialog box, in the Reason box, type the reason for rebooting the server.
5
In the Reboot Hyper-V Server dialog box, click OK.
2
On the Hyper-V Explorer Administration tab, click Shutdown.
The Shutdown Hyper-V Server dialog box appears.
Figure 236. Shutdown Hyper-V Server dialog box
3
In the Shutdown Hyper-V Server dialog box, in the Reason box, type the reason for shutting down the server.
5

Creating, re-configuring, and moving virtual machines

Use the Create VM, Edit, and Move buttons on the Hyper-V Explorer Administration tab to create virtual machines and move them, as required.

Figure 237. Create VM, Edit, and Move buttons

2
On the Hyper-V Explorer Administration tab, click Create VM.
The Create HyperV VM dialog box appears with the Specify VM Name and Host page open.
Figure 238. Create HyperV VM dialog box
3
Follow the flow in the wizard by supplying the required information and clicking Next. At any point you can return to a previous step using the Previous button.
a
On the Specify VM Name and Host page, in the VM Name box, specify the name of the virtual machine that you are about to create.
Optional. Add any notes, if necessary.
b
On the Select Data Storage page, specify the location of the virtual machine or select the use default location check box.
c
On the Customize Hardware and Network page, define the number of CPUs and memory size that you want to allocate to the VM. If necessary, add a network adapter and assign a static or dynamic IP address.
d
On the Customize VM Disk(s) page, allocate disk resources to the virtual machine. You can choose from existing disk drives or create a new one.
e
On the Summary page, review your settings and click Finish.
2
On the Hyper-V Explorer Administration tab, click Edit.
The Edit HyperV VM dialog box appears with the VM Name & Location page open.
Figure 239. Edit HyperV VM dialog box
3
Follow the flow in the wizard by supplying the required information and clicking Next. At any point you can return to a previous step using the Previous button.
a
On the VM Name & Location page, edit the name of the virtual machine, if required.
Optional. Add any notes, if necessary.
b
On the Customize CPU Usage page, edit the CPU allocation properties as required, including the number of CPUs, if the CPUs are to be shared, and the related allocation limits.
c
On the Customize Memory Usage page, edit the memory amount that is allocated to the virtual machine.
d
On the VM Disk page, add or remove any disks, as required.
e
On the VM Network page, add or remove any network adapters, and edit their IP addresses, as required.
f
On the Summary page, review your settings and click Finish.
2
On the Hyper-V Explorer Administration tab, click Move.
The Move HyperV VM dialog box appears.
Figure 240. Move HyperV VM dialog box
相关文档

The document was helpful.

选择评级

I easily found the information I needed.

选择评级