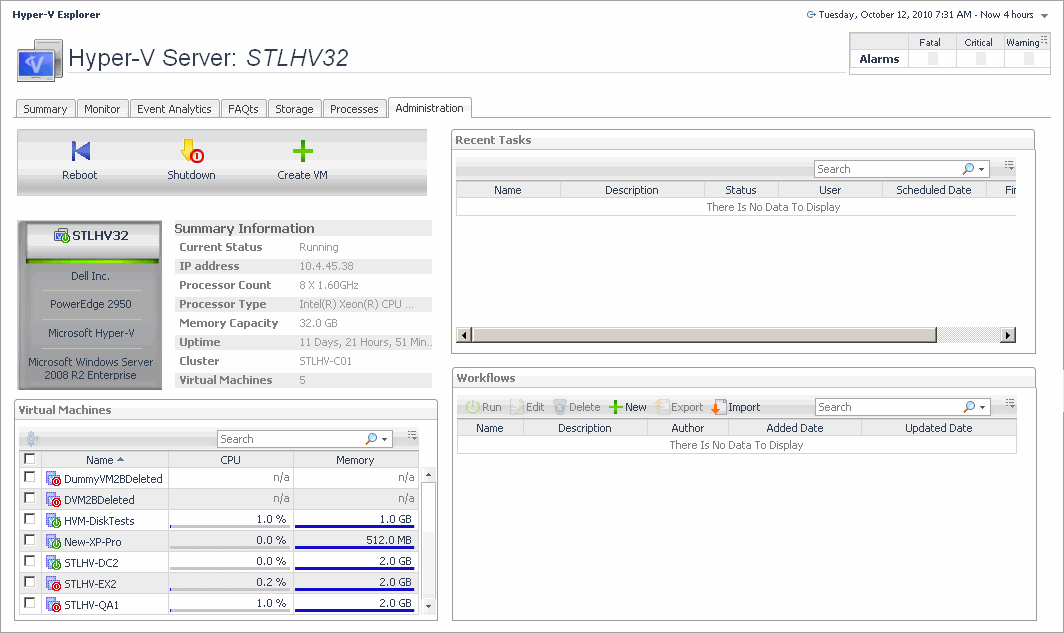
Accessing the Hyper-V Explorer Administration tab
The Hyper-V Explorer Administration tab provides quick access to common administrative tasks that include server shutdown, virtual machine creation, resource allocation, and others. The range of available tasks depends on whether you are exploring server or virtual machine objects. For example, when exploring server details, use this tab to access server-related workflows, such as rebooting or shutting down servers, or adding virtual machines. Similarly, when you select a virtual machine in the Hyper-V Explorer, use this tab to power off, shut down, save, pause, delete, clone, move, or edit resource allocation for the selected virtual machine. For more information about the administrative tasks, see Hyper-V server and virtual machine administration .
This tab also lists the related workflows and snapshots updated in real time, and allows you to edit and re-run them to simplify your daily administration load quickly and easily.
|
|
NOTE: The Hyper-V Explorer Administration tab is only available when the Virtual-HyperV-Admin-<version>.car and Virtual-HyperV-<version>.car are installed. This tab is accessible if your Foglight user account includes the Hyper-V Automation User role, when you are exploring individual servers and virtual machines. |
Hyper-V Explorer Administration tab
The Hyper-V Explorer Administration tab provides access to common administrative tasks. It also shows configuration details for a server or a virtual machine (depending on the selected object type), and some high-level information about the object’s resource consumption.
|
|
NOTE: The Hyper-V Explorer Administration tab is only available when the Virtual-HyperV-Admin and Virtual-HyperV cartridges are installed. It is accessible if your Foglight™ user account includes the Hyper-V Automation User role, while exploring individual servers and virtual machines. |
This tab appears in the Hyper-V Explorer when you select a Hyper-V server or a virtual machine on the Hyper-V Explorer Topology tab.

This tab is made up of the following embedded views:
Shutting down and rebooting Hyper-V servers
Use the Reboot and Shutdown buttons on the Hyper-V Administration tab to reboot and shut down servers, as required.

The Reboot Hyper-V Server dialog box appears.
|
3 |
In the Reboot Hyper-V Server dialog box, in the Reason box, type the reason for rebooting the server. |
|
5 |
In the Reboot Hyper-V Server dialog box, click OK. |
The Shutdown Hyper-V Server dialog box appears.
|
3 |
In the Shutdown Hyper-V Server dialog box, in the Reason box, type the reason for shutting down the server. |
Creating, re-configuring, and moving virtual machines
Use the Create VM, Edit, and Move buttons on the Hyper-V Explorer Administration tab to create virtual machines and move them, as required.


The Create HyperV VM dialog box appears with the
Specify VM Name and Host page open.
|
a |
On the Specify VM Name and Host page, in the VM Name box, specify the name of the virtual machine that you are about to create. |
|
b |
On the Select Data Storage page, specify the location of the virtual machine or select the use default location check box. |
|
c |
On the Customize Hardware and Network page, define the number of CPUs and memory size that you want to allocate to the VM. If necessary, add a network adapter and assign a static or dynamic IP address. |
|
d |
On the Customize VM Disk(s) page, allocate disk resources to the virtual machine. You can choose from existing disk drives or create a new one. |
|
e |
On the Summary page, review your settings and click Finish. |
The Edit HyperV VM dialog box appears with the
VM Name & Location page open.
|
a |
On the VM Name & Location page, edit the name of the virtual machine, if required. |
|
b |
On the Customize CPU Usage page, edit the CPU allocation properties as required, including the number of CPUs, if the CPUs are to be shared, and the related allocation limits. |
|
c |
On the Customize Memory Usage page, edit the memory amount that is allocated to the virtual machine. |
|
d |
On the VM Disk page, add or remove any disks, as required. |
|
e |
On the VM Network page, add or remove any network adapters, and edit their IP addresses, as required. |
|
f |
On the Summary page, review your settings and click Finish. |
The Move HyperV VM dialog box appears.