Workflow Configuration
This window goes through the configuration and management of the Workflow. For each CW model, for which a configuration has been set up (See Configurations), the user can define more than one workflow.
Each workflow is described through three main sections:
-Data Source, containing information for getting the input data.
-Transformation, containing activities to be applied to transform the input data.
-Operation, which details the target of the workflow, i.e. where to send the output data
Configuring a workflow means:
1.Providing general information, like name, descriptions and “active” status
2.Choosing applicable data sources, and providing normalization parameters (like name of the sheet for Excel files, or the object type to extract for an EA/EA Agile Adapter)
3.Optional data transformation – filters on source data and other needed data manipulations settings
4.Operation and target – what system/human resource is the target for the desired operation
5.Test and save the workflow: workflow is ready to be tested (whatever the setting for “Active” checkbox is) and saved for further scheduled executions (if set in “Active” mode)
First of all the user is required to select a model/workspace configuration in the Configuration drop-down list.
In the “Workflow” drop down list are displayed all the existing workflows for that model configuration.
To create a new Workflow, press the 
•Create the new Workflow from blank settings (option “New – from blank settings”), or
•Copy it from an existing Workflow, that the user can choose from the displayed drop-down list (option “New – copy from”).
When the user presses the “Add” button the workflow name and description are set and then the three sections of a workflow are defined.
Data Source
To define the source of a Workflow follow the steps in the section “External Data Source Definition”:
•Select ADD button
•Select the external data source type
According to the type of the data source, the External Data Source Definition section shows the requested data normalization parameters as described below.
User may also create File Adapter, DB Adapter and Web Service Adapter using the <Create New> item in the available adapters list, and pressing “Apply” button.
File Adapter
Select the name of the File Adapter from the drop-down list, Name (as mentioned in “File Adapter Configuration” only “GET” File Adapters will appear in the list).
•If the type of file is “CSV” it’s necessary to complete the following information:
- Header (yes/no)
- Separator (between columns)
•If the type of file is “Sheet” it’s necessary to complete the following information:
- Header (yes/no)
- 1� column
- 1� row
- Sheet name
•If the type of file is “XML” it’s necessary to complete the following:
- XSL Parser
This parser can be selected in a list containing all “non CC compliant” custom transformations, previously defined in “XSLT Library”. Any XSLT parser developed to manage XML data has to provide a CSV structure, with a “semicolon” as a separator.
•If the type of file is “Project” it’s necessary to complete the following:
- Project Information (TASK, RESOURCE)
This allows the user to extract information from the project file, related to the work breakdown structure, task start and end dates, task duration, task cost; or the resource assignments in task, with earned value information, budget and actual cost and work.
•If the type of file is “DM” it’s necessary to complete the following:
- DM Information (ENTITY_ATTRIBUTES, RELATIONSHIPS)
This allows the user to extract information from DM export file, about Entities, their attributes and Primary Key/Foreign Key roles and Relationships:
oClick the “Apply” button to save the data source
oA preview of the source fields will be shown
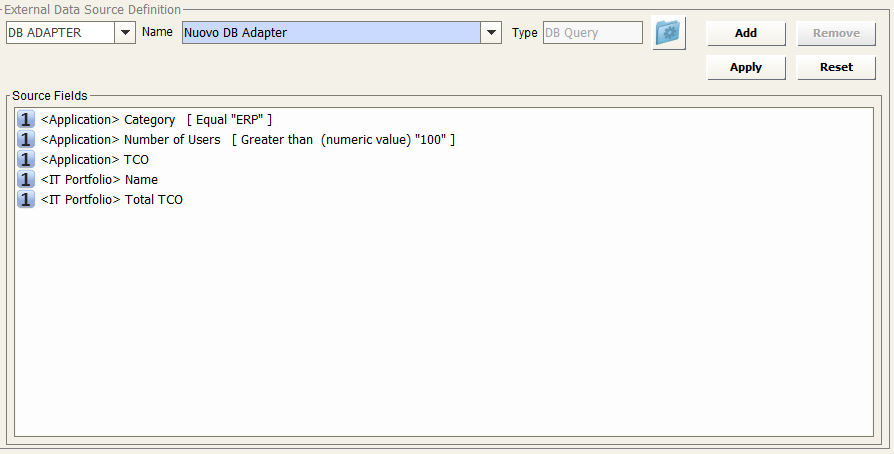
DB Adapter
•Select the name of the DB Adapter from the drop-down list, Name (only DB Query and Stored Procedure Adapters will appear in the list)
•Click the “Apply” button to save the data source
•A preview of the source fields will be shown
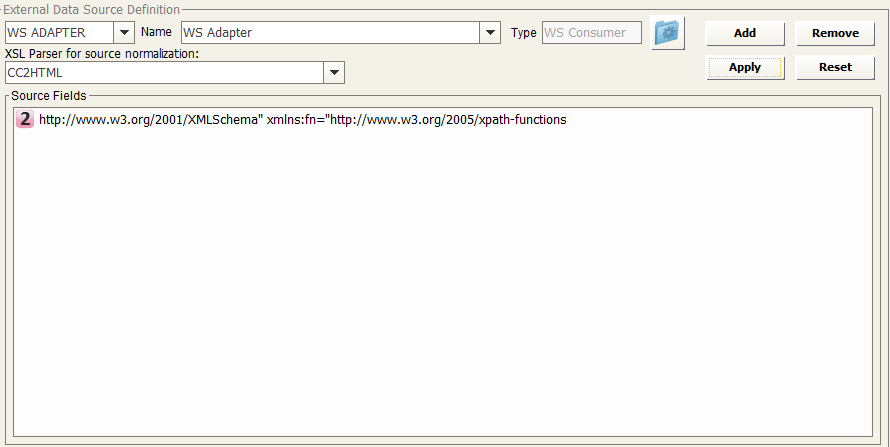
WS Adapter
•Select the name of the Web Services Adapter from the drop-down list
•Select XSL Parser for source normalization from the list. This parser can be chosen in a list containing all “non CC compliant” custom transformations previously defined in “XSLT Library”; in particular, any XSLT parser developed to manage outside XML data has to provide a CSV structure, with “semicolon” as separator, to be effective in this step.
•Click on the “Apply” button to save the data source
•A preview of the source fields will be shown
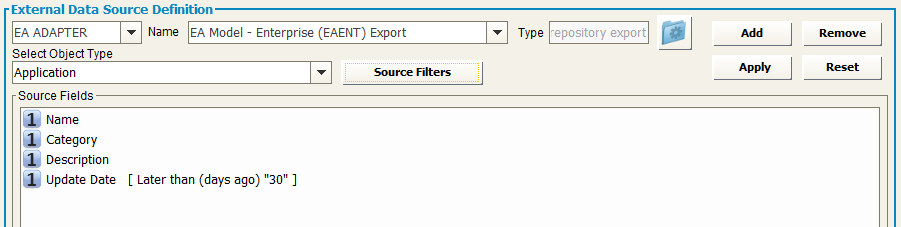
EA Adapter (formerly CM Adapter)
When creating a model configuration, adapters to import / export data from model are automatically created (the working folder is the one set as “Export folder”):
Select the name of the EA Adapter from the drop-down list Name (only the “EA Adapters for import” will be shown in the list)
•Select the object type from the drop-down list “Select Object Type”
•Click on the “Apply” button to save the data source
•A preview of the source fields will be shown
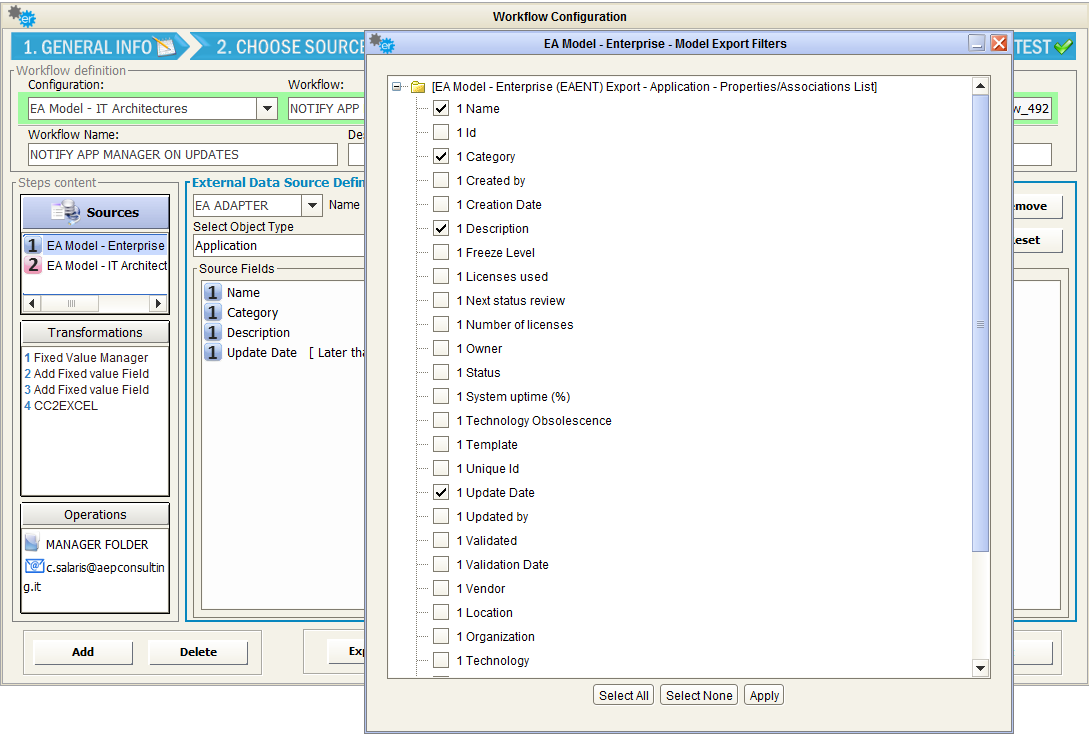
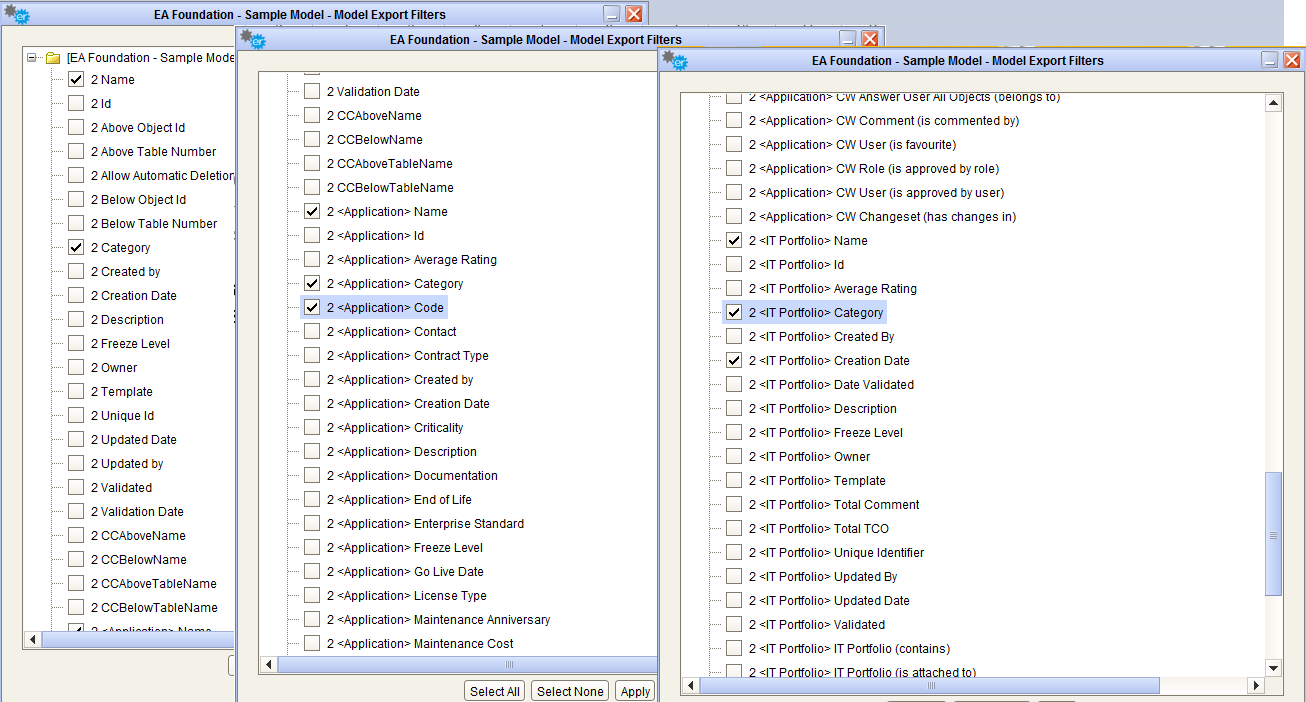
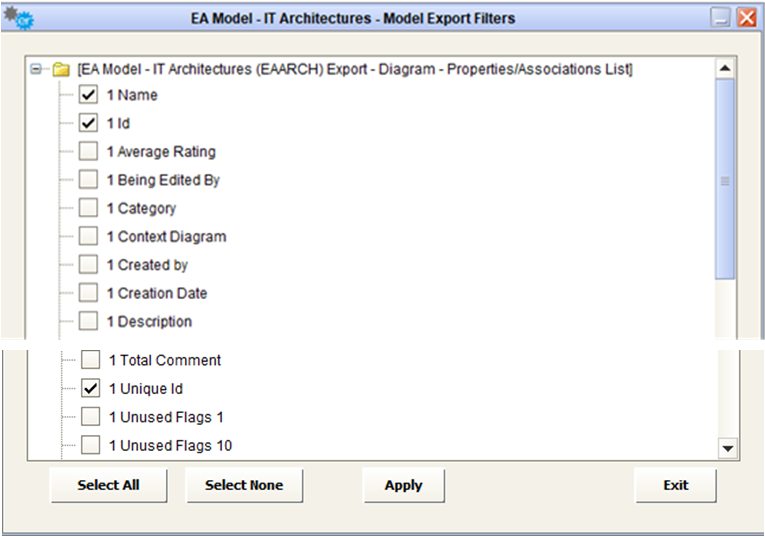
It’s also possible to choose which Properties/Associations extract through an EA Adapter for the selected object type. The “Source Filters” button allow user to pick only the desired information from a model, while default operation includes all of them.
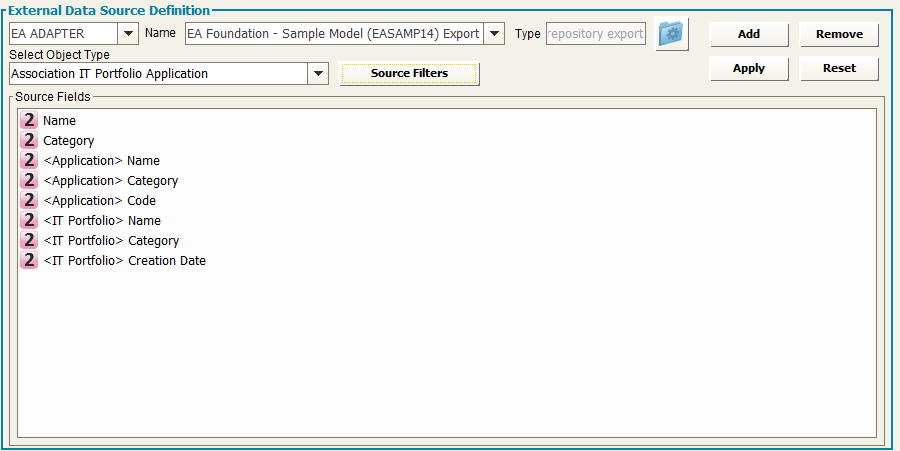
When selecting an intersection object type, the list of exportable fields includes not only the ones defined for the intersection object itself, but the ones defined for associated objects. This way, it’s easy to have with a single data source a combined set of source object and target object of the association:
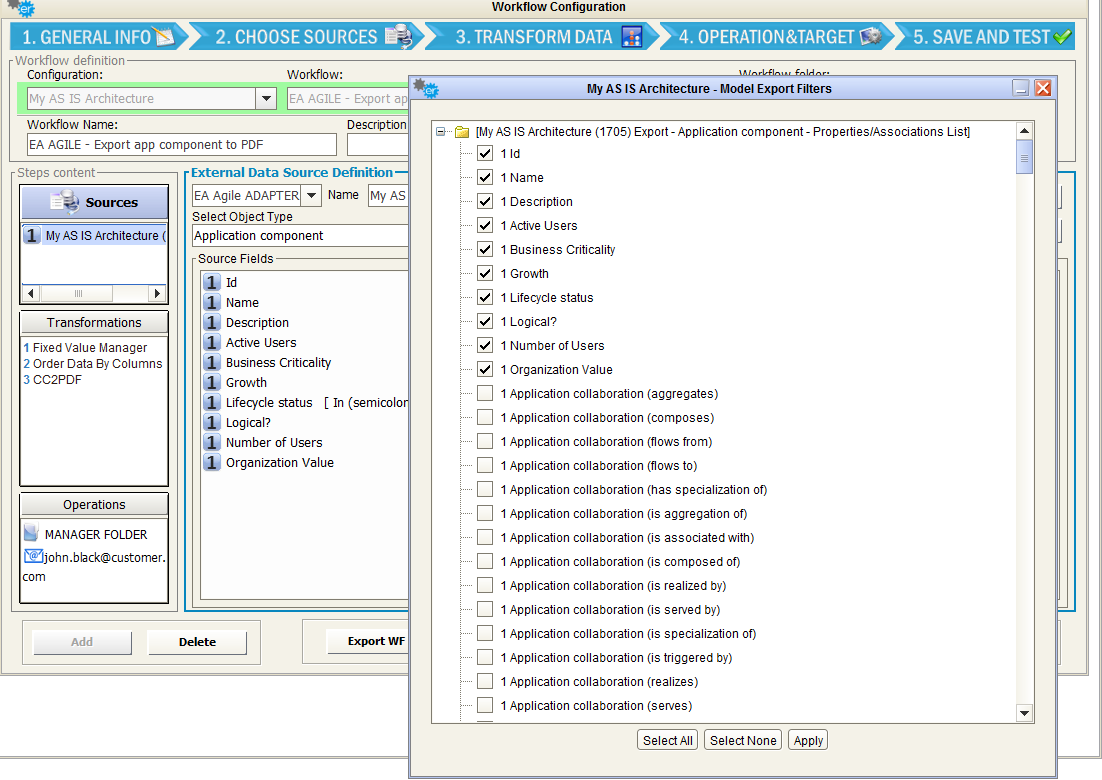
EA Agile Adapter
When creating a workspace configuration, adapters to import / export data from workspace are automatically created (the working folder is the one set as “Export folder”):
•Select the name of the EA Agile Adapter from the drop-down list Name (only the “EA Agile Adapters for export” will be shown in the list)
•Select the object type from the drop-down list “Select Object Type”
•Click the “Apply” button to save the data source
•A preview of the source fields will be shown
It’s also possible to choose which Properties/Associations
extract through an EA Agile Adapter for the selected object type. The “Source Filters” button allow user to pick only the desired information, while default operation includes all of them.
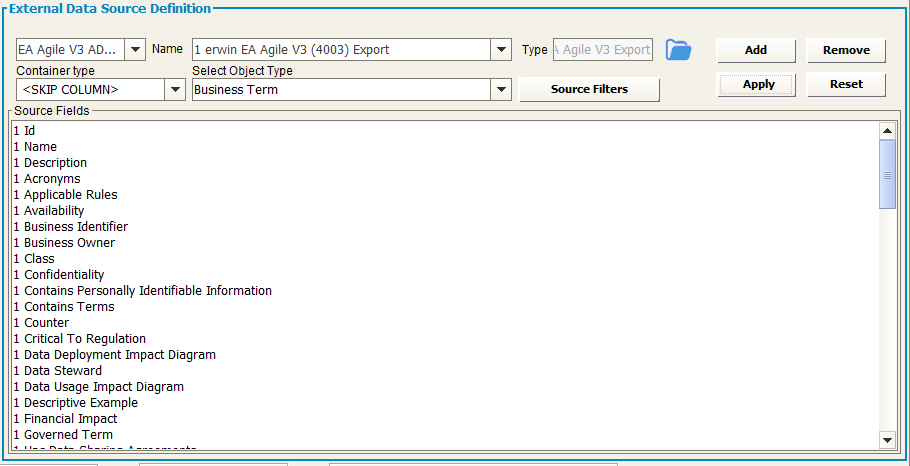
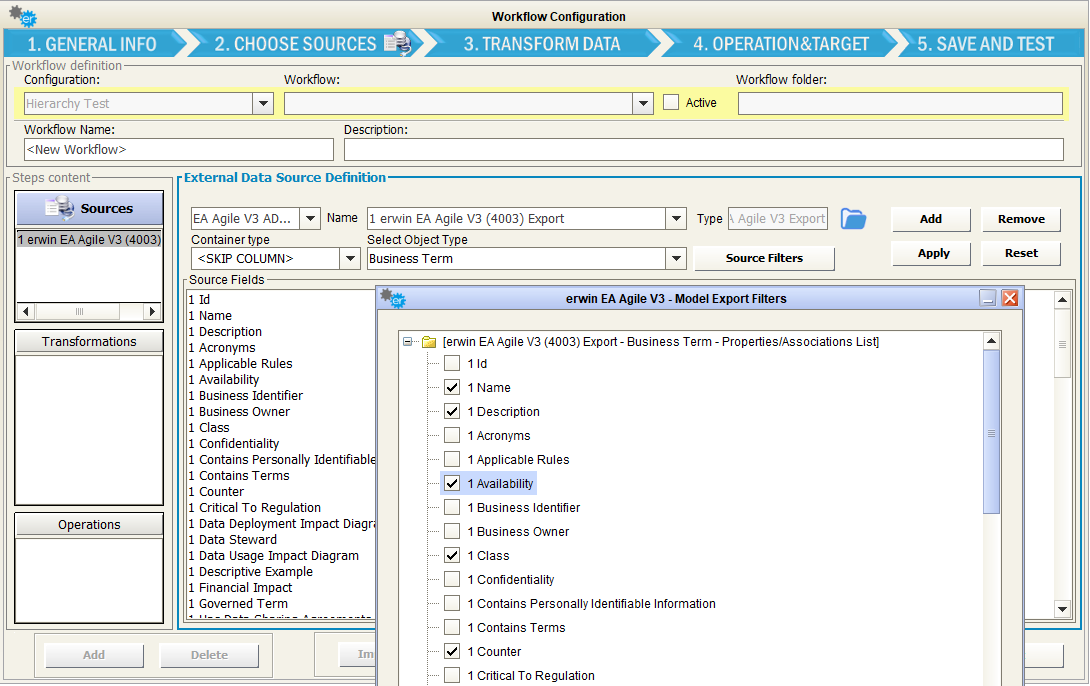
EA Agile V3 Adapter
When creating a workspace configuration for EA Agile V3, adapters to import / export data from the platform are automatically created (the working folder is the one set as “Export folder”):
•Select the name of the EA Agile V3 Adapter from the drop-down list Name (only the “EA Agile V3 Adapters for export” will be shown in the list)
•Select the object type from the drop-down list “Select Object Type”
•Click the “Apply” button to save the data source
•A preview of the source fields will be shown
It’s also possible to choose which Properties/Associations
extract through a EA Agile V3 Adapter for the selected object type. The “Source Filters” button allow user to pick only the desired information, while default operation includes all of them.
It is also possible to optionally select a “Container type” for the selected; for an object type that contains either an object of the same type or the selected object type as a terminal node, the hierarchy of the source object type will be resolved in generated fields. This cannot be combined reliably with the source filters.
Regardless of the data source type, it is possible to insert more than one data source in the same workflow of the same type or of different types); each data source is then marked with a sequence number.
In this case you have a “multi source” workflow, and a specific “multisource job” is created to be scheduled and produce all the different data sets involved at the same time (thus ensuring the time consistency of the whole set of related information). The data sources defined in a workflow will be displayed in the section Source Definition in the left upper area of the Workflow window:
It’s possible to select one of these data sources to modify it. Please be careful, as when a user modifies the source of a workflow, all fields will be deleted for the transformation and mapping rules, where they are not required by the new source definition.
|
|
Please be careful, as when a user modifies the source of a workflow, all fields will be deleted for the transformation and mapping rules, where they are not required by the new source definition. |
The 

|
|
Note that changing the source will result in a transformation and mappings reset unless the new source provides exactly the same source columns as the previous. |
Transformation
To define the transformations in the intermediate step of the new Workflow follow the following steps in the section Transformation Configuration:
•Click on the ADD button to insert a transformation. It’s possible to add more than one transformation for each workflow and apply a specific transformation to the data source fields or to the new columns coming from a previous transformation of the same workflow. - Select the transformation from the “Transformation” and “Activity” drop-down lists
•Click the “Apply” button to apply the selected transformation rule
The available Transformations and Activities are:
Data Cleansing
Data Type Check
The “Data Type Check” Transformation applies in the case the user needs to check the format of the columns and perform an action in case the data format is not compliant with the specified format. The actions are drop text (exclude from the following workflow steps only the invalid format values in the specified column), drop row (exclude from the following workflow steps the whole record containing an invalid value for any specified column) or drop file (discard the entire file – no following operations will be performed). All these configurations may be done separately for each source field.
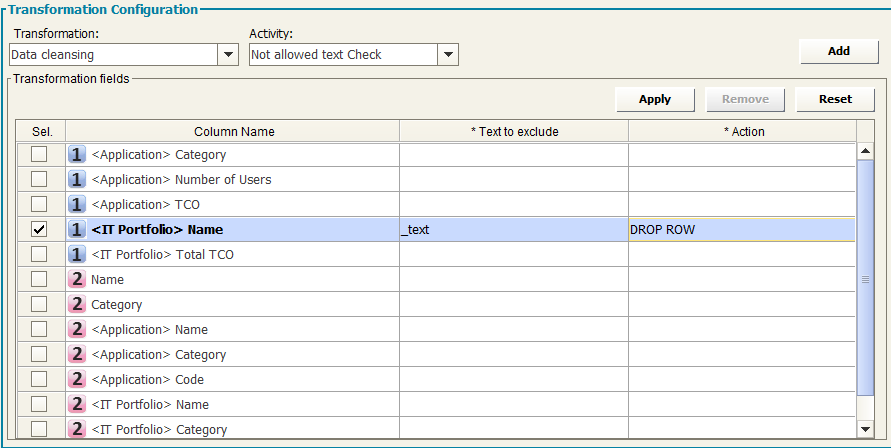
Not Allowed Text Check
The “Not Allowed Text Check” Transformation applies when it’s required to check if in the selected column there is a specific string value and perform an action in the case of invalid data.
If a cell contains a value containing that text (i.e. is not valid) the user can choose the action to perform. The possible choices of action are drop text (remove specified text from the cells in the specified column), drop row (exclude from the following workflow steps the whole record containing an invalid value for any specified column) or drop file (discard the entire file – no following operations will be performed). All these configurations may be done separately for each source field.
Normalize Blank Spaces
The “Normalize Blank Spaces” Transformation applies when it’s required to delete some redundant blank spaces in the cell value. It’s possible to choose between “Left Trim”, “Right Trim”, “Trim (both sides)”, “Normalize Blank Spaces” (this will trim blank spaces from both sides and delete internal spaces between words if more than one. All these configurations may be done separately for each source field.
Data Formatting
Format Date
The “Format Date” Transformation applies if it is required to transform a column with internal data type DATE from a specific source format (for example EUR date format) into a different target format (for example USA date format). If the column value can’t be transformed into the specific format, the user can choose the action to perform. The possible actions are; drop text (exclude from the following workflow steps only the values in the specified column where transformation can’t be performed), drop row (exclude from the following workflow steps the whole record for a specified column where the transformation can’t be performed in any specified column) or drop file (discard the entire file – no following operations will be performed). All these configurations may be done separately for each source field.
Format Number
The “Format Number” Transformation applies if it is required to transform a column with internal data type NUMBER (integer or decimal) from a specific source format (for example EUR number format) into a different target format (for example USA number format). If the column value can’t be transformed into the specified format, the user can choose the action to perform. The possible actions are drop text (exclude only the values in the specified column where the transformation can’t be performed), drop row (exclude the whole record for a specified column where the transformation can’t be performed in any specified column) or drop file (discard the entire file and stop). All these configurations may be done separately for each source field.
Capital/Small letter
The “Capital/Small Letter” Transformation applies if it is required to change the string format of a specific column; the user can choose from Capitalized, To Upper and To Lower. The transformation will be applied to the specified column value. All these configurations may be done separately for each source field.
Suffix/Prefix
The “Suffix/Prefix” Transformation applies if it is required to add a specific string to a specific column value; the user can choose between Suffix and Prefix and insert the string to add as prefix/suffix to the column value. All these configurations may be done separately for each source field.
Replace Text
The “Replace Text” Transformation applies if it is required to replace a specific string value with another string value into a specific column values; the user can edit the text to be replaced and the text to replace it with. Some special replace can be obtained: in a cell containing multi-values separated by commas, for instance, using “\n” to replace “,” will result in a cell containing a list of those values separated by a newline. Also, wildcards can be used: for instance, when asked to replace “PROC*_” with “”, DT will delete this sub word from the cell value regardless of the dynamic part of it. All these configurations may be done separately for each source field.
Special parameter can be used for particular replace requirements:
-<%BLANK%> as text to be replaced: to replace empty text
-<%SYSDATE%> as text to replace with: to obtain datetime (at execution time) in UTC format or <%SYSDATE_EUR%> to obtain datetime in European format or <%SYSDATE_USA%> to obtain datetime in United States format (see here for date format descriptions).
Replace Value on Condition
The “Replace Value on Condition” Transformation applies if it is required to set a specific value if a condition is matched and another if it’s not. The user can edit the condition on the source column, choosing between “Equal”, “Not Equal”, “Less than (numeric value)”, “Greater than (numeric value)”, “Like” or “Not Like” options, and then editing the value to be compared with the source column value. Then the user may pick between the available columns to set the column target to be used in case the condition is matched or not. Parameters can be applied as previous transformation.
Rename and Order Columns
The “Rename and Order Columns” Transformation applies if it is required to change the name of a specific column, and or its order, in the output; the user can choose to rename a column, to give it a different order from the natural one (as coming from the source), or both. The order is not mandatory, while the given orders must not be conflicting. The transformation will be applied to the specified column value. All these configurations may be done separately for each source field.
Selected Value in List
The “Selected Value in List” Transformation applies if it there is a column containing a multiline text, as when exporting from a CM model an object and a list of associated objects, and it’s needed to have a single item of that list, either the first or the last. The user can set the option on the source column, choosing between “First value in List”, “Last value in List”. All these configurations may be done separately for each source field.
Multiple Rows Values to Multiline Cell
The “Multiple Rows Values to Multiline Cell” Transformation applies to get a list of items from a column containing different values, fixed other columns, grouping them in a multiline cell.
Typical use case: when exporting an intersection object type, with couples of associated objects, from a model, for a given couple obj1-obj2, obtain one single row with obj1 and a list of all the obj2 for that obj1 value.
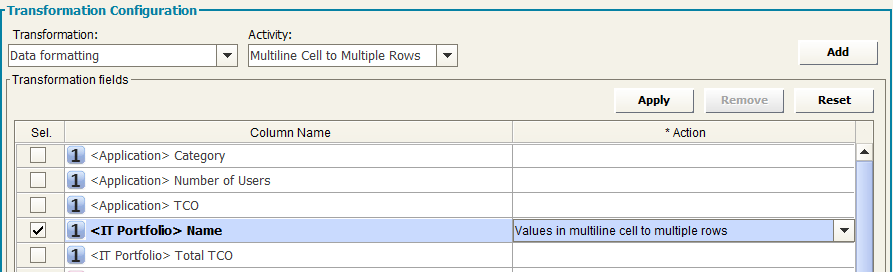
Multiline Cell to Multiple Rows
The “Multiline Cell to Multiple Rows” Transformation applies to get, from a single multi-value (multiline) cell, one different row for one single different value in multiline value
Typical use case: getting an object from CM, with properties and associations and obtain one row per associated object, for selected association type
Group data from datasets
The “Group data from datasets” Transformation applies when data belonging to different dataset must be grouped into one.
Typical use case: different lists of the same object type are provided by different data sources, and must be loaded into model, in a single workflow operation. This can be obtained defining:
•one dataset to be the master (this will contain all merged data): set this option on whatever column in the dataset
•one or more dataset providing data to append by column name (data will be appended to the master one by its columns name): set this option on whatever column in the dataset
•one or more dataset providing data to append by column position (data will be appended to the master one by its columns position): set this option on whatever column in the dataset
After the transformation, the master dataset will contain all data as per configured merging options, and can be used to send data to model:
Sort Data by Columns
The “Sort Data by Columns” Transformation applies if it is required to sort data by column contents. Use columns “Order Index” (1..4) and “Order Type” (“A to Z”, “Z to A”, “Numerical Ascending”, “Numerical Descending”) to have data sorted by the corresponding content and settings.
Compare and Replace
The “Compare and Replace” Transformation applies if it is required to compare two column values, and replace a third or fourth column value, if the condition is matched or not. Check the source column to be compared, set the condition, and the value for the comparison; select the true value (column to be used to replace value of the source, when condition is matched) and false value (column to be used to replace value of the source, when condition is not matched). After the transformation, the source column value will be replaced with the “true” value or “false” value, depending form the result of the condition evaluation.
Value Substring
The “Value Substring” Transformation applies if it is required extract part of a text from the value of a given field. Check the source column, the start from index, and the length of the text to extract. After the transformation, the source column value will be replaced with the extracted text. For instance, applying this transformation to “Application” with a start from equal to 1 and a length of 3, the output will be “App”. Providing a negative number for the start from parameter, the start will be considered from the end of the original string. For instance, applying the transformation to “New York” with a start from equal to -4 and a length of 4, the output will be “York”.
Data Structure Changing
Combine Field
The “Combine Field” Transformation applies if it is required to create a new column as result of the combination of two other column values. The user can insert a name of the new column, the first field of the combine operation, a separator and the second field.
The user must indicate which is the data source to assign to the new column, using the “Adapter to assign column” drop-down list. This new column can be used by another transformation or by the mapping operation. Special chars like “\n” (combine with newline) can be used for specific requirements.
Split Field
The “Split Field” Transformation applies if it is required to create two new columns as result of the splitting an existing column value.
The user can insert the name of the two new columns and the separator that the system must use to perform the split operation. If you have more than one data source, you must indicate which is the data source to assign the new column to, using the “Adapter to assign column” drop-down list. This new column can be used by another transformation or by the mapping operation. Special chars like “\n” (split by newline) can be used for specific requirements.
Add Fixed value field
The “Add Fixed Value Field” Transformation applies if it is required to create a new column with the same value for all the entries. The user can insert a name for the new column and the value to assign to it. When you have more than one data source you must indicate which is the data source to assign the new column to, using the “Adapter to assign column” drop-down list. This new column can be used by another transformation or by the mapping operation. A parameter can be used to populate the new column with the system date and time: <%SYSDATE%> for UTC format, <%SYSDATE_EUR%> for EUR format, <%SYSDATE_USA%> for USA format (see paragraph 1.3.1 for date format descriptions).
Copy Column
The “Copy Column” Transformation applies if it is required to create a new column with the same values of another. The user can insert the name of the new column and the column value to assign to it, picking it from a list of available columns. The user must indicate which is the data source to assign the new column to, using the “Adapter to assign column” drop-down list.
This new column can be used by another transformation or by the mapping operation.
Drop Column
The “Drop Column” Transformation applies if it is required to delete one or more columns from the output. The user must check the column to be deleted and set the action to “DROP COLUMN”. The selected columns will not be included in the resulting output. A second option, “DROP DATASET”, will remove from the output the entire dataset that the column is in.
Data Filtering
Fixed value manager
The “Fixed Value Manager” Transformation applies if it is required to filter the workflow data by some fixed value specified for a given column. The user can insert the format of the column, the filter operator between “Equal”, “Not Equal”, “Greater than”, “Less than”, “Like” or “Not Like”, “Equal sysdate”, “Later than (days ago)”, “Later than (hours ago)”, “Later than (minutes ago)”, “Earlier than (days ago)”, “Earlier than (hours ago)” , “Earlier than (minutes ago)”, “In (semicolon separated)”, “Not in (semicolon separated)” and the value to use as filter. For example, the condition “Not Like” and the value “a” will remove from the resulting dataset all the rows in which that column value does not contain “a” (case sensitive). All the configurations may be done separately for each source field.
When using “Like” and “Not Like”, wildcard “%” can be used to filter content containing text (“%CRM%”: only cells containing “CRM” match filter), starting with text (“CRM%”: only cells starting with “CRM” match filter), ending with text (“%CRM”: only cells ending with “CRM” match filter).
When possible, filters defined as first transformation in the list, for columns coming from a CM Object Type export, are executed at export time, allowing for more compact and less consuming workflow execution.
Interval value manager
The “Interval Value Manager” Transformation applies if it is required to filter the workflow data by a list of possible values specified for a given column. Users have to define the value list, and the separator between the list items. All these configurations may be done separately for each source field.
Distinct values
The “Distinct Value” Transformation applies if it is required to obtain distinct occurrences of data by a list of columns specified as the keyset. Users have to define the columns to be the keyset setting the action “DISTINCT”. The result will contain only one occurrence for any combination of values of the selected “DISTINCT” columns list.
Not All Null values
The “Not All Null values” Transformation applies if it is required to check that at least one value is not null in a list of columns specified by user. Users have to define the columns to be verified setting the action “Check value in Column”. The result will contain only rows containing at least one non null value in the selected columns.
In/Not In Dataset
The “In/Not In Dataset” Transformation applies if it is required to filter one dataset by the condition that a key column value is (not) in the allowed values list, provided by a slave key column in a second dataset. Users have to define for the master dataset a column as the “Key (master)” and a column as the “Key (Slave) – IN” or “Key (Slave) – NOT IN”. The result will contain rows in the master dataset, only if its master key column value (does not) exist in the slave dataset, in the slave key column.
Data Derivation
Match Keys and Pick Values
The “Match Keys and Pick Values” Transformation (former “Format Values On Conditions”) applies if it is required to join values from different data sets, apply conditions to different column values, and then specify a result column value if the conditions (evaluated all together) are matched or not. For first, given two datasets, the user must choose a column for the first and a column for the second, setting one as “Key (master)” and the other as “Key (slave)” for the join operation. Then, for the remaining columns, the user may optionally define a “condition” as described for the “Replace value on condition” transformation: they have to all be matched to make the transformation condition be true. Lastly, the user can choose one or more columns as “result” column, thus choosing which column value to set for it if the condition is true and which if it’s false, picking them from the joined dataset columns. User may also define a single column as “Key (master)/Result”, to be used both as a key for the join, and to host the result when matching occurs.
|
|
Please be sure that column that is identified as “Key (slave)” contains only one occurrence per key value, while this is not mandatory for the master. |
Count Items In Column
The “Count Items In Column” Transformation applies if it is required to evaluate the number of item in a list, with an item per line in a multiline column. The user must give a name for the new column that will contain the number of items (one per line of the multiline cell) and select from a dropdown list the column containing the multiline text. The output column will contain the number of items (lines) in the selected multiline column.
Count Items In Rows
The “Count Items In Rows” Transformation applies if it is required to count the occurrence of a given keyset for several rows. The user must choose one or more columns to be the “Key (for data aggregation)”, a column to be the “Source column (to count items for keyset)” and a third column to be the “Result”. The output will contain a single row for any combination of keys; the “Result” column will contain the count of selected “Source” column in different rows for the same keyset. It can be used for instance to count associated objects for a master object.
Sum Values In Rows
The “Sum Values In Rows” Transformation applies if it is required to sum the numerical values in a selected column for several rows. The user must choose one or more columns to be the “Key (for data aggregation)”, a column to be the “Source column (to sum values from)” and a third column to be the “Result”. The output will contain a single row for any combination of keys; the “Result” column will contain the sum of values in the selected “Source” column in different rows (non numerical values will be skipped).
Sum Values In Columns
The “Sum Values In Column” Transformation applies if it is required to sum the numerical values in selected columns for one single rows. The user must choose one or more columns to be the “Source column (to sum values from)” and another column to be the “Result”. The “Result” column will contain the sum of values in the selected “Source” columns in same row (non numerical values will be skipped).
Divide Values In Two Columns
The “Divide Values In Columns” Transformation applies if it is required to get the division between values in two columns of a dataset . The user must choose one column to be the “Numerator“, a column to be the “Denominator” and a third column to be the “Result (number)” or “Result (percent)”. The output will contain in the “Result” column the division between values in “Numerator” and “Denominator” columns in the selected format (non numerical values will produced a blank result).
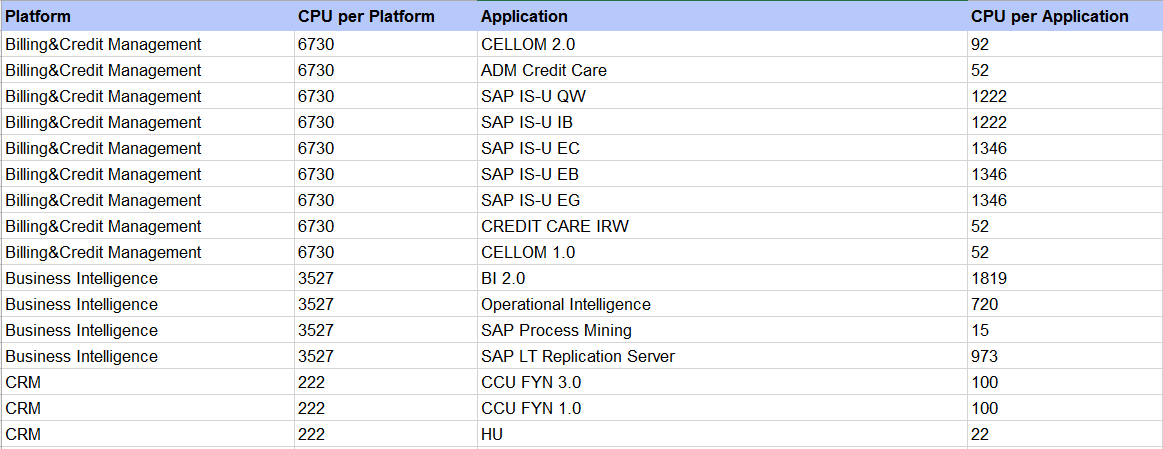
Two Levels Aggregation
The “Two Levels Aggregation” Transformation applies if it is required to sum the numerical values in a selected column for several rows, with two different levels of aggregation.
The user must choose one column to be the “Key (for first level aggregation)“,
•a column to be the “Result (for first level aggregation)”,
•a column to be the “Key (for second level aggregation)”,
•a column to be the “Result (for second level aggregation)”, and
•a column to be the “Source column (to sum values from)”.
The output will contain a single row for any combination of keys; the “Result (for first level aggregation)” column will contain the sum of values in the selected “Source column (to sum values from)” column in different rows, given a single “Key (for first level aggregation)” value, and the “Result (for second level aggregation)” column will contain the sum of values in the selected “Source column (to sum values from)” column in different rows, given a single “Key (for second level aggregation)” value (non numerical values will be skipped).
Typical use case: A model contains a technical chain from server with number of CPU, associated to IT services, associated with application, aggregated in platforms: exporting the two intersection object types, and using the “Sum Values in Rows” for association between servers (with CPU) and IT Services, collecting the CPU for IT Service in the first dataset (association between platform and application), using the IT service as key in “Match keys and pick values” transformation, this output can be obtained:
Custom Transformation
If it is required to apply a custom transformation the user must define a specific XSLT Library using the XSLT Library Configuration Tool (see before).
The user may define a “CC Uncompliant” or “CC Compliant” (compliant to CC schema) XSLT Library item.
|
|
Please note that the “CC uncompliant” custom transformation can't be followed by any other transformation and the workflow operation can only be set to “File Adapter”. |
“CC compliant” transformations are instead not subject to any constraint (besides adhering to CC internal XML schema) when used in workflow transformations.
A number of “CC uncompliant” transformations are included, producing a formatted workflow:
•CC2CSV: produces a csv output file
•CC2HTML
•CC2EXCEL: produces a MS Excel compatible file via XSLT, so that it can be slightly customized
•CC2MSEXCEL: produces an XLSX file through Excel API, not configurable
•CC2OGFF: Produces an Open Group File Format XML output file. Note that this additionally requires the application of a fixed value field (OGFF_Type) specifying the target object type.
A special third type is “CM Compliant” transformations, which means that the output file is an XML ready to be consumed by the import module CM4Collector (i.e. describing target model, operation, objects metamodel, identity constraints, maps and object instances to be uploaded). Using that one, all the user interface setting for operation will be skipped at workflow execution time.
|
|
Please note that saving the entire workflow using the “Save” button will also save the selected transformations. |
It’s possible to insert more than one transformation in the same workflow of the same type or of different types. The transformation defined in a workflow will be displayed in the section “Transformation” in the left middle section of the Workflow window.
It’s possible to select one of these transformations to delete it; if the user deletes a transformation in a workflow, the mapping rules applying to the fields that are no longer required (i.e. created by that transformation) will also be deleted.
Operation
To define the operation of a Workflow follow the steps in the section “Mapping and Operation”:
•Select the operation in the “with operation” drop-down list.
•Optionally, provide the email configuration parameters
According to the rules of the operation type, the Mapping and Operation section shows the requested parameters as described below.
In the “Model Name” field you can see the model linked to the selected configuration.
The user may proceed with the mapping operation in the mapping table, having the requested parameters described in the following list:
Column Name: shows the columns coming from the data source and from the transformation steps; a sequence number that the system assigns to each data source can be seen as prefix to the column name, so the user can easily recognize the source of the data, in the case of multiple data sources.
Column type and format: choose the type and format of the column of the source (String, numeric, boolean, date). This is important if user wants DT to perform a re-format operation on the target column data type.
In particular, to properly import date fields with DT, it’s important to follow the following rules.
First, it’s helpful to configure the query/file in order to have preformatted source data.
In particular, dates coming from data sources that are mapped onto CM datetime property types have to be one of the following:
•DD/MM/YYYY i.e. 31/08/2016 (EUR FORMAT)
•MM/DD/YYYY i.e. 08/31/2016 (USA FORMAT)
•YYYY-MM-DD i.e. 2016-08-31 (UTC FORMAT)
while time, when provided, has to be mandatory in the format:
•HH24:mm:ss
This input date format has to be set in workflow mapping step:
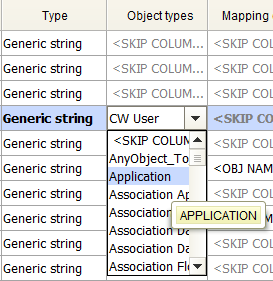
Model object type: choose the model object type to load the data; it’s possible to select different object types in the same operation
Mapping (prop./assoc.): once you have selected the object type you can map the property or the association between the ones defined in CM for that object type.
|
|
Please be sure that the “Name” property of an object type is always mapped, to allow DT to identify the object instance to work with (except for Association Types imports, see later). Take into consideration that you can map Unique ID to keep the values when moving objects from a model to another. |
Type: shows the type of the mapped column of the target (String, numeric, boolean, date)
Action: user can now choose what to do for a single attribute/association mapping. This means that:
•For multiline property: the user can choose between APPEND, REPLACE or EMPTY model values
•For other data type properties: the user can choose EMPTY model values (not for Name or ID)
•For association type: user can choose between MERGE, REPLACE or EMPTY model values
•For property types:
oUUID
oCreated By
oCreation Date
oUpdated by
oUpdated Date
user is requested to choose between two Actions: KEEP TARGET (default) and KEEP SOURCE.
KEEP TARGET: target object property is maintained regardless of what is mapped from the user (the property is skipped)
KEEP SOURCE: target object property is overridden with source property
UUID, Creation Date and Created By properties cannot be updated.
KEEP SOURCE action should be used in a federated models environment and is also supported by Synch in CM Repository
Unique Key: users must check, for all the mapped object types, which set of columns must be considered as the unique keyset when performing the upload of the data. Keep in mind that this setting will work according to the usual Corporate Modeler behaviour, where “Name” has to be unique in the object type instances list, while mapping ID or Unique ID allows object name to be updated. For example, the user may check “Name” as key, and all other properties/associations of an existing object with that name will be updated, or a new object with that name will be created by DT if it is not already in use, or will concatenate it with a sequence number.
Any other mapped column can be included in the keyset, without the “name” – in this case, if an object is identified by the configured keyset, DT will try to update the name with the uniqueness rules described above.
No New: when importing data from an external source, it’s possible that the master list of objects involved in the operation is the one contained in the model. In such a case, the user would want existing objects to be updated (only for the properties used in mapping), but no new objects to be created. If so, user may choose to check “No New” option, on the keyset of the master object type, and this will prevent new objects to be created, while existing will be updated within bounds of mapped properties. The same applies when the object list which has not to be extended is the one related to an object type associated with the master, involved in the operation. In such a case, the user may choose to check the “No New” option, on the record related to the association, and this will prevent new associated objects from being created.
As a result for this operation, data coming from the source adapter will be transformed as defined in “Transformation” step and uploaded into specified model according to the defined mapping rules.
Some additional requirements apply to specific kind of operations, as follows.
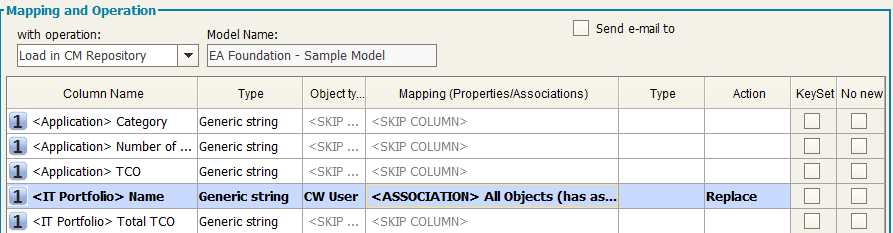
1. In case of “All Objects” type of associations, differently from other type of associations, the target object type has to be specified, allowing a proper execution of data import. To do this, after mapping a source column to an association to all object, it is then mandatory to map one more specific column:
•TARGET_OBJTYPE: scriptname of the object type at the other side of the “all object“ association with the same name, which user wants the objects to belong
To help this mapping, the tooltip of Model Object type, when selecting one, is equal to the SCRIPTNAME of the selected.
This can be added in the source with a fixed value field, with scriptname value, to be then used in mapping.
2. In case of multiple data source, it is implied that the different dataset, alternatively:
Have to be joined, if each of them contains a subset of properties/associations information for the same Object Type. If so, the “Name” property of the object type must be mapped onto each dataset resulting in multiple “Name” mappings – this will be the field used to perform the join operation at runtime on the actual data.
Have to be used to map on different object types; if so, “Name” property must mapped only once for each Object Type.
3. In case of association type, when the user wants, for instance, to import the association’s properties, it is mandatory to map four specific columns:
•CCAboveName: name of the object instance at one side of the association (the one defined as “Source Object Type” at design time)
•CCBelowName: name of the object instance at one side of the association (the one defined as “Target Object Type” at design time)
•CCAboveTableName: scriptname of the object type at one side of the association (the one defined as “Source Object Type” at design time)
•CCBelowTableName: scriptname of the object type at one side of the association (the one defined as “Target Object Type” at design time)
To help the last two mappings, the tooltip of Model Object type, when selecting one, is equal to the SCRIPTNAME of the selected.
4. In case of Users or User Group import operation, which is allowed using the Admin Model configuration, the operation, will be executed within the following conditions:
•New users can be created, if:
oUser Name and Logon Name are both unique - records which are uncompliant to this Corporate Modeler requirement are skipped at import time, and logged into the operation log file
•Password cannot be provided
•Power Level has to be provided, in a numeric form, and is documented by a tooltip:
oUsers - 1 (System Manager), 2 (Project Manager), 3 (Normal User), 4 (Read Only User)
•No new user groups are going to be created; user can only associate users to existing user groups
•The operation key has to be one and only one of the following fields:
•User Name – in that case, for existing objects, fields can be updated, except for Logon Name, Power Level and Password
•Logon Name – in that case, for existing objects, name and other fields can be updated, except for Power Level and Password
•CW ID - in that case, for existing objects, name and other fields can be updated, except for Logon Name, Power Level and Password
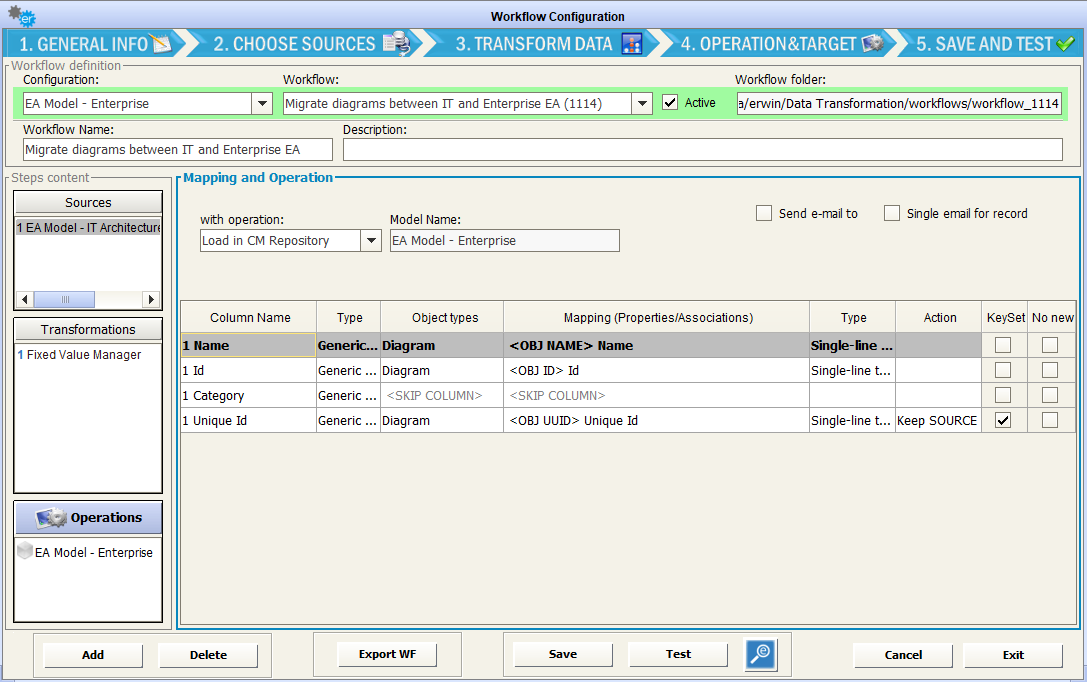
Load in CM Repository - Migrate diagrams between CM Models
The “Load in CM Repository” operation can be used to migrate Diagrams between CM Models. To enable this migration, both source and target model configuration must be created, and diagram migration utilities must be located into erwin EA (Corporate Modeler) bin folder, see Installation guide for instructions.
Then, create a workflow selecting the target model configuration, and select as the source model EA Adapter, Diagram object type as data source, selecting at least Name, Id, Unique Id fields:
Other fields, like Category, Parent Object/Parent object name etc can also be selected to be used to filter diagrams of interest, if desired.
Finally, select the “Load in CM Repository” mapping name, Id, Unique Id as mandatory fields, using Unique Id as key for the operation, with Action “Keep SOURCE” or “Keep TARGET” as desired:
All other mappings are unnecessary, since the diagram migration component will take care of moving diagram properties and associations, diagrammed objects and actual diagram image content (shapes, connectors etc)
The migration will actually work under the following conditions:
1.Workflow operation involves the object type DIAGRAM
2.CwImport.exe, CwSingleExport.exe, CwSingleExportAndImport.exe are found into Corporate Modeler bin folder (see Installation Guide)
3.Source and target models share the same design, at least for diagrammed objects
Please note that the diagrams already existing into target model, based on their UUID, are exported in XML (“Diagrams_DT_TARGET_BAK_YYYYMMDD_hh24mmssmillis.xml” into operation folder) for backup and rollback support, before being updated.
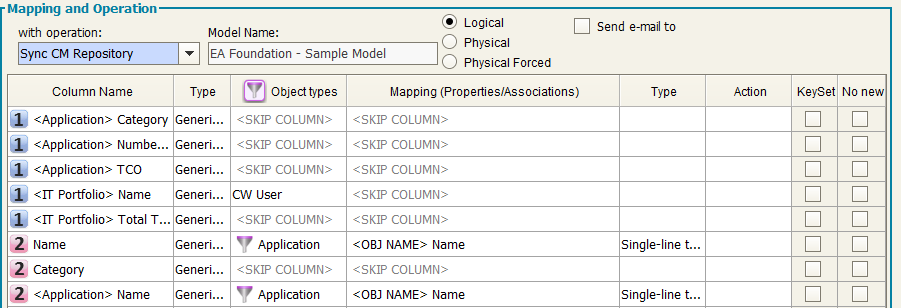
Delete in CM Repository
When selecting this operation, the only mandatory mapping is the NAME of the object type that the user wants to manage: as a result of this operation, data coming from the source adapter will be physically deleted in the specified model accord to the defined mapping rules, for the ones that are not diagrammed (while diagrammed ones will be listed in the operation log file).
When selecting this operation, it is mandatory that user choose a keyset that’s unique in the source dataset to avoid undesired results. In particular:
•Objects coming from the source dataset will be inserted/updated in the specified model accord to the defined mapping rules
•Objects already in the specified model object type, that are not listed in the source dataset, will be:
oWhen “logical” option is set, logically deleted, and renamed with the prefix “_TO_BE_DELETED_”
oWhen “physical” option is set, physically deleted, if not diagrammed, or renamed with the prefix “_TO_BE_DELETED_” if diagrammed
oWhen “physical forced” option is set, physically deleted, even if diagrammed
If the synchronization operation must be done against a subset of objects, and not the whole set of instances (for example, when contributing external source are more than one for a given object type, each one managing a set of instances, like a CMDB providing data for “Applications in Production environment”), this can be managed using the sync filters interface.
Double clicking on the “filter” icon on object type column name
Opens a popup window allowing the creation of sync filters and showing previously defined filters:
User can add, delete (uncheck the filters to be deleted) and apply desired filters.
When the sync operation is defined to be executed according to filters, the involved object type name will be marked with a specific filter icon in the map table, the name will be plain otherwise:
For filtered sync option, the load step will follow the usual behavior, while the deletion of redundant object instances will be done within the filtered subset on objects compliant with the filters.
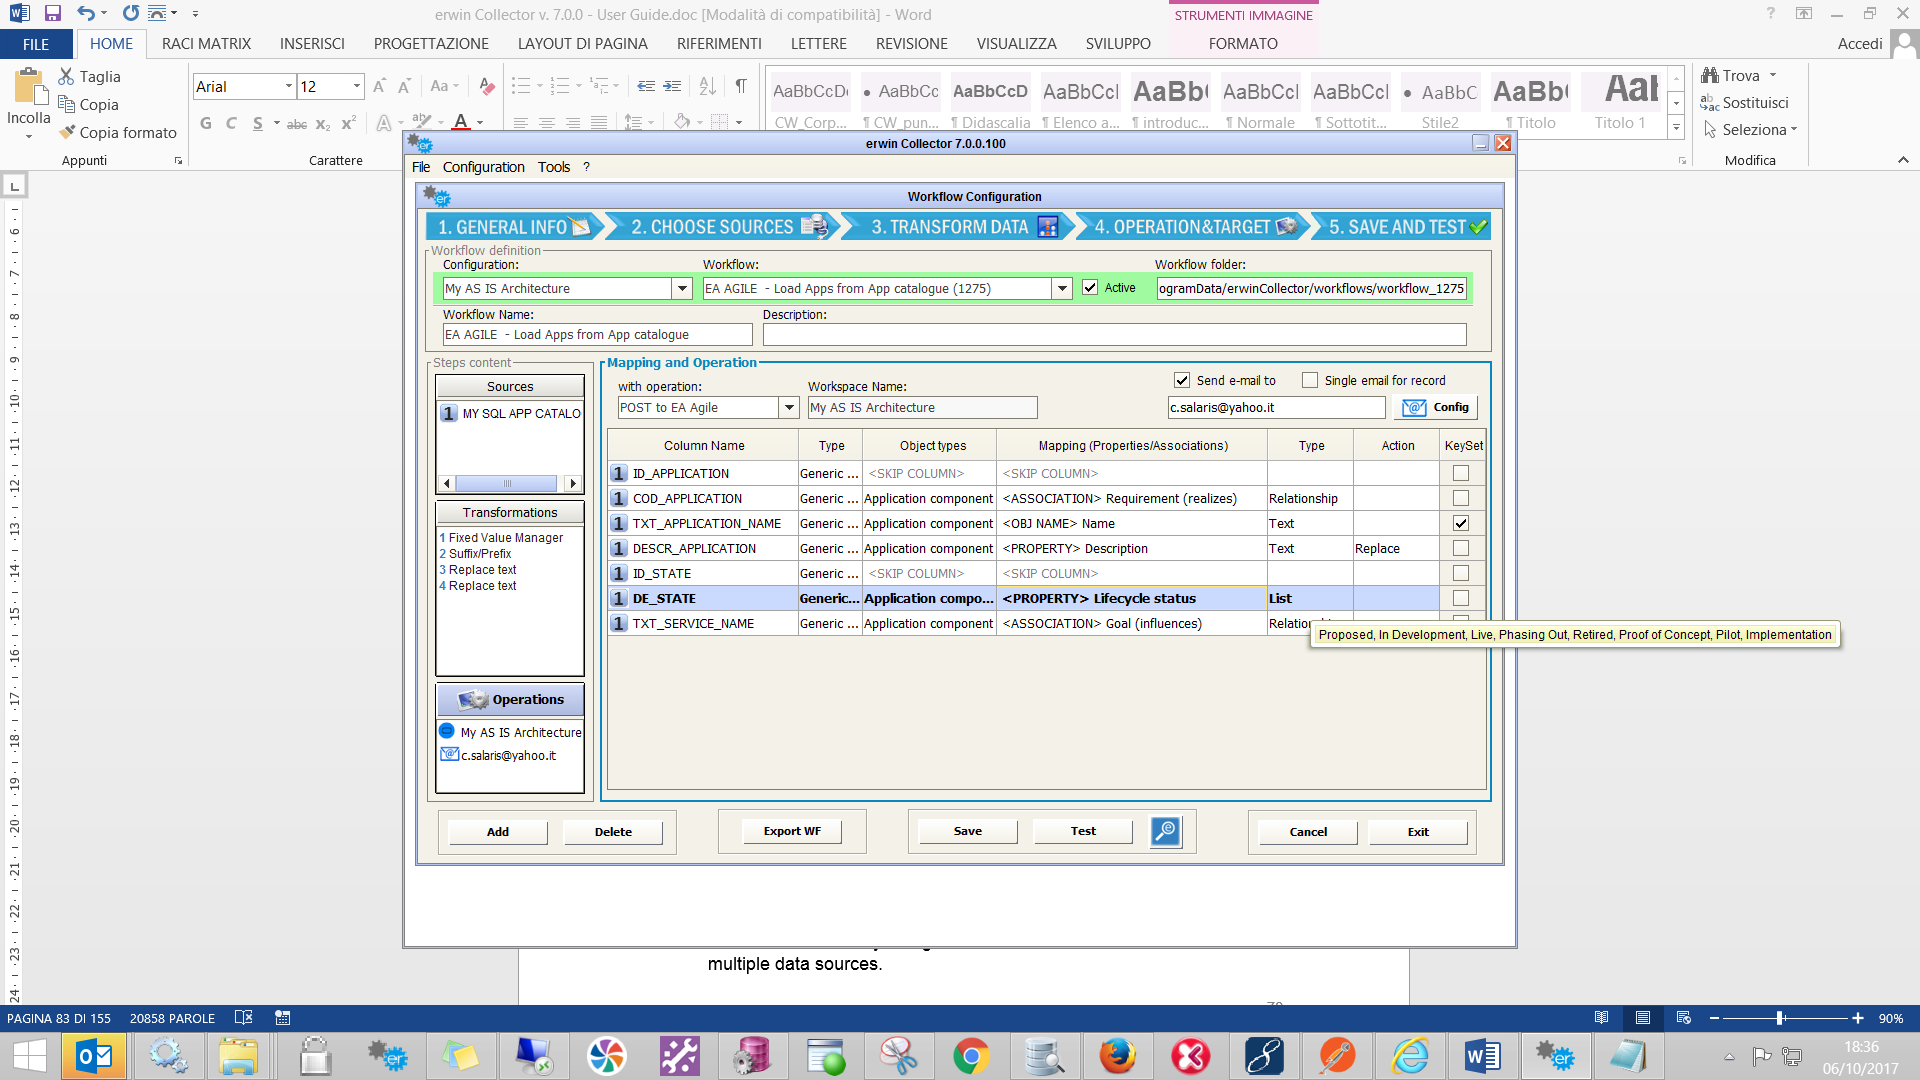
POST to EA Agile
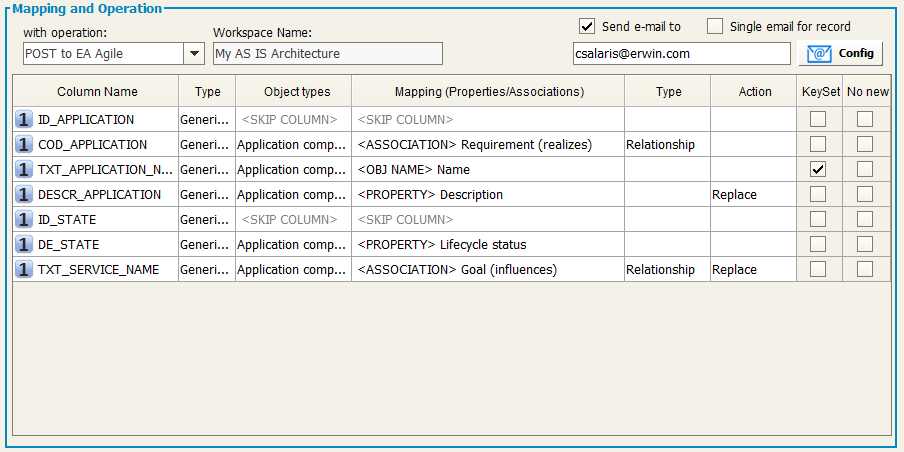
In the “Workspace Name” the name of target workspace will be shown.
User may proceed with the mapping operation in the mapping table, having the requested parameters described in the following list:
Column Name: shows the columns coming from the data source and from the transformation steps; a sequence number that the system assigns to each data source can be seen as prefix to the column name, so the user can easily recognize the source of the data, in the case of multiple data sources.
Column type and format: choose the type and format of the column of the source (String, numeric, boolean, date). This is important if user wants DT to perform a re-format operation on the target column data type.
Date in UTC format
Date / Datetime
The following ISO-8601 formats are supported:
•YYYY-MM-DD (e.g. 2019-01.28)
•YYYY-MM-DDThh:mm (e.g. 2019-01-28T01:02)
•YYYY-MM-DDThh:mm:ss (e.g. 2019-01-28T01:02:03)
•YYYY-MM-DDThh:mm:ssTZD (e.g. 2019-01-28T01:02:03+04:05)
When positing to EA Agile, if a time and offset are not provided, these will default to 00:00Z (i.e. 00:00+00)
Date Ranges
For the supported UTC date formats outlined above, DT supports the following separators:
•$UTCDATE/$UTCDATE
•$UTCDATE,$UTCDATE
•$UTCDATE;$UTCDATE
•start:$UTCDATE end:$UTCDATE
•start: $UTCDATE end: $UTCDATE
Date in EUR format
Date / Datetime
The following formats are supported:
•dd/MM/yyyy (e.g. 28/01/2019)
•dd/MM/yyyy HH24:mm (e.g. 28/01/2019 13:01)
•dd/MM/yyyy HH24:mm:ss (e.g. 28/01/2019 13:01:02)
•dd/MM/yyyy HH:mm AM/PM (e.g. 28/01/2019 01:01 PM)
•dd/MM/yyyy HH:mm:ss AM/PM (e.g. 28/01/2019 01:01:02 PM)
•dd/MM/yyyy HH:mmAM/PM (e.g. 28/01/2019 01:01PM)
•dd/MM/yyyy HH:mm:ssAM/PM (e.g. 28/01/2019 01:01:02PM)
Date Ranges
For the supported EUR date formats outlined above, DT supports the following date range formats:
•start:$EURDATE end:$EURDATE
•start: $EURDATE end: $EURDATE
•$EURDATE;$EURDATE
•$EURDATE,$EURDATE
Date in USA format
Date / Datetime
The following formats are supported:
•MM/dd/yyyy (e.g. 01/28/2019)
•MM/dd/yyyy HH24:mm (e.g. 01/28/2019 13:01)
•MM/dd/yyyy HH24:mm:ss mm (e.g. 01/28/2019 13:01:02)
Date Ranges
Dates ranges may be formatted as:
•start:$USADATE end:$USADATE
•start: $USADATE end: $USADATE
•$USADATE;$USADATE
•$USADATE,$USADATE
This input date format has to be set in workflow mapping step:
Object type: choose the model object type to load the data; it’s possible to select different object types in the same operation
Mapping (prop./assoc.): once you have selected the object type you can map the property or the association between the ones defined in EA Agile for that object type.
|
|
Please be sure that the “Name” property of an object type is always mapped, to allow DT to identify the object instance to work with (except for Association Types imports, see later). |
About associations mappings, multiple values can be associated putting the different values in a single cell, newline separator. Other separators can be replaced with “Data Formatting: Replace Text”:
If an association is of “composition” type, like “Entity is part of Data Model”, the action “set as parent” must be selected from drop down list in order to properly identify objects parent in the platform.
Type: shows the type of the mapped column of the target (String, numeric, boolean, date). To help the user in mapping, in case of list or key values allowed values are shown in the “type” cell tooltip:
No New: when importing data from an external source, it’s possible that the master list of objects involved in the operation is the one contained in the workspace. In such a case, the user would want existing objects to be updated (only for the properties used in mapping), but no objects from being created. If so, the user may choose to check the “No New” option, on the keyset of the master object type, and this will prevent new objects from being created, while existing will be updated within bounds of mapped properties.
The same applies when the object list which has not to be extended is the one related to an object type associated with the master, involved in the operation. In such a case, user may choose to check “No New” option, on the record related to the association, and this will prevent new associated objects from being created.
Delete in EA Agile
When selecting this operation, user should map only the “Name” of the object type that he wants to manage: as a result of this operation, data coming from the source adapter will be deleted in the specified workspace according to the defined mapping rules.
POST to EA Agile V3
In the “Workspace Name” the name of target workspace will be shown (“Default”).
User may proceed with the mapping operation in the mapping table, having the requested parameters described in the following list:
Column Name: shows the columns coming from the data source and from the transformation steps; a sequence number that the system assigns to each data source can be seen as prefix to the column name, so the user can easily recognize the source of the data, in the case of multiple data sources.
Column type and format: choose the type and format of the column of the source (String, numeric, boolean, date). This is important if user wants DT to perform a re-format operation on the target column data type.
Date in UTC format
Date / Datetime
The following ISO-8601 formats are supported:
•YYYY-MM-DD (e.g. 2019-01.28)
•YYYY-MM-DDThh:mm (e.g. 2019-01-28T01:02)
•YYYY-MM-DDThh:mm:ss (e.g. 2019-01-28T01:02:03)
•YYYY-MM-DDThh:mm:ssTZD (e.g. 2019-01-28T01:02:03+04:05)
When positing to EA Agile, if a time and offset are not provided, these will default to 00:00Z (i.e. 00:00+00)
Date Ranges
For the supported UTC date formats outlined above, DT supports the following separators:
•$UTCDATE/$UTCDATE
•$UTCDATE,$UTCDATE
•$UTCDATE;$UTCDATE
•start:$UTCDATE end:$UTCDATE
•start: $UTCDATE end: $UTCDATE
Date in EUR format
Date / Datetime
The following formats are supported:
•dd/MM/yyyy (e.g. 28/01/2019)
•dd/MM/yyyy HH24:mm (e.g. 28/01/2019 13:01)
•dd/MM/yyyy HH24:mm:ss (e.g. 28/01/2019 13:01:02)
•dd/MM/yyyy HH:mm AM/PM (e.g. 28/01/2019 01:01 PM)
•dd/MM/yyyy HH:mm:ss AM/PM (e.g. 28/01/2019 01:01:02 PM)
•dd/MM/yyyy HH:mmAM/PM (e.g. 28/01/2019 01:01PM)
•dd/MM/yyyy HH:mm:ssAM/PM (e.g. 28/01/2019 01:01:02PM)
Date Ranges
For the supported EUR date formats outlined above, DT supports the following date range formats:
•start:$EURDATE end:$EURDATE
•start: $EURDATE end: $EURDATE
•$EURDATE;$EURDATE
•$EURDATE,$EURDATE
Date in USA format
Date / Datetime
The following formats are supported:
•MM/dd/yyyy (e.g. 01/28/2019)
•MM/dd/yyyy HH24:mm (e.g. 01/28/2019 13:01)
•MM/dd/yyyy HH24:mm:ss mm (e.g. 01/28/2019 13:01:02)
Date Ranges
Dates ranges may be formatted as:
•start:$USADATE end:$USADATE
•start: $USADATE end: $USADATE
•$USADATE;$USADATE
•$USADATE,$USADATE
Object type: choose the model object type to load the data; it’s possible to select different object types in the same operation
Mapping (prop./assoc.): once you have selected the object type you can map the property or the association between the ones defined in EA Agile V3 for that object type.
|
|
Please be sure that the “Name” property of an object type is always mapped, to allow DT to identify the object instance to work with (except for Association Types imports, see later). |
About associations mappings, multiple values can be associated putting the different values in a single cell, newline separator. Other separators can be replaced with “Data Formatting: Replace Text”:
If an association is of “composition” type, like “Entity is part of Data Model”, the action “set as parent” must be selected from drop down list in order to properly identify objects parent in the platform.
Type: shows the type of the mapped column of the target (String, numeric, boolean, date). To help the user in mapping, in case of list or key values allowed values are shown in the “type” cell tooltip:
No New: when importing data from an external source, it’s possible that the master list of objects involved in the operation is the one contained in EA Agile V3 workspace. In such a case, the user would want existing object to be updated (for the only properties used in mapping), but no objects to be created. If so, user may choose to check “No New” option, on the keyset of the master object type, and this will prevent new objects to be created, while existing will be updated within bounds of mapped properties. The same applies when the object list which has not to be extended is the one related to an object type associated with the master, involved in the operation. In such a case, user may choose to check “No New” option, on the record related to the association, and this will prevent new associated objects to be created.
Delete in EA Agile V3
When selecting this operation, user should map only the “Name” of the object type that he wants to manage: as a result of this operation, data coming from the source adapter will be deleted in the specified workspace according to the defined mapping rules.
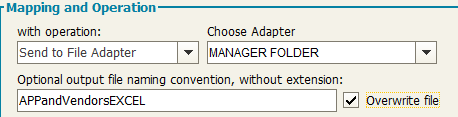
Send to File Adapter
•Choose the File Adapter in the “Choose Adapter” drop-down list (only the “PUT” File Adapter will be available in the list)
•Optionally, define a customized name for the ouput file, without the extension (it will be .xml, if no final custom transformation is applied; it will be .csv, if Custom transformation (CC uncompliant):CC2CSV transformation is applied, or .xls, for Custom transformation (CC uncompliant):CC2EXCEL, or .html, for Custom transformation (CC uncompliant):CC2HTML, etc). Moreover, the user can choose between overwriting file if existing, or have a different file for different executions (in this case, the name will be post fixed with a timestamp)
As a result of this choice, data coming from the source adapter will be transformed as defined in “Transformation” step and sent to the File Adapter folder. When completed it will be delivered to the destination.
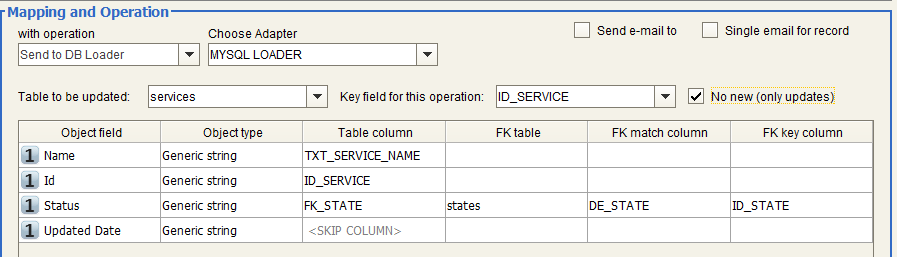
Send to DB Loader
•Select the Table to be uploaded with data, coming from the source and transformations of the workflow, among the ones owned by the user specified at DB Loader Adapter configuration time.
•Select the Key column among the ones describing the Table, to be used to allow DT to properly perform an “INSERT” or “UPDATE” SQL command at runtime, for any given field value occurrence in input data.
•Then, for each input column name the user may alternatively:
1. Map onto a specified column of the previously chosen table, when the input value is natively hosted by that
2. Map onto a specified column of the previously chosen table, when this contains the foreign key of another table in the same database, actually containing the input values, providing:
oThe name (“FK table”)
oThe column hosting the input values (“FK match column”)
oThe column hosting the foreign keys for given table (“FK key column”)
•The option “No New (only updates)” allows user to set import operation to be limited to updates on selected table
As a result of this choice, data coming from the source adapter will be transformed as defined in “Transformation” step and sent to the DB Loader Adapter for the upload operation previously defined.
Web Service POST
Choose the Web Service POST Adapter in the “Choose Adapter” drop-down list (only the Web Service “POST” Adapters will be available in the list)
As a result of this choice, data coming from the source adapter will be transformed as defined in “Transformation” step and sent to the Web Service, as defined in its configuration.
Evolve Site Import
In order to copy Evolve sites from model to model, you should consider that:
•A target site has to be created before executing the operation
•Only the following components are copied from source model to target model: Menu, Index Pages, Object Pages, Diagram Popouts, Diagram Designer Layouts
•If you want to manage Diagram Designer Layouts you should enable target model with Diagram Designer
•If any objects is already defined in the target site it will be overwritten
•It is recommended that all the pages linked to source Evolve site, should not be associated to other Evolve sites
The following instructions have to be followed in order to copy an Evolve Site. It is recommended to back up your target model before the operation, as a bad configuration may result in a loss of information.
1. Create a new workflow configuration on your target model configuration
2. Select as source EA Adapter and select the export adapter related to your source model
3. Select CW Site as object type and filter only Name and Description properties
4. Add a second source EA Adapter and select the export adapter related to your source model: select CW View as object type and filter the following properties/associations:
a. Name
b. App Type
c. Business Description
d. Category
e. Description
f. Display Name
g. Hash Code
h. Root Object Type
i. CW Site (belongs to (index))
j. CW Site (belongs to (single))
k. CW Site (belongs to (diagram pop out))
5. (Optionally, only if you want to copy Diagram Designer Layouts) Add a third source EA Adapter, select the export adapter related to your source model and filter the following properties:
a. Name
b. Automatic Diagram
c. Category
d. Description
e. Enabled Version
f. Root Object Type
6. Add a Fixed Value Manager transformation on the following columns:
|
Src. Number |
Column Name |
Consider as |
Operator |
Value |
|
1 |
Name |
String |
Equal |
source_site_name |
|
2 |
CW Site (belongs to (index)) |
String |
In (semicolon separated) |
;source_site_name* |
|
2 |
CW Site (belongs to (single)) |
String |
In (semicolon separated) |
;source_site_name* |
|
2 |
CW Site (belongs to (diagram popout) |
String |
In (semicolon separated) |
;source_site_name* |
*: use semicolon in value cell as specified
7. Add a Replace Text transformation on the following columns:
|
Src Number |
Column Name |
Text to be replaced |
Replace with |
|
1 |
Name |
source_site_name |
target_site_name |
|
2 |
CW Site (belongs to (index)) |
source_site_name |
target_site_name |
|
2 |
CW Site (belongs to (single)) |
source_site_name |
target_site_name |
|
2 |
CW Site (belongs to (diagram popout) |
source_site_name |
target_site_name |
8. Choose the operation Evolve Site Import that will automatically map all needed fields
Email Configurations
The email notification allows the user to be easily aware of what’s going on with DT operations, particularly for the owners of model information managed by the tool.
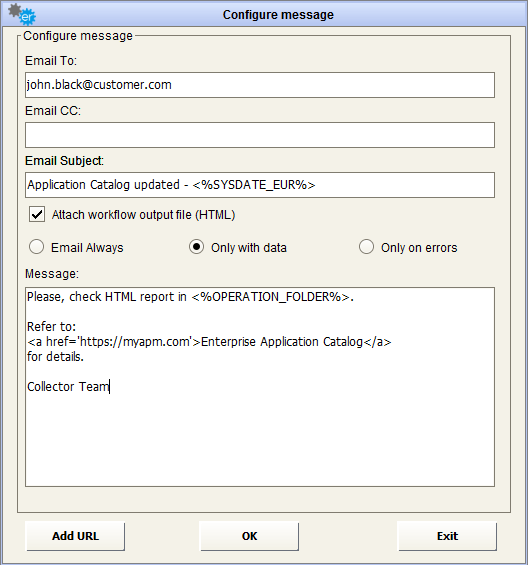
Notification email for the workflow operation results can be configured with a custom setting for recipients, CC recipients, email subject and message text.
The workflow output, in HTML format, will be attached to email. If it is not needed – for example, the workflow is configured to produce a file that will be also attached to email – the option “Attach workflow output file” should be deselected:

another option is provided to send email always (per default), only with data, or only on errors:
Some parameters can be used in subject or message text:
•<%SYSDATE%>,<%SYSDATE_EUR%>,<%SYSDATE_USA%>,<%SYSDATE_UTC%>: replaced at execution time with date time, using requested format.
•<%OPERATION_FOLDER%>: replaced at execution time workflow operation folder path.
•<%WORKFLOW_FOLDER%>: replaced at execution time workflow folder path.
The email can contain links to specified URL: just use “Add URL” button to have a sample link text and replace your own site address and name:
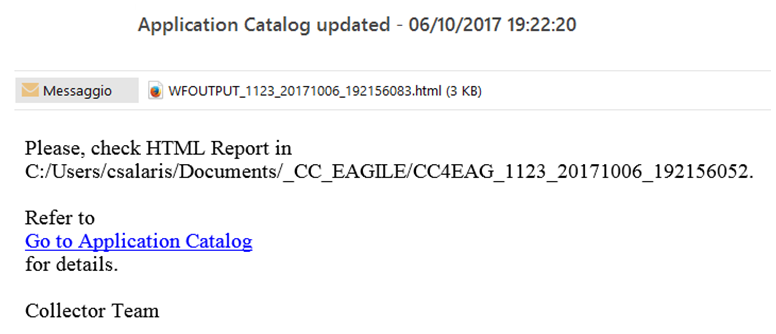
The resulting email looks like this:
It is possible to use the option “Single email for record” to send a notification for each input dataset record.
Users may put parameters in the email configuration using column name to give specific information regarding the recipient: to be recognized by DT as a parameter, a column name must be enclosed between a prefix “<%” and a suffix “%>”.
For instance if the first dataset of a workflow has a column named “1 AM email”, containing the application manager email related to the column “1 Application name”, a proper email recipient could be configured in the email as <%1 AM email %> and the subject of the message could be:
“Application <%1 Application name%> has been updated in EA model”
This setting, when the “Single email for record” option is selected, produces a single notification per source dataset record, replacing parameters with their value as read from the input.