Sequential headers and footers
A report can have multiple headers. The reason you placed the header and footer as the first and second component in the PDF Layout’s Views tab was to have them registered by the report generator before any body views. Perhaps the table of hosts in your environment spans more than one page. If the footer is placed after the table component, it does not appear until after the table. In fact this is true even if the table contains only a few rows. The report generator delays emitting the footer until the page after the table is drawn. In the first part of this exercise, there is no page after the first, so the footer does not appear at all.
Therefore, to switch headers or footers, place the new header or footer component before the view that should begin the new page. If necessary, emit a page break between the header and the new component. Using this technique, it is possible to have different headers and footers in all sections of a long report.
Tutorial 7: Creating a Form
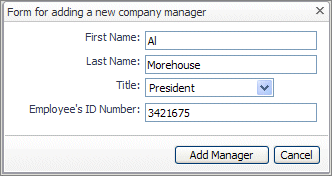
This tutorial shows you how to create a form and populate it with data. For the purpose of this tutorial, we use a Form Dialog as a form because this component contains a number of input components and as such can behave like a form. When completed, the end user fills in various input values on the form. In this tutorial, the form fields are placed in a Grid Layout, and the Grid Layout is placed in a Form Dialog container, and clicking the Form Dialog’s Submit button transmits this data to the server. The Form Dialog that we use in this tutorial is called Form for adding a new company manager. The Grid Layout that contains the input controls is called Bean Data Fields for Manager. The Grid has only a few fields, but it illustrates the general idea. A form can have any number of input fields. The dialog supplies the button that initiates the submit action.
|
• |
About this Tutorial
This tutorial covers the following topics:
|
• |
Using the Dialog component as a form: The Form Dialog component can be used to perform a batch submit of its data. When used in this way, it is normally referred to as a form. |
|
• |
Defining Web Component User Interface Types: If you are building a complex user interface, you often discover the need to create temporary objects to manage the visual components you are creating. You may need to capture input from users and convert it later into more persistent objects, or to remember choices that a user previously made in order to streamline the user’s workflow in the future. |
|
• |
Using Bean Input components: The Web Component Framework provides a mechanism for collecting user data. The collected data can be stored in context keys and passed from the form that collects them to other views, but for many data fields a much more efficient solution exists by using Bean Input components. |
|
• |
Storing or removing the collected data using Groovy function scripts: This tutorial shows you how to create scripts that persist the collected data, but it assumes that you have a working knowledge of Foglight API and that you are familiar with Groovy. It makes no attempt to be a tutorial for the Foglight API or for Groovy. |
|
• |
Using a function to control the state of a button: In addition to the four main objectives, an additional activity demonstrates a simple procedure for controlling a button’s Disabled property. The only parameter passed to the function is a number, which is generated by a Context binding that returns the count of all managers by setting the return type to the context’s Count All property. |
Anatomy of a form and its design objective
The basic elements of a form are:
|
• |


