
Using If Condition Activity
Summary
This tutorial demonstrates how to use the If Condition activity in Automation scripts.
In this tutorial you will learn:
- How to use the If Condition activity in Automation
You will need:
- A sample batch file or executable file to run from your script

Introduction
When building an Automation script you might find that you want to execute a set of activities only when a certain condition exists. In this case you want to use the If Condition activity. The If Condition allows you to instruct your script to execute one or more activities if a condition you specify is true.
You can add several branches to the If Condition activity to simultaneously evaluate more than one condition. This allows you to have multiple code paths in your script. Please note that the If Condition is not an If Else statement. Each branch only executes if the condition resolves to true. Multiple branches can be true. If all branches resolve to false, then none of the branches execute.
To learn how to use the If Condition to automate exception reporting, see the tutorial, Automate Exception Reporting. In that tutorial, you learn how to use the If Condition activity to evaluate the row-count variable generated by a Select to File activity. The evaluation is then used to determine whether or not to distribute the report.
Create Script
The most obvious use case for the If Condition activity is to evaluate the value of a variable. So in this tutorial you will evaluate the value of the return code variable generated by the Run Program activity.
- To get started, select Tools | Automation to open a new Automation window.
- Click the Run Program activity in the Toolbox to add it to the Automation design window.
-
Click
in the Program field. Browse to and select your sample batch file or executable. If you don't have a batch file, for the purpose of this demonstration you could select the Notepad executable at
C:\Windows\notepad.exe
- Now select the Activity Info tab and deselect the Stop on Error option. This instructs your script to continue, even if the Run Program activity errors. This is necessary because your script will use the program's execution status to trigger tasks in the If Condition activity.
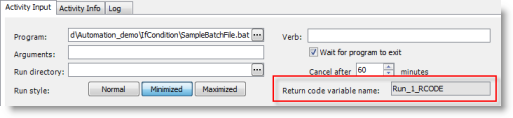
- The Run Program contains a built-in variable called the Return Code variable. After the activity executes, this variable contains a numeric value determined by the program's execution status. If the program runs successfully, the return code variable value is 0.
Notice that Toad provides a default name for the return code variable. You can modify the return code variable name by entering a new name or by changing the activity's name.
- Now click the If Condition activity in the Toolbox to add it to the Automation design window, just after the Run Program activity.
- Click the left branch of the If Condition to select it.
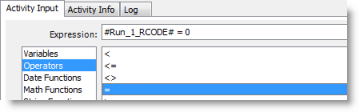
- In the Activity Input tab of the left branch, build an expression that evaluates to TRUE when the Run Program activity is successful.
- Click Variables in the left pane to display a list of variables in the right pane.
-
The return code variable from the Run Program activity is listed. Double-click it to add it to the expression editor.
Note: Variables from any other previous activity plus any stored bind variables are also listed.
-
Complete the expression to read: #Run_1_RCODE# = 0. Notice that in the Variables list, each variable name is surrounded by hash (#) symbols. If you manually enter the variable name, you must surround the name with hash symbols.
- With the left branch still selected, click the Log Comment activity in the Toolbox to add it to the left branch. Enter the following log message: Success.
- Click the right branch of the If Condition to select it.
- In the Activity Input tab of the right branch, build an expression that evaluates to TRUE when the Run Program activity is not successful.
- Click Variables in the left pane to display a list of variables in the right pane.
- Double-click the return code variable to add it to the expression editor.
- Complete the expression to read: #Run_1_RCODE# <> 0.
- With the right branch still selected, click the Log Comment activity in the Toolbox to add it to the right branch. Enter the following log message: Failure.
-
Click
-
After the script executes, review the Log to see the steps the script performed. If the Run Program executes successfully, then the run code variable is set to 0, the expression in the left branch evaluates to TRUE, and the message generated is "Success."
If the Run Program execution was not successful, then the expression in the right branch evaluates to TRUE, and the message generated is "Failure."
-
In our example, the If Condition activity has two branches. However, the If Condition can have more than two branches or just one branch.
- To add a branch, right-click the If Condition activity in the Automation design window and select Add Branch.
- To delete a branch, right-click the branch and select Delete.

Schedule A Script
See Schedule Your Script to learn how to schedule the Automation script.