
Using the While Activity
Summary
This tutorial demonstrates how to use the While activity in Automation scripts. The While activity runs a loop while a condition you specify is true.
In this tutorial you will learn:
- How to use the While activity in Automation
- How to use the Pause activity in Automation
You will need:
- A sample database

Introduction
Suppose you have a situation where you want to use an Automation script to perform a task, but you want the task to execute only when a certain condition exists. In addition, you want to periodically test for the condition until it exists. In this situation, you can use the While and Pause activities. The While activity is used to continuously execute a loop until the condition is met. The Pause activity is used to make the loop execution periodic.
In this tutorial, you create a script that checks to see if a table has been populated with data. If the data does not exist, then the script pauses for 10 minutes before checking for the data again. If the data exists, then the script exports the data to a report.
Create Script
- To get started, connect to your sample database.
- Select Tools | Automation to open a new Automation window.
- Click the Set Variable activity in the Toolbox to add it to the Automation design window.
- In the Activity Input tab, enter a name for the variable. To follow along, name the variable KeepTrying.
- In the Variable type field, select Number.
- In the Variable value field, enter 0 to set the initial value to zero.
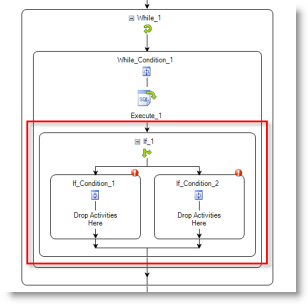
- Now, click the While activity to add it to the design window just after the Set Variable activity. You will use the While activity to set up a loop to periodically check for the condition.
- The While activity contains only one branch by default. Click the branch to select it.
- You want to build an expression that evaluates to TRUE when the condition you are looking for does not exist. In this way, the While activity continues to loop until the condition is met.
You will use the KeepTrying variable to store a value that determines whether or not the condition is met—whether or not the data exists.
- In the Activity Input tab, select Variables in the left pane to display the list of variables in the right pane.
- Double-click #KeepTrying# to add it to the expression editor.
-
Complete the expression to read: #KeepTrying# = 0. You want the While loop to execute until the KeepTrying variable value is something other than 0.
- Now you want to test for the actual condition. You want to know if the table in your database contains data. You can use a Row Count variable to do this. If the Row Count variable contains rows, then the table has been populated with data.
- With the While activity branch selected, click the Execute Script activity to add it to the branch.
-
In the Activity Input tab, enter a query to use to look for rows in the table. If you are using the Toad Sample database, you can follow along by entering the following statement:
Select * from ADDRESS
-
Before continuing, notice the name of the variable in the RowCount variable name field. This is the variable that stores the number of rows returned by the query.
- Next, you want to evaluate the Row Count variable and select a script path based on the variable's value. If the value is 0, you want the While loop to pause for a few minutes and then re-execute. If the value is not 0, then the data exists and you want to export the report.
- Click the While branch in the Automation design window to select it.
-
Click the If Condition activity in the Toolbox to add it to the While branch (just after the Execute Script activity).
Note: If the If Condition is not added inside the While branch as intended, select the If Condition activity and drag it into the While branch, just after the Execute Script activity.
- Click the left branch of the If Condition to select it. In the Activity Input tab, select Variables in the left pane to display the list of variables in the right pane.
-
Double-click the Row Count variable created by the Execute Script activity to add the variable to the expression editor. In our example, the Row Count variable has the default name #Execute_1_RCOUNT#.
Note: You can go back to the Execute Script activity in the design window to review the name of the Row Count variable.
- Complete the expression to read: #Execute_1_RCOUNT# = 0.
- With the left branch of the If Condition selected, click the Pause activity in the Toolbox to add it to the left branch.
- In the Activity Input tab, enter the number of seconds to pause. To follow along, enter 600.
- Click the right branch of the If Condition to select it. In the Activity Input tab, build the expression to read: #Execute_1_RCOUNT# > 0. This instructs the script to take this path when the Row Count variable is greater than 0.
- Now you want to add an activity that exports the data as a report. You can choose any activity that exports data to a file. For this tutorial, click the Select to File activity to add it to the right branch.
-
In the Activity Input tab, enter a query to select the data you want to export. To follow along, enter the following statement:
Select * from ADDRESS
- Select an export file type, file name, and file location.
- Finally, if the script path takes the right branch of the If Condition, that means your actual condition was met (the data exists). So, at the end of the right branch, you want to set the KeepTrying variable to a value other than 0.This will signal to the While loop that the condition was met and the loop can stop.
- With the right branch of the If Condition selected, click the Set Variable activity in the Toolbox to add it to the right branch just after the Select to File activity.
- In the Activity Input tab, in the Variable name field, select KeepTrying.
- In the Variable type field, select Number.
- In the Variable value field, enter 1.
- Click
-
The While activity allows you to specify a limit on the number of times it loops. Click the branch of the While activity in the design window to select it. In the Loop limit field, select the maximum number of times you want the While loop to execute during one script execution.
Notes:
- If you set the Loop limit to 0, the loop will execute continuously until the condition is met.
- Don't forget to factor in the duration of the pause when determining the maximum number of loops.


Schedule A Script
See Schedule Your Script to learn how to schedule the Automation script.