
Build Queries Visually
The Query Builder enables you to create a query without writing or editing SQL statements. Even if you are familiar with SQL, the graphical interface makes it easier to create relationships and visualize the query.
For some Business Intelligence data sources, Toad provides additional methods or instructions for building queries. See the following:
- To create Google Analytics queries, see Create Google Analytics Queries.
- To create SQL Server Analysis Services queries, see Create Queries for SQL Server Analysis Services.
- For special instructions when building Salesforce queries, see Create Salesforce SOQL Queries.
- For additional information about MongoDB queries, see About MongoDB Data Sources.
- For special considerations with other data sources, see About Business Intelligence and NoSQL Data Sources.

Notes:
- Toad displays existing relationships for some ODBC connections, such as Access, PostgreSQL, and Netezza. For other ODBC connections, you may be required to manually create relationships.
- When creating a query that uses Access, you must use ANSI SQL. To do so, click
.
To build a query
-
Select Tools | Query Builder
-
Drag tables and views from the Object Explorer to the Diagram pane.
-
Join columns by selecting a column in a table and dragging it to a column in another table. A connector line displays between the two objects to visually represent the relationship.
- To modify the join type, right-click the join. By default, all joins are initially created as Inner Joins. See Join Columns for more information.
- To view data based on the join, click the join to open the Analyze Join pane. See Analyze Joins for more information.
-
Add columns to the query using one of the following methods:
-
Select each column you want to add to the query.
- To add all columns, select (Add All Columns).
-
To add all columns to the query using a SELECT * statement, select * (Wildcard) . If selected, an asterisk displays for the Field name in the Criteria tab.
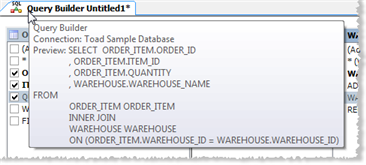
The selected columns display in the Criteria pane in the bottom portion of the Query Diagram window (see the following image).
Notes:
- To add a column to the query a second time, right-click the column in the table diagram and select Add to Output.
- To sort columns in a table diagram, right-click the table and select Sort.
- You can click
to remove a column from the query.
-
-
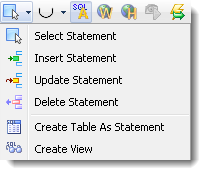
Select the type of statement you want to create (default is Select Statement):
Notes:
-
The CREATE statement is only available for Oracle, DB2, SQL Server, and MySQL.
- If you select an INSERT, UPDATE, or DELETE statement after adding a single table or view to the Query Builder, you cannot add another table or view because it can only apply to a single table or view. Also, if you add more than one table or view to the Query Builder, this action is disabled because it only applies to a SELECT or CREATE statement.
-

-
Use the Criteria pane (bottom portion of the Query Diagram window) to specify the query options. Review the following for additional information:
Only fetch unique records
Select this checkbox to eliminate duplicate records from query results.
Top row count Enter the number of records that you want to return that have the highest values.
You can also select the Percent checkbox to select a percentage of records to return instead of an exact value.
Aggregate Function
Select one of the following functions to calculate column values:
-
Avg—Returns the average of the values in a group.
-
Avg (Distinct)—Returns the average of the unique values in a group.
-
Count—Returns the total number of items in a column. This function does not ignore NULL values when calculating results.
-
Count (Distinct)—Returns the total number of unique values in a column.
-
Max—Returns the maximum value for the column.
-
Min—Returns the minimum value for the column.
-
Stddev—Returns the sample standard deviation of a numeric expression evaluated over a set.
-
Sum—Returns the sum of all the values in the expression.
-
Sum (Distinct)—Returns the sum of all the unique values in the expression.
- Variance—Returns a statistical measure of how far a set of numbers are spread out from each other.
Note: If you add a Group By clause, you must specify an aggregate function for any remaining columns.
Where Condition
Use to compose a Where clause or to add a subquery.
- Select the Where field in the column and click
.
- In the Where Condition editor, then do one of the following:
- Use the Where Condition editor to compose the clause. See Set Where Conditions.
- Click Subquery in the editor to add a subquery to the Where clause. See Add Subqueries.
To learn about adding date ranges, see Set Date Ranges.
Notes:
- If you reverse engineer a query that contains a Where condition from the Editor or edit it in the Query tab of the Query Builder, it displays in a Global Where clause bubble on the Diagram pane rather than the Where Condition field below the Diagram pane. You can double-click the bubble to edit the clause, or can click
to edit it.
- You can also use the Where Condition to add the same column twice to the query.
Or
Select the operators and expressions to add to the OR condition. See Add Or Conditions for more information.
Group By
Select the column you want to add the Group By clause to and click +.
You can add a new Group By clause to any remaining columns to group them in sequence. Any remaining columns that do not have a Group By clause must include an aggregate function.
Tip: You can add a Group By clause to all selected columns in each table/view, by right-clicking the Diagram pane and selecting Add Group By.
Having Condition
Select the operators, aggregate, and expressions to include in the Having condition. This option is disabled unless you have set a Group By clause. See Set Having Conditions for more information.
Note: If you reverse engineer a query that contains a Having condition from the Editor or edit it in the Query tab of the Query Builder, it displays in a Global Having clause bubble (click here to see an example) on the Diagram pane rather than the Having Condition field below the Diagram pane. You can double-click the Global Having clause to edit it.
Sort
Select an option to add this column to the Order By clause and specify a sort direction.
Visible
Select this checkbox to return this column in query results. This is useful if you need to include a column in the selection criteria, but do not need to display it in the query results.
Field Alias
Enter a name to use as an alias for the column name in the query results. This is useful if you have an ID or vague column name and want to easily identify that column in the query results.
Table Alias
Enter a name to use as an alias for the table name in the query results. For example, if there are multiple employee tables that you need to join for the query, you can rename the tables to permanent, contract, etc., to easily identify them.
If you add a subquery to the From clause, you can use this field (in the Criteria pane for the parent query) to create an alias for the subquery. Enter the name in one of the subquery columns. The name displays in the table diagram and the Queries navigation pane.
Note: If you selected All Columns for a table or created a column using the Edit Calculated Fields window, you cannot modify the table alias.
-
-
To add a subquery to the FROM clause, right-click the Diagram pane and select Add Subquery. To add a subquery to a WHERE, OR, or HAVING clause, see Add Subqueries.
- Click Fetch n rows to specify the number of rows to initially retrieve when executing the query. You can set a default value for this option in Tools | Options | Database | General. See General Database Options.
-
Click
to execute the query.
-
To save the query, right-click the Query Builder tab and select Save File.
If you save the file as a Query Builder file (.tsm), Toad saves the current connection with the file. After saving, you cannot change the associated connection. You can execute the query against a different connection, though (see To change the connection).
Note: You can also save a query and any results sets in a Toad editor file (.tef). This file format is useful for building scripts that have large result sets that you do not want to continue executing or for saving results when you have not finished building a script.
-
To view the connection associated with the file and preview the script, place the cursor over the Query Builder tab.
To re-visualize after modifying SQL statement
- If you manually enter or modify the SQL statement in the Query tab, click
to re-visualize the query in the Diagram tab. You can also right-click the statement and select Visualize Query.
- In a Query Builder file, to execute the query against a different connection, right-click the Query Builder tab or Diagram pane and select Change Connection.
- Select a new connection of the same connection type.
- Toad opens a new Query Builder document containing the same query and the new connection. Click
to execute the query.
- If you save the new Query Builder document, it contains the new connection. The connection in your original Query Builder document remains unchanged.
Tips:
-
When opening a previously saved Query Builder file, you can right-click the Diagram pane and select Refresh to get the latest objects from the database, including added/removed columns and data type updates.
An * in the title of the object indicates that the saved version differs from the database version.
- To create a new column that is comprised of other columns or functions and assign the new column to a table in the query, click
. See Create Calculated Fields for more information.
-
To view details for a table in the Diagram, click
(F4). If a table is not selected, details for the last selected table display.
-
To create a data report, pivot grid, or chart from the data, right-click the data and select Send To | report_type.
- To add tables without creating their relationships, clear the Automatically join tables with relationships checkbox in Tools | Options | Database |Query Builder.
- Toad automatically saves a backup copy of any modified Query Builder file in the Application Data Directory to avoid losing your work. When you restart Toad after an unexpected close, Toad checks the timestamp on the backup file against the original file, and opens the file that has the latest timestamp. The document recovery option is in Tools | Options | Environment | General.
- To set column sorting options, fully qualify object and column names, or limit the number of objects added to the Diagram pane, specify options in Tools | Options | Database | Query Builder.
- If you opened the Query Builder on SQL defined in the Create or Alter window for a view or trigger, click
to return the finished query to the originating window.