
Automate Excel® Macro-Enabled Reports
You can add advanced formatting to Excel reports by using Excel macros. When you export data using the Export wizard, Toad allows you to execute the macros in an Excel report during the export process. In addition, you can automate the entire process using a Toad Automation script.
In this example, you will create an Automation script that exports data to an Excel file and also executes the macros in the Excel file during the export process.

Create a Macro-Enabled Excel File
You must create the Excel file that contains a macro prior to creating the Automation script. You can use an existing file or use the following steps to create a new one.
- Start with a new or existing Excel file.
- In an Excel 2007 or later workbook, in order to include a macro, you must save your Excel file as an .xlsm (Excel Macro-Enabled Workbook) file.
-
You must also enable macros in the Excel file. To do this, go to Microsoft Office button | Excel Options | Trust Center | Trust Center Settings | Macro Settings and select Enable all macros. Also, select Trust access to the VBA project object model.
Note: You may want to review your company’s policy on the use of macros before proceeding.
-
Now add a few macros to your macro-enabled Excel workbook. For demonstration purposes, you can use the following macros. One macro clears the contents of Sheet1 and the other macro changes the color of alternate rows in Sheet1.
ClearSheet1
Sub ClearSheet1()
Sheet1.Cells.Clear
End Sub
FormatAlternateRows
Sub FormatAlternateRows()
Dim r As Range
Dim row As Integer
Set r = Sheet1.UsedRange
For row = 1 To r.Rows.Count
If row Mod 2 = 1 Then
r.Rows(row).Interior.ColorIndex = 37
End If
Next
End Sub
Create the Automation Script
- Open a new Automation window.
- Click the Export Wizard activity in the Database Activities toolbox to add this activity to the Automation design window. You will use this activity to build an Export Wizard template.
-
In the Export Wizard activity's Activity Input tab, click
to the right of the Export template text box.
- The Data Export Wizard opens. Click Next.
- Click Add on the Export Object page.
- On the Select Objects page, select Tables in the Export Category panel. Then select a table or tables to export. Click Next.
- Select Excel as the output format on the Select Output Format page. Click Next.
- Include all columns on the Select Columns page. Click Next.
- On the Select Excel Output Options page, click
in the Destination text field, and select the macro-enabled Excel file you created earlier. (If you do not see your file, select Excel Macro Enabled Files from the Save as Type drop-down list to show the .xlsm files.)
- Select Sheet1 in the Worksheet name field. (The macros included in this tutorial modify Sheet1.) Click Next.
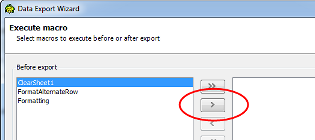
-
The Execute Macro page displays. This page shows the list of macros in your macro-enable Excel file. This page allows you to select a macro or macros to execute before the data is exported and also after the data is exported. In the Before export list, select the ClearSheet1 macro and click the right arrow to move it to the execute list. The purpose of this macro is to clear the sheet before the data is exported.
- In the After export list, select the FormatAlternateRow macro and move it to the execute list. This macro will format the data, so we want it to execute after the data is exported. Click Next.
- Click Next on the Export Object page (we don’t want to add any more objects).
- On the Save Settings as Template page, select Save template. Then click
-
For this example, on the Activity Input tab, select Use Automation Connection and select the same database connection you selected in the Export wizard.
Note: If you deselect this option, Toad will use the database connection in the Export Wizard template (in this case, it is the same connection).
-
Click
- To view the file, click the hyperlink in the Log tab. Notice that any previous data on Sheet1 was cleared before export (the ClearSheet1 macro executed before export) and the exported data now includes formatting with a background color on alternate rows (the FormatAlternateRows macro executed after export).

The output of this script is a macro-enabled Excel file with formatted data. The script uses an Export Wizard template which is a stand-alone file that can be used by other scripts.
Schedule A Script
See Schedule Your Script to learn how to schedule the Automation script.