
Start a Spotlight session
This chapter provides basic procedures to help you start a Spotlight session and monitor a DB2 for LUW database or database partition.
Contents
Set up a connection to a DB2 database or database partition
Spotlight on IBM DB2 LUW home pages
Start a Spotlight session
-
Use either method:
» Double-click the Spotlight icon on your Windows desktop. or
- On the Windows task bar, click Start.
- Select Programs | Quest Software | Spotlight on IBM DB2 LUW | Spotlight on IBM DB2 LUW 6.10.0.
- Press F1 for information about using the Welcome to Spotlight page.
License Spotlight
To license Spotlight on IBM DB2 LUW, you will need a license key and the site message.
Obtain the License
The required license key is delivered in one of three ways:
- If you purchased Spotlight from the Questweb site and have downloaded the product, you should receive an e-mail with the license key and site message shortly after the download has completed.
- If Spotlight was delivered in a package, the license key and site message are included with that package.
- If Spotlight was delivered as part of a trial, your sales representative should provide you with the license key.
If you do not get a license key, contact your sales representative.
Specify the license to authorize your use of Spotlight
After you have started Spotlight, you can authorize your use of Spotlight in one of two ways:
- If you attempt to open a feature from the Spotlight console, Spotlight displays a message window that states that Spotlight on IBM DB2 LUW is unlicensed. You can launch the authorization process from this message window.
- You can launch the authorization process from the About Spotlight window.
To authorize your use of Spotlight from license message window
- From the message window that states you need to license Spotlight, click the Authorize button.
- On the Product Authorization window, provide the authorization (license) key, and then the site message.
- Click OK.
To authorize your use of Spotlight from the About Spotlight window
- From the Spotlight console, select Help | About Spotlight.
- On the Installed products tab, click View/change product license for Spotlight on IBM DB2 LUW.
- On the License Viewer window, click Change this license for the installed version of Spotlight whose license you want to update.
- On the Product Authorization window, provide the authorization (license) key, and then the site message.
- Click OK to save the license information.
- Close the remaining windows.
Set up a connection to a DB2 database or database partition
Before Spotlight can monitor a DB2 database or database partition, it must connect to that system. If you have not connected to the specific database or database partition in Spotlight before, you need to set up a connection profile for that system.
Note: To set up a connection profile for a database or any of its partitions, the DB2 instance and database must already be cataloged on the DB2 client that Spotlight uses. This DB2 client resides on the same Windows machine where you installed Spotlight.
To set up a connection profile
- Click
in the Spotlight toolbar to open the Spotlight Connection Manager.
- In the Connections bar on the left, click Spotlight on IBM DB2 LUW to display the connections currently defined for DB2 for LUW databases and database partitions.
-
In the Spotlight on IBM DB2 LUW connections pane on the right, double-click New connection.
-
In the New Connection window, identify the connection:
Field Description Select connection type Select Spotlight on IBM DB2 LUW. New connection name Enter a unique name for this Spotlight connection. This name will identify the connection on the Spotlight browser (the far-left pane on the Spotlight console). -
Click OK to open the Properties window for the new connection. The Details tab on this window is in focus.
-
In the DB2 Details section, enter the information that allows Spotlight to connect to the DB2 database or specific database partition:
Field Description Database Alias Select the alias for the DB2 database. This alias was defined when you cataloged this DB2 database on the DB2 client. DB2 Instance Enter the name of the DB2 instance as defined on the database server. DB2 Database Enter the alias of the DB2 database that you want to monitor in this connection. DB2 System Database host, port and LDAP information. DB2 Auto Monitor Nodes For a multiple-partition database, select this option if you want the Connection Manager to set up a separate connection automatically for every partition for the database. (The alternative for monitoring a multiplepartition database is to select an option in the DB2 Node field.)
When you select DB2 Auto Monitor Nodes, the DB2 Node field is disabled.
DB2 Auto Monitor Active Databases Select this option if you want Spotlight to monitor all active databases residing in the instance in which the database or database partition for which you are creating this connection resides.
When Spotlight connects to this database or database partition, it also connects to all the other active databases in the instance. These databases are listed in the browser pane. You can monitor their home pages and drilldowns just as you can for the database whose connection you set up.
DB2 Node For a multiple-partition database, select Global if you want the Connection Manager to establish a single connection that aggregates statistics for all partitions for the database. Or select the number that identifies a specific partition to establish a connection for that partition only.
For a single-partition database, select Global.
DB2 User Enter the user ID with which to connect to the DB2 database. DB2 Password Enter the password with which to connect to the DB2 database. -
In the SQL Archive Options section, set the options that run the Spotlight SQL Statement Archiver for this connection. The Archiver captures SQL statements and statistics that you can view on the Top SQL drilldown for the connection:
Field Description Archive Default Startup To turn the Archiver on or off for this connection, select Archive SQL statements or Do not archive SQL statements, respectively. Archive Capacity Enter the number of distinct SQL statements that the Archiver will capture before it starts dropping statements. -
In the OS Details section, provide information that Spotlight needs to monitor the operating system on which the database or database partition runs:
Field Description OS Monitor Select this option if you want Spotlight to monitor the operating system on which the database or database partition runs. When you select this option, specific fields listed below are enabled. OS Type Choose the operating system type of the target machine. OS Local Machine (For a Windows target machine only) Select this option if the machine you are currently using is the one you want to monitor. If you select this option, you need to complete only the OS Address field. OS Domain (For a Windows target machine only) Enter the domain to which the specified user (in the OS User field) belongs. If you are entering no user in the OS Userfield, leave this field blank. OS Address Enter the address of the target machine:
-
For a Windows machine, enter its IP address, hostname, or URL.
-
For a Linux or Unix machine, enter its connection string.
OS User Enter the user ID used to log on to the target machine. OS Password Enter the password used to log on to the target machine. OS Port (For a Unix SSH target machine only) Enter the port number that Spotlight will use for its SSH (secure shell) connection to the Unix host. The default value is 22. -
-
Select the Save password details (for this connection) to save the user ID and password information with this connection. Each time you open this connection in Spotlight, you will not have to provide the user ID and password.
If you unselect this option, you are prompted to provide the DB2 User and DB2 Password values each time you open this connection in Spotlight. If Spotlight monitors the operating system also for this connection, you are prompted to provide the OS User and OS Password values as well.
-
Click OK to add the new connection to the list of DB2 for LUW connections.
Open a connection
After you have created the Spotlight connection profile for a specific DB2 for LUW database or database partition, you can connect to that database or partition in Spotlight to start the monitoring process.
To open a connection to monitor
-
In the toolbar on the Spotlight console, click the Connect
icon to open the Spotlight Connection Manager.
-
In the Connections bar on the left, click the category from which you want to select the Spotlight connection to the database or database partition you want to monitor.
Field Description All connections Click to display all the Spotlight connections currently defined. Recent connections Click to display the connections that have been opened recently. Spotlight on DB2 LUW Click to display all connections to DB2 LUW databases and database partitions. -
For the specified category, choose the connection you want to open by clicking an item in the pane on the right. (If the connection does not yet exist, follow the procedure described in “Set up a connection to a DB2 database or database partition ."
The home page for the connection opens.
If this is the first time you have opened this connection, the Calibration window is also displayed. From this window, you start the calibration process to set the normal range of certain Spotlight metric values for your system. For more information, press F1 from the Calibration window.
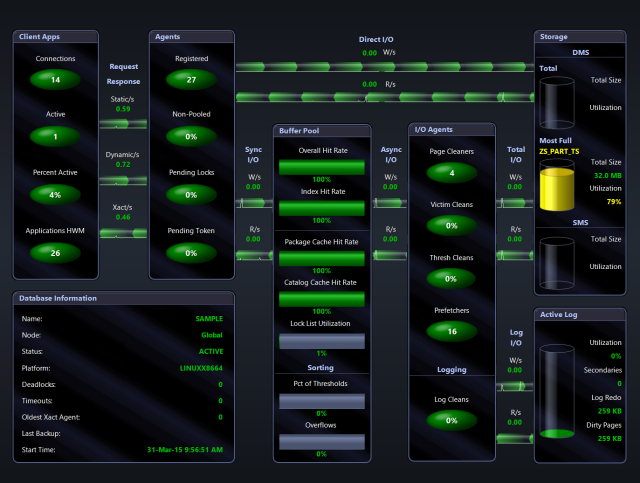
Spotlight on IBM DB2 LUW home pages
The home page is based on the Spotlight connection you are currently monitoring—either a database or a single database partition. This home page provides a visual representation of the performance—in the form of icons, labels, and data flows—of this system. Throughout your Spotlight session, you can switch between the home pages for the different connections by selecting that connection in the Spotlight browser.
Additionally, you can click the DB2 Instance 
For more information about the currently displayed home page and related drilldowns and alarms, press F1.
The following shows a sample home page for the DB2 for LUW 9 database connection highlighted in the Spotlight browser (the pane on the far left of the Spotlight console):
Access on-line help
You can obtain more information about using Spotlight’s features by accessing Spotlight’s on-line help system and its context-sensitive help.
Open Spotlight’s online help system at the Contents page
To open Spotlight’s on-line help system at the Contents page
- Select Help | Contents.
-
Navigate the help contents to locate a help topic.
The Spotlight basics node points to help topics for features common to all Spotlight products. The Spotlight on DB2 LUW Version 9 nodes point to help specific to Spotlight on DB2.
Access context-sensitive help
Spotlight’s context-sensitive help includes window-level help as well as What’s this? help for individual items in the current window.
To view help specific to the current Spotlight window
| » | Press F1 or select Help | Context Help. |
The help topic specific to the current window opens. Additionally, the help contents and index relate to only the specific Spotlight plugin you are currently using.
To view What’s this? help using the toolbar button
- Click the Help icon (?) on the Spotlight toolbar.
- Move the mouse help pointer over the component with which you need help.
- Click to display help for that component.
To view What’s this? help by clicking the component
| » | Click a component to view its component help or alarm help. |
Note: What’s this? behavior might be configured differently in your Spotlight setup. For more information, see Spotlight basics in the online help system.