Configure change history
To configure change history, you use special syntax in the SharePlex configuration file and, optionally, configure filter rules and other attributes to customize the history to your needs.
Create a change-history configuration file
- Make certain that SharePlex is installed and the system is prepared according to the instructions in the SharePlex Installation Guide.
-
Create the Oracle target history tables with the same name and structure as the source tables whose history they will track, but omit all constraints on all columns.
Important: The Oracle target tables must not have PRIMARY KEY, FOREIGN KEY, UNIQUE, NOT NULL, or CHECK constraints, nor can columns be defined with a DEFAULT value. Because this is a history of changes, a row may have the same image as another row that has the same key. Post does not perform integrity checks on a change-history target.
- Disable triggers on the target tables.
- Allow no DML or DDL to be performed on the target tables except by SharePlex.
-
On the source system, create a configuration file using the following syntax. For more information about how to create a configuration file, see Configure data replication.
| datasource_specification |
| src_owner.table |
!cdc:tgt_owner.table |
host@c.SID |
where:
- Datasource:o.SID is the ORACLE_SID of the source Oracle instance.
- src_owner.table is the fully qualified name of a source object (owner.object) or a wildcarded specification.
- !cdc: identifies the target as a change-history table.
- tgt_owner.table is the fully qualified name of the target history table or a wildcarded specification.
- host is the target system.
- c.SID specifies the target Oracle instance.
-
(Optional) Run the following script on the target tables to add default metadata columns with their default names. Post automatically populates the default metadata columns without any additional configuration. You can customize the script to meet your requirements.
product_dir/util/add_change_tracking_columns.sql
Notes:
- The script only adds the default columns. To add optional columns, or to change a column name, use the target command to add them to the Post configuration. For a list of default and optional metadata columns, see the target command in the SharePlex Reference Guide.
- The default columns are automatically added to new tables that are added to the SharePlex change history configuration.
Additional change history configuration options
This section describes how you can customize the SharePlex change history configuration.
Customize column names
You can use the target command with the colname option to customize the name of any target metadata column. For instructions, see the SharePlex Reference Guide.
Add the before image to each change row
You can include the before image of updates in the target table by setting the SP_OPO_TRACK_PREIMAGE parameter to U. This parameter causes Post to insert two rows to the target table for every change made to the tracked source table: one for the after image and one for the before image. The before image is composed of the key values plus the before values of the columns that were changed, unless the SP_OCT_USE_SUPP_KEYS parameter is used.
When before images are enabled, the SHAREPLEX_SOURCE_OPERATION column values for the two records will be:
UPDATE BEFORE
UPDATE AFTER
Note: The before row will not include the before image of any LOB columns, because the redo log does not contain the before image of LOBs.
You can override the global setting of SP_OPO_TRACK_PREIMAGE at the table level by using the set cdc preimage option of the target command.
For more information about SP_OPO_TRACK_PREIMAGE and the target command, see the SharePlex Reference Guide.
Include all columns of an operation in the history
This option is valid for Oracle data only. To include the values of all table columns in each target history record, rather than only the changed columns, configure the following:
-
Turn on supplemental logging for all columns of the source tables that are being tracked. For example:
Alter table emp ADD SUPPLEMENTAL LOG DATA (ALL) COLUMNS;
- Set the SP_OCT_USE_SUPP_KEYS parameter to 1.
- Set the SP_OCT_INCLUDE_UNCHANGED_COL to 1.
Note: When both SP_OCT_USE_SUPP_KEYS and SP_OPO_TRACK_PREIMAGE are enabled, the before image includes all column values as they were before the change.
Disable change history of an operation type
To disable the change history of a DML operation type, set the SP_OPO_TRACK_OPERATIONS parameter to the appropriate value or values. Separate values with a slash (/). For example, to maintain change history only for inserts and updates, change the parameter to I/U.The default is I/U/D which sends all DML operation types to the history records.
Set rules and filters
You can use the set rule option of the target command to apply conditions on columns to control whether a change is applied to the target history table. For example, you can specify a rule that if column 1 and column 3 are changed, then apply the operation and discard any changes that apply to other columns. For instructions, see the SharePlex Reference Guide.
Include COMMITs
By default, the COMMIT record is not included in the history tables. To configure Post to insert a row for every COMMIT, set the SP_OPO_TRACK_COMMITS parameter to 1.
Configure a replication strategy
Configure a replication strategy
This chapter contains instructions for configuring SharePlex to support different replication objectives. Production implementations can vary widely from basic configurations with one source and target, to multiple instances of SharePlex with named queues,multiple targets, partitioned data, and more.
It is difficult to foresee and document every possible way that an organization may want to deploy SharePlex. The goal of this documentation is to present instructions for setting up the basic deployment types in a way that is clear enough for you to be able to combine them and expand upon them to suit your needs. Additional deployment assistance is available through our Professional Services organization.
Contents
Configure Replication to share or distribute data
These instructions show you how to set up SharePlex for the purpose of sharing or distributing data from one source system to one or more target systems. This strategy supports business requirements such as the following:
- reporting to support real-time decision making
- data sharing to support research and transparency requirements
- data integration throughout an enterprise
- customer service inquiries and other query-intensive applications
- data auditing and archiving
Supported sources
Oracle
Supported targets
All
Capabilities
This replication strategy supports the following:
- Replication to one or more target systems
- Replication between databases on the same system
- Replication between schemas in the same database (Oracle)
- Identical or different source and target names
- Use of vertically partitioned replication
- Use of horizontally partitioned replication
- Use of named export and post queues
- Use of transformation
Requirements
- Prepare the system, install SharePlex, and configure database accounts according to the instructions in the SharePlex Installation Guide.
- No DML or DDL should be performed on the target tables except by SharePlex. Tables on the target system that are outside the replication configuration can have DML and DDL operations without affecting replication.
-
If sequences are unnecessary on the target system, do not replicate them. It can slow down replication. Even if a sequence is used to generate keys in a source table, the sequence values are part of the key columns when the replicated rows are inserted on the target system. The sequence itself does not have to be replicated.
Important! These instructions assume you have a full understanding of SharePlex configuration files. They use abbreviated representations of important syntax elements.
For more information, see Configure data replication.
Conventions used in the syntax
In the configuration syntax in this topic, the placeholders represent the following:
- source_specification[n] is the fully qualified name of a source object (owner.object) or a wildcarded specification.
- target_specification[n] is the fully qualified name of a target object or a wildcarded specification.
- host is the name of a system where SharePlex runs. Different systems are identified by appending a letter to the names, like hostB.
- db is a database specification. The database specification consists of either o. or r. prepended to the Oracle SID, TNS alias, or database name, as appropriate for the connection type. A database identifier is not required if the target is JMS, Kafka, or a file.
Important!
Replicate within the local system
Replication on the same system supports the following configurations:
- Within one Oracle instance, replicate to different tables within the same schema or to the same table in different schemas.
- Replicate to from an Oracle instance to any SharePlex-supported target on the same system.
On the Windows platform, SharePlex does not support replication between Oracle databases that reside on the same system, but you can replicate to Open Target targets on the same system.
Configuration options
|
datasource_specification |
|
|
| source_specification1 |
target_specification1 |
hostA[@db] |
| source_specification2 |
target_specification2 |
hostA[@db] |
Example
This example shows how you can replicate data to the same Oracle instance, to a different Oracle instance (Unix and Linux only), and to different target types, all on the same local system.
| Datasource:o.oraA |
|
|
| hr.emp |
hr.emp2 |
hostA@o.oraA |
| hr.sal |
hr.sal2 |
hostA@o.oraB |
| fin.* |
fin.* |
hostA@r.mss |
| act.* |
!file |
hostA |
Configuration when using SharePlex Manager
Replication from and to the same machine omits an Export process. However, SharePlex Manager expects an export queue to exist. If using this configuration with SharePlex Manager, you must explicitly configure an export queue as follows. The hostA* component in the routing map creates the export queue and an Export process, which sends the data to an Import process, then the post queue.
|
datasource_specification |
|
|
| source_specification1 |
target_specification1 |
hostA*hostA[@db] |
| source_specification2 |
target_specification2 |
hostA*hostA[@db] |
Replicate to a remote target system
Configuration options
|
datasource_specification |
|
|
| source_specification1 |
target_specification1 |
hostB[@db] |
| source_specification2 |
target_specification2 |
hostB[@db] |
Example
The last line in this example shows how you can replicate data to different target types on the same remote target system.
| Datasource:o.oraA |
|
|
| hr.emp |
hr.emp2 |
hostB@o.oraB |
| hr.sal |
hr.sal2 |
hostB@o.oraB |
| fin.* |
!file |
hostB |
Replicate to multiple target systems
This topology is known as broadcast replication. It provides the flexibility to distribute different data to different target systems, or all of the data to all of the target systems, or any combination as needed. It assumes the source system can make a direct connection to all of the target systems. All routing is handled through one configuration file.
For more information, see Configure replication through an intermediary system.
Configuration options
If the target specification is identical on all targets
If the target specification of a source object is identical on all target systems, you can use a compound routing map, rather than type a separate entry for each route. For more information, see Configure data replication.
|
datasource_specification |
|
|
| source_specification1 |
target_specification1 |
hostB[@db]+hostC[@db][+...] |
| source_specification2 |
target_specification2 |
hostC[@db]+hostD[@db][+...] |
If the target specification is not identical on all targets
- When the target specification of a source object is different on some or all target systems, you must use a separate configuration entry to specify each one that is different.
- You can use a compound routing map for routes where the target specifications are identical.
|
datasource_specification |
|
|
| source_specification1 |
target_specification1 |
hostB[@db] |
| source_specification1 |
target_specification2 |
hostC[@db] |
Example
Note: This example does not cover all possible source-target combinations. The last entry in this example shows the use of horizontally partitioned replication to distribute different data from the sales.accounts table to different regional databases.
| Datasource:o.oraA |
|
|
| hr.emp |
hr.emp2 |
hostB@o.oraB |
| hr.emp |
hr."Emp_3" |
hostC@r.mssB |
| hr.emp |
!jms |
hostX |
| cust.% |
cust.% |
hostD@o.oraD+hostE@o.oraE |
| sales.accounts |
sales.accounts |
!regions |
Configure Replication to maintain a central data store
These instructions show you how to set up SharePlex for the purpose of consolidated replication: replicating from multiple source systems to one central target system. This strategy supports business requirements such as the following:
- Real-time reporting and data analysis
- The accumulation of big data into a central datastore/mart or warehouse
Supported sources
Oracle
Supported targets
Oracle and Open Target
Capabilities
This replication strategy supports the following:
- Identical or different source and target names
- Use of vertically partitioned replication
- Use of horizontally partitioned replication
- Use of named export and post queues
Requirements
-
Prepare the system, install SharePlex, and configure database accounts according to the instructions in the SharePlex Installation Guide.
- No DML or DDL should be performed on the target tables except by SharePlex. Tables on the target system that are outside the replication configuration can have DML and DDL operations without affecting replication.
-
Each source system must replicate a different set of data to the central target. If any source systems replicate the same data to the central target system, it is considered to be active-active replication. For more information, see Configure peer-to-peer replication.
- If sequences are unnecessary on the target system, do not replicate them. It can slow down replication. Even if a sequence is used to generate keys in a source table, the sequence values are part of the key columns when the replicated rows are inserted on the target system. The sequence itself does not have to be replicated.
Deployment options
You have two options for deploying SharePlex to replicate from many source systems to one target system.
In either deployment, if any source system cannot make a direct connection to the target system, you can use cascading replication for that route to enable SharePlex to cascade the data an intermediary system that allows connection to the target. For more information, see Configure replication through an intermediary system.
Note: The SharePlex compare and repair commands cannot be used in a cascading configuration.
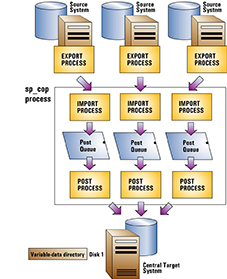
Deploy with one instance of SharePlex on the target system
You can use one instance of SharePlex to process all incoming data on the target. For each source system, SharePlex creates an Import process on the central target system when replication starts. That, in turn, creates post queues and Post processes for each source-target replication stream, all controlled by one sp_cop process. You can control each source-target stream separately, but the post queues all share the same SharePlex variable-data directory on the target system.
A deployment with a single variable-data directory has the following potential risks:
- An event that interrupts processing to and from the disk that contains the variable-data directory will affect all replication streams.
- Any cleanup utilities that you use will affect all of the replication streams, because the cleanup is performed across the entire variable-data directory.
- A purge config command that is issued on one source system also deletes the data that is replicated from the other source systems, because the purge affects the entire variable-data directory. The use of named post queues eliminates this risk, but adds complexity to the naming, monitoring and management of the SharePlex objects in the deployment.
To use this deployment
- Install SharePlex in the normal manner, with one port number and one variable-data directory on each system (sources and target).
- Make certain that when you install SharePlex, you create a database account for SharePlex for each installation.
- Important! Use the same port number for SharePlex on all systems.
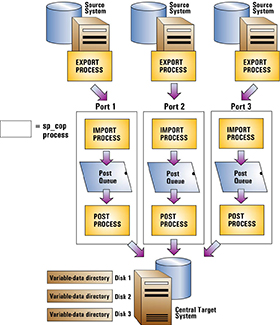
Deploy with multiple instances of SharePlex on the target system
You can deploy multiple instances of SharePlex on the target, one for each source system. A SharePlex instance is composed of the following elements:
- A unique sp_cop process
- A unique variable-data directory
- A unique port number on which sp_cop runs
- A unique database account that the processes of that instance use to interact with the database.
By running multiple, distinct instances of SharePlex, you can isolate each source-target replication stream from the others. It enables you to:
To use this deployment
Install on the target system first, if possible. This enables you to establish a port number for each variable-data directory, which you can then refer to when you set up SharePlex on the corresponding source system.
Steps on the target system
Select either of the setup options presented in Run multiple instances of SharePlex. These procedures will guide you through the steps to establish independent instances of SharePlex on the target. If you already installed SharePlex on the target, a variable-data directory, database account, and port number already exist. You can dedicate that SharePlex instance to one of the source systems, and then create additional instances on the target per those instructions.
Steps on the source systems
Install one instance of SharePlex on each source system, as directed in the SharePlex Installation Guide. Match the port numbers of those instances to the port numbers of their associated target variable-data directories. If you already installed SharePlex on the source systems, you can change the port numbers as needed. For more information, see Set the SharePlex port number.
Configuration
Create a configuration file on each source system that replicates the objects from that system to the central target. For more information about how to create a configuration file, see Configure data replication.
|
datasource_specification |
|
|
| source_specification |
target_specification |
central_host[@db] |
where:
- source_specification is the fully qualified name of a source object (owner.object) or a wildcarded specification.
- target_specification is the fully qualified name of a target object (owner.object) or a wildcarded specification.
- central_host is the target system.
- db is a database specification. The database specification consists of either o. or r. prepended to the Oracle SID, TNS alias, or database name, as appropriate for the connection type. A database identifier is not required if the target is JMS, Kafka or a file.
Example
This example shows data from datasource oraA on hostA and datasource oraB on hostB replicating to oraC on system hostC.
Data from hostA
| Datasource:o.oraA |
|
|
| hr.* |
hr.* |
hostC@o.oraC |
| fin.* |
fin* |
hostC@o.oraC |
Data from hostB
| Datasource:o.oraA |
|
|
| cust.* |
hr.* |
hostC@o.oraC |
|
mfg.* |
mfg.* |
hostC@o.oraC |
Recommended target configuration
Each source system in a consolidated configuration sends a discrete data stream that flows to its own Post process on the target. You can assign a unique identifier of your choosing to each source system, and then configure the Post process to include that identifier in each insert or update that it posts on the target.
By identifying rows in this manner, your environment is prepared to support the SharePlex compare and repair commands (which require a source ID) as well as any other work that may require the selection or identification of rows by their source. The compare and repair processes will use the source ID value to select only the rows that are valid for that source.
To configure each Post to write a source ID
-
Create or alter the target table to include a column named SHAREPLEX_SOURCE_ID. This is the column that will contain the source ID value.
Note: You can change this name by running the target command with the set metadata option, before continuing further. See the SharePlex Reference Guide for more information.
- Choose a unique ID for each of the source systems. Any single alphanumeric string is permitted.
- On the target, run sp_ctrl for each Post process.
-
For each Post process, issue the target command with the set source option. This command sets the source ID that will be posted by that Post process. The following example shows the command for three Post processes:
sp_ctrl> target sys4 queue Q1 set source east
sp_ctrl> target sys4 queue Q2 set source central
sp_ctrl> target sys4 queue Q3 set source west