
The procedure is typically used in these situations:
- When the source system fails and replication must be switched to a standby database system
- When replication must be positioned back in time to re-read old archive logs.
Requirements to support SharePlex replication recovery
To resume replication when the source, target or both have failed, there must be the following in place at the onset of replication:
- A disaster recovery (DR) solution that provides a physically identical copy of the production source instance and another physical copy of the production target instance. Methods such as Oracle Data Guard or disk mirroring, tape backups and other methods support this requirement.
- The SP_OPO_UPDATE_SCN parameter must be set to a value of 1. This parameter directs SharePlex to keep a record of the SCNs of the transactions that it processes. When you set this parameter to 1, it also disables the Post Enhanced Performance feature.
Overview of initial setup
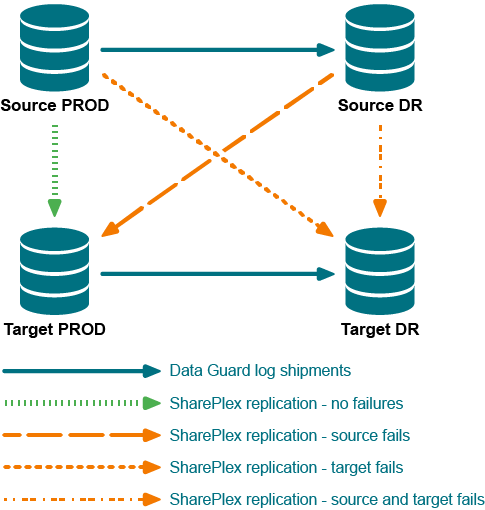
The following diagram depicts a DR configuration at the onset of replication. There is a source production instance and a mirrored source DR instance that is kept current by Oracle Data Guard. Similarly, there is a production target instance and a mirrored DR target instance that is kept current by Oracle Data Guard.
- The solid (blue) lines represent the Oracle Data Guard DR deployment.
- The dotted (bright green) line between the production source instance and the production target instance represent SharePlex replication under normal operating circumstances.
- The dashed lines (red, orange or aqua) show possible replication recovery paths if the source, target or both fail.
Figure 2: DR configuration at the onset of replication
Example failure/recovery scenario
This example illustrates one of the potential failure/recovery scenarios, in this case where the production target instance fails. The recovery path is shown as the diagonal, orange dotted line in the DR configuration at the onset of replication diagram.
Normal replication
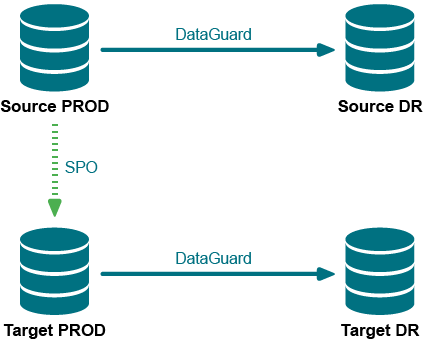
The following diagram illustrates the configuration and the names that are used in this example.
- The production source is named Source PROD and the DR source is named Source DR.
- The production target is named Target PROD and the DR target is named Target DR.
- SharePlex (SPO in the diagram) replicates from Source PROD to Target PROD.
Figure 3: Normal replication and mirroring configuration
Production target fails
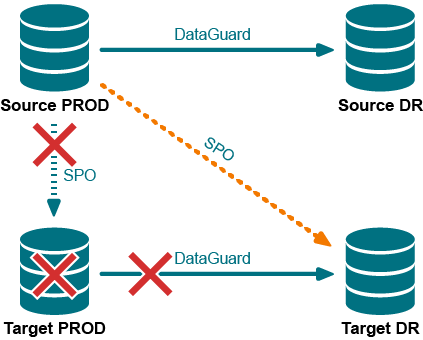
The Target PROD target fails, as represented by the red X across it in the following diagram. SharePlex can no longer replicate to Target PROD, as represented by the red X over the original replication data stream.
Because Target PROD is offline, Oracle Data Guard can no longer keep Target DR up to date. However, SharePlex can. SharePlex (SPO in the diagram) is able to resume replication from Source PROD to Target DR, thus resuming data availability.
Figure 4: Failure and recovery by SharePlex (SPO)
Resume replication after failover
In this procedure you will do the following to direct SharePlex to recover replication:
- Direct SharePlex to capture the correct Oracle SCN of the last committed transaction processed by each post queue.
- Direct SharePlex, through the reconcile command, to discard all transactions that were committed to the target before the failure, so that SharePlex resumes replication at the correct point in the data stream.
Note: This procedure requires the following:
- The source instance is recovered to a later point in time than the target instance; otherwise, this method will not work.
- The SP_OPO_UPDATE_SCN parameter is set to 1.
To resume replication
Note: In these instructions, the source and target systems are whichever source and target are operational after the failover.
-
Shut down SharePlex on the source system, if it is still running.
sp_ctrl> shutdown
-
On the target, start sp_cop if it is not running already.
$ /productdir/bin/sp_cop &
-
On the target, use the qstatus command to make certain that all of the message in the queues are posted to the target database. The command output should show 0 backlog in the post queue.
sp_ctrl> qstatus
-
From the command line of the target, run the show_scn utility from the bin subdirectory of the SharePlex product directory. For ORACLE_SID use the ORACLE_SID of the target database.
$ /productdir/bin/show_scn ORACLE_SID
- Keep the output of the show_scn utility open. The output displays the complete reconcile command that you will use for each of your post queues to reposition Post to the correct transaction for recovery. It also shows the SCN to which you will activate the configuration later in these steps.
-
Shut down sp_cop on the source and target.
sp_ctrl> shutdown
-
Run ora_cleansp on the source and target to clean out the queues.
$ /productdir/bin/ora_cleansp
-
Start sp_cop on the source and target.
$ /productdir/bin/sp_cop &
-
On the target, stop Post.
sp_ctrl> stop post
-
On the source, issue the activate config command with the scn option to activate the configuration. For scn_value, use the value that is shown in the output of the show_scn utility on the line that states On source activate to scn=nnnnnnn.
sp_ctrl> activate config configname scn=scn_value
Example:
sp_ctrl> activate config myconfig scn=510012416
-
On the target, copy the first reconcile command from the show_scn output and then execute it in sp_ctrl. Then do the same for the second reconcile command, and work your way down the list.
Example:
sp_ctrl> reconcile queue spx11 for o.ora112-o.ora112 scn 235690
sp_ctrl> reconcile queue pq1 for o.ora112-o.ora112 scn 132436
sp_ctrl> reconcile queue pq2 for o.ora112-o.ora112 scn 246843
sp_ctrl> reconcile queue pq3 for o.ora112-o.ora112 scn 123457
The reconcile command may seem stalled until new data comes in. However, the command is working.
-
On the target, start Post.
sp_ctrl> start post