
Size limits when ingesting into Office 365
For quite some time there has been a limit imposed by Microsoft on the size of individual items that can be ingested into Office 365 by third parties. This limit was 25 Mb. The limits for system-provided applications has been increased, and now, the limits for third parties has also been increased. This section explains how to take advantage of this increase.
Details
The default limit on a new Office 365 tenant is still 25 Mb, but this can be increased per user, or across the board for all users.
To increase the limit for an individual user:
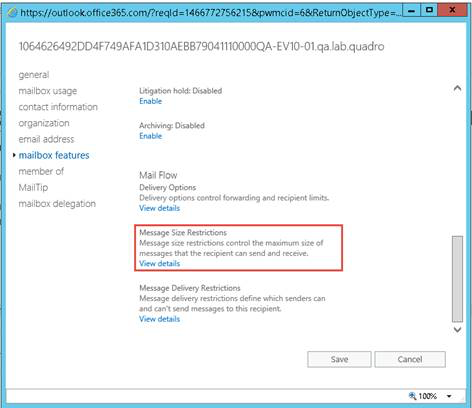
In the Office 365 Admin Center, locate the user and change the max send and max receive sizes:
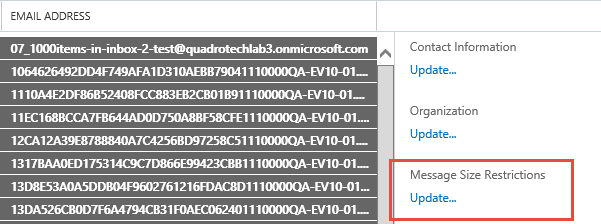
To increase the size for multiple users:
To edit size for multiple users. Shift + Click to select multiple recipients, then click the Update link on the right side to modify those users message size restrictions.
To increase the limit across the board:
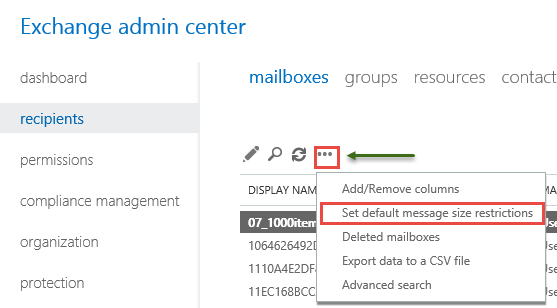
Go to Recipients, Mailboxes, Click and choose Set default message size restrictions
To increase the limits via PowerShell:
Limits can also be changed by PowerShell as follows:
For a single user:
Set-Mailbox -identity user@somedomain.com -MaxSendSize 75Mb -MaxReceiveSize 75Mb
For multiple mailboxes:
{"alias","alias2","alias3") | % {Set-Mailbox -identity $_ -MaxSendSize 75Mb -MaxReceiveSize 75Mb}
For all mailboxes:
Get-Mailbox | Set-Mailbox -MaxSendSize 75Mb -MaxReceiveSize 75Mb
To change the default:
Get-MailboxPlan | Set-MailboxPlan -MaxSendSize 75Mb -MaxReceiveSize 75Mb
|
|
NOTE: Archive Shuttle has seen items more than 120 Mb ingest successfully after making these changes. |

Using OAuth Authentication
Archive Shuttle can be configured to use OAuth to authenticate with Microsoft Office 365, using a Certificate and/or Secret. Read the step-by-step guide below on how to configure OAuth using Secret and a certificate. For more on this, click here.
Considerations when using OAuth
·OAuth is currently supported over both Exchange Online and PowerShell endpoints.
·If you would like to use OAuth without a Global Administrator account, a certificate with thumbprint needs to be configured together with an installed Exchange Online PowerShell v3.2.0 module. Otherwise, a Global Administrator account is required. Click here for more information.
·You cannot utilize more than one service account when using OAuth.
·Basic authentication in Windows Remote Manager (WinRM) only needs to be enabled when a project's scope includes mapping source retention categories to retention labels in Exchange Online. Click here for more information.
Credential Editor
An account with Global Administration rights from Archive Shuttle 10.3 and below in Credential Editor. A Global Admin account is not required in later versions.
Considerations when using the Credential Editor
·This is only when using a certificate thumbprint with installed Exchange Online PowerShell v3.2.0 (EXO v3.2.0). Click here for more information.
·An account with Global Administration rights when using the Credential Editor is still required when using an Application Secret or using certificate thumbprint without installed Exchange Online Powershell v3.2.0 module.
·For more on configuring OAuth for GCC and GCC High tenants by configuring the Credential Editor, click here.
·If using Microsoft Graph, ensure that the Azure App Registration section has been filled, regardless if OAuth is being used. If Azure App Registration is left empty, an error will occur.
Minimum permissions required for the account are listed on the Archive Shuttle Installation Guide.
Configuring OAuth with a Secret
Step 1: Create a new Registered Application in Azure
To get an application ID:
1.Go to https://portal.azure.com and log in to your Office 365 tenant with an administrator account.
2.From the left menu, select Microsoft Entra ID > App registrations.
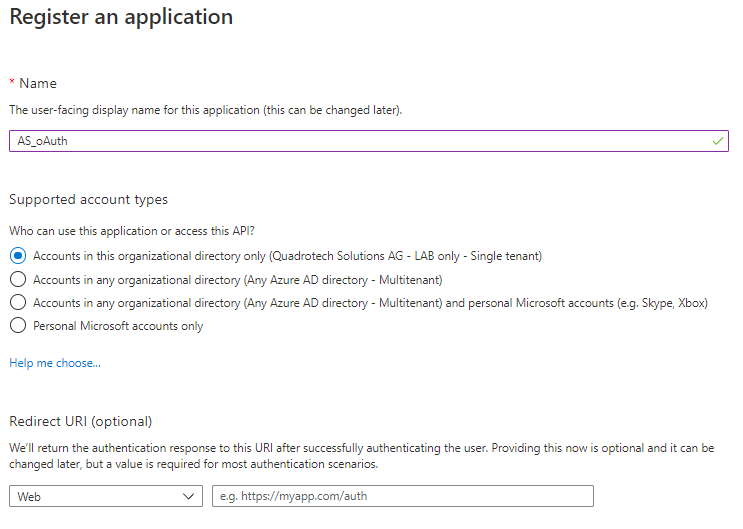
3.Click New registration.
4.Enter a name.
5.From the Supported account types, select Supported Account Type Single tenant.
6.Dont enter anything for Redirect URI (optional). Leave it as it is.
7.Click Register.
8.Copy the Application (client) ID and save it somewhere secure that you will remember. You will need it later.
Step 2: Configure Permissions, Roles and Secret
Configure Application Permissions: Return to the Azure portal and access Microsoft Entra ID > App registrations > owned applications. Then find the application you created in Step 1 above.
1.Select your application, and then select API Permissions.
2.Click Add a Permission.
3.In the Request API permissions section > Select APIs my organization uses, search for Office 365 Exchange Online and select this API.
4.Click Application Permissions
5.In the Permissions list section, select the full_access_as_app listed in this section.
6.Click Add permissions.
7.Click Grant Admin consent.
Assign User Administrator role to the registered Application:
1.Navigate to Active Directory - Roles and Administrators
2.Find and open the User Administrator role
3.Click on Add Assignments
4.Search for the registered application (by Display Name)
5.Select the application and click Add.
The application is now recognized as Service Principal for the User Administrator role.
|
|
NOTES: ·A Microsoft Entra ID Active Directory Premium license is required for these steps. ·This role is mandatory to collect mailboxes. For more on this role, click here. |
Configure Application Secret:
1.Go to Certificates & Secrets and click the New Client Secret button.
2.Enter a descriptive name.
3.Choose an Expiry duration for the Secret (it is recommended to set the secret to not expire)
4.Click Add.
5.Copy the Secret created and save it somewhere. You will need it later.
Step 3: Add your Application ID and Secret on the server running the Archive Shuttle Office 365 Import module.
To do this:
1.In Archive Shuttle, open the Credential Editor while logged in as the account the module is running under.
2.Select the Office 365 OAuth tab and click Add.
3.Enter the Name (free format text), Application ID, Tenant (eg. tenant.onmicrosoft.com) and Secret Value.
4.Save and close the Credential Editor.
5.Restart the Office 365 module to force settings to take immediate effect.
Configuring OAuth with a certificate
Step 1: Create a new Registered Application in Azure
To get an application ID:
1.Go to https://portal.azure.com and log in to your Office 365 tenant with an administrator account.
2.From the left menu, select Microsoft Entra ID > App registrations.
3.Click New registration.
4.Enter a name.
5.From the Supported account types, select Supported Account Type Single tenant.
6.Dont enter anything for Redirect URI (optional). Leave it as it is.
7.Click Register.
8.Copy the Application (client) ID and save it somewhere you will remember and securely. You will need it later.
Step 2: Add a certificate to the server running the Office 365 module.
To add an untrusted certificate to your bridgehead servers local certificate store:
1.Access the server where the Office 365 module is installed.
2.Open the certificates manager by start/run certlm.msc
3.Expand Trusted Root Certificate Authorities > Certificates.
4.Right-click Certificates and select All Tasks > Import to launch the Certificate Import Wizard.
5.Locate the (.cer) certificate file and follow the wizard prompts.
6.Supply password, if required.
7.Right-click Certificates and select All Tasks > Import to launch the Certificate Import Wizard.
8.Locate the (.pfx) certificate file and follow the wizard prompts.
9.Supply the password, if required.
Step 3: Configure Permissions and Roles
Configure Application Permissions: Return to the Azure portal and access Microsoft Entra ID > App registrations > owned applications. Then find the application you created in Step 1 above.
1.Select your application, and then select API Permissions.
2.Click Add a Permission.
3.In the Request API permissions section > Select APIs my organization uses, search for Office 365 Exchange Online and select this API.
4.Click Application Permissions
5.In the Permissions list section, select the full_access_as_app listed in this section.
6.Click Add permissions.
7.Click Grant Admin consent.
Assign User Administrator role to the registered Application:
1.Navigate to Active Directory - Roles and Administrators
2.Find and open the User Administrator role
3.Click on Add Assignments
4.Search for the registered application (by Display Name)
5.Select the application and click Add.
The application is now recognized as Service Principal for the User Administrator role.
|
|
NOTES: ·A Microsoft Entra ID Premium license is required for these steps. ·This role is mandatory to collect mailboxes. For more on this role, click here. |
Step 4: Get a Thumbprint
To get a thumbprint:
1.Go to Certificates & Secrets and click the Upload Certificate button.
2.Upload your certificate file from Step 2.
3.Copy the certificate Thumbprint and save it somewhere. You will need it later.
|
|
NOTE: OAuth supports the Exchange Online Powershell Module v3.0.0 and above (v.3.2.0 recommended). This can be used to authenticate the use of a certificate and thumbprint in the case of a Global Administrator not being present to connect to Office 365. Application secret is NOT supported via this method. |
Step 5: Add your Application ID and Thumbprint on the server running the Archive Shuttle module.
To do this:
1.In Archive Shuttle, open the Credential Editor while logged in as the account the module is running under.
2.Select the Office 365 OAuth tab and click Add.
3.Enter the Name (free format text), Application ID, Thumbprint, and Tenant (eg. tenant.onmicrosoft.com)
4.Save and close the Credential Editor.
5.Restart the Office 365 module to force settings to take immediate effect.