
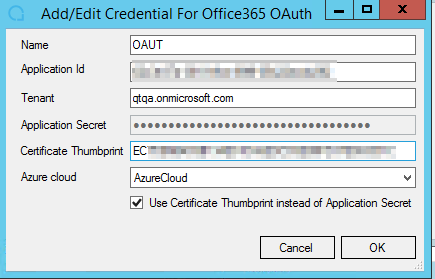
Required API permissions for to use modern authentication (oAuth)
Below are required API permissions for Archive Shuttle.
As Global Administrator
|
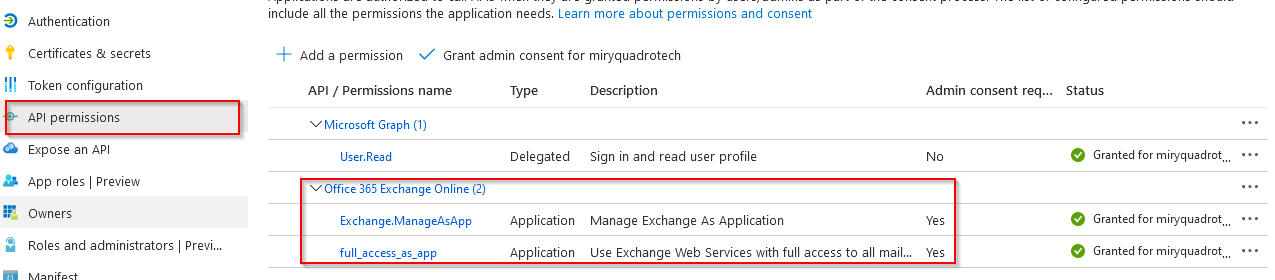
Office 365 Exchange Online (1) | ||
|---|---|---|
|
full_access_as_app |
Application |
Use Exchange Web Services with full access to all mailboxes |
For Exchange Online
|
Microsoft Graph (1) | ||
|---|---|---|
|
User.Read |
Delegated |
Sign in and read user profile |
|
Office 365 Exchange Online (2) | ||
|---|---|---|
|
Exchange.ManageAsApp |
Application |
Manage Exchange as Application |
|
full_access_as_app |
Application |
Use Exchange Web Services with full access to all mailboxes |
Using Exchange Online PowerShell module
Connecting to Office 365 using OAuth supports the Exchange Online Powershell Module v3.0.0 and above. This can be used to authenticate the use of a certificate and thumbprint. This is useful in the case of a Global Administrator account not being present to connect to Office 365.
Visit this article from Microsoft for more about the module.
|
|
NOTES: ·Application secret is NOT supported via this method. ·PowerShell compliance commands still need to use Global Admin credentials to connect to Exchange Online. Microsoft does not support AccessToken parameter for the Connect-IPPSSession command. PowerShell compliance is used to get a list of compliance tags. |

Installing the Exchange Online Management module
You first need to download the Exchange Online Management module. This needs to be on the same machine as the Office 365 module.
|
|
PRE-REQUISITES: ·PowerShell 5.1 and later are supported. ·Minimum requirements: EXO v3.0.0 installed on machine where module is located.
·PowerShell command: Install-Module ExchangeOnlineManagement on machine where module is located. ·A self-signed certificate can be used. Certificates issued with SHA 1 or SHA 2 can also be used. Azure permits only .cer, .pem and .crt public keys. For more about Azure requirements for certificates, click here. View this section and this page for more information. |
1.Install the certificate into the Personal and Trusted Root Certification Authorities folder stores on a virtual machine where the Office 365 module is running.

2.Open the Azure portal, and go to Microsoft Entra ID.
3.Select App registrations, then New registration.
4.Give the application a name, and select Accounts in this organizational directory only.
5.Set Redirect URI to Web, and leave the URL blank. Then click Register.
6.Next, we need to configure the Application permissions. Select API Permissions.
7.User Read should appear as default. Click Add a permissions, and locate Office 365 Exchange Online from the APIs my organization uses tab.
8.Select Application permissions. In the next screen, expand Exchange, and check full_access_as_app and Exchange.ManageAsApp. Then click Add permissions.
9.Now we need to grant administration consent. Click Grant admin consent for <tenant>. When this is completed, the Status column for full_access_as_app and Exchange.ManageAsApp permissions should read Granted for <tenant>.
10.Select Certificates & Thumbprints, and upload the certificate you previously created.
|
|
NOTE: Check that the certificate (that is on the same virtual machine as the Office 365 module) is in the .cer format. .pfx is not supported. |

11.Navigate to Active Directory - roles and administrators.
12.Find the Global Reader role and open it.
13.Click on the Add assignments button.

14.Select the registered application from step 4 as the ServicePrincipal for the Global Reader role.
15.Repeat steps 12 and 13 for the Exchange Administrator and User Administrator roles.
Scoping the application access policy (creating scoped accounts)
|
|
NOTE: This process can only be used when configuring Archive Shuttle using a certificate. |
Creating an application registration using a certificate
1.Create a new registered application with Azure using a certificate. Use the instructions as seen in step 1, under the Configuring OAuth with a certificate section here.
2.Upload a certificate by going to Certificates & secrets, and under Certificates, click Upload certificate.
3.Select the required certificate, enter a description if needed, and click Add.
4.On API Permissions, click Add a permission, and enter the API permissions as seen under the For Exchange Online section here. Do NOT grant admin consent at this time.
Adding administrative roles
5.On the Roles and administrators tab in the Microsoft Entra ID admin center, and in the text field, search for the role titled Exchange recipient administrator or global reader. Click on its name.
|
|
NOTE: The global reader role will allow you to read any attribute, but not update attributes. |
6.Click Add assignments, then search for the application registration you created earlier, then click Add.
Grant admin consent
7.Go back to the API permissions for your application registration, and click Grant admin consent for <tenant>, and click Yes.
Creating an Exchange security group
1.You now need to create an Exchange security group. Go to the Exchange admin center.
2.Under Recipients > Groups, click Add a group.
3.On the Group type page, select Mail-enabled security, and click Next.
4.On the Basics page, enter a group name and, optionally, a description. Once created, this is the group where you will need to add the mailboxes that you want the app registration to have write access to write to. Once this is done, click Next.
5.On the Settings page, enter a group email address. This could be the same name as the group name, and click Next.
6.Review the group you have created. Once you are satisfied, click Create group. It may take a few minutes for the group to appear in the group list.
|
|
NOTE: You may want to remove access to emails being sent to the group directly. To do this, click on the group name under Mail-enabled security, and under Settings, check the Hide this group from the global address list. |
7.You will now need to add users to the group. Select the group under Mail-enabled security, and under Members, select View all and manage members. Enter the members by selecting their checkbox, and click Add until all your desired members have been added.
|
|
NOTE: The Exchange security group and application access policy can replace usage of the Exchange Administrator role to work with Office 365. Using this process may result in certain features not functioning as expected, such as leavers and virtual journal migrations. We strongly recommend use of Exchange Administrator role instead. |
Connecting to the tenant
8.Open the PowerShell module, and connect to the Exchange module using the following command: Connect-ExchangeOnline. Then click the Run Selection button.
9.Sign into the module using a global administration account. Connecting may take up to a minute.
Creating the application access policy
10. Use the following command in PowerShell to create the application policy. Replace the fields in bold with your own credentials:
New-ApplicationAccessPolicy -Description Policy Name -AppId OAuth App Registration ID -AccessRight RestrictAccess -PolicyScopeGroupId Mail Enabled Security Group Email Address
Then click Run Selection. The output to the command should appear below.
|
|
NOTES: ·Once the command has been ran, it may take up to one hour for the command to take effect. It is recommended that you wait this full period to ensure application of this command. Click here for more information. ·You can test whether the application of the command has been successful by using the following command. Replace the fields in bold with your own credentials: Test-ApplicationAccessPolicy -Identity SMTP address -AppId Outh App Registration ID |