Chat now with support
Chat with Support

NetVault 13.0.1 - Administration Guide

Introduction Getting started Configuring clients Managing catalog search Configuring storage devices
About storage devices SAN considerations Quest DR Series systems Quest QoreStor NetVault SmartDisk EMC Data Domain Systems Snapshot Array Manager Virtual Tape Libraries Virtual standalone drives Shared Virtual Tape Libraries Physical tape devices Storage tiers
Backing up data Managing policies Restoring data Managing NetVault dashboard Managing jobs Monitoring logs Managing storage devices
Monitoring device activity Managing disk-based storage devices in list view Managing disk-based storage devices in tree view Managing the Snapshot Array Manager Managing tape libraries in list view Managing tape libraries in tree view Managing tape drives in list view Managing tape drives in tree view Adding shared devices
Managing storage media Managing user and group accounts Monitoring events and configuring notifications Reporting in NetVault Working with client clusters Configuring default settings for NetVault
About configuring default settings Configuring encryption settings Configuring plug-in options Configuring default settings for post-scripts Configuring default settings for Verify Plug-in Configuring Deployment Manager Settings Configuring Job Manager settings Configuring Logging Daemon settings Configuring Media Manager settings Configuring Network Manager settings Configuring Process Manager settings Configuring RAS device settings Configuring Schedule Manager settings Configuring Web Service settings Configuring Auditor Daemon settings Configuring firewall settings Configuring general settings Configuring security settings Synchronizing NetVault Time Configuring default settings for global notification methods Configuring the reporting utility Configuring NetVault WebUI default settings Configuring NetVault to use a specific VSS provider Configuring default settings using Txtconfig
Diagnostic tracing Managing diagnostic data Using the deviceconfig utility NetVault processes Environment variables Network ports used by NetVault Troubleshooting
Common errors
NetVault Service fails to start on Windows NetVault Service fails to start after the machine is restarted NetVault Service starts, but stops immediately on Linux Login fails after any change in the server IP address Unexpected behavior of NetVault WebUI WebUI does not run in Compatibility View in Internet Explorer NetVault installer fails during push installation VSS-based backup fails Modifying TCP/IP socket buffer size on Windows Restores using Data Copy savesets fail on clients running NetVault 10.0.1 Restore fails on Itanium platforms if the index is larger than 2GB After upgrade, Data Copy and Consolidated backup job on Linux fails After upgrade, console error is displayed on WebUI pages Deployment task hangs on target Linux machine during push installation. Unable to add package store with hostname. Deployment task fails due to network configuration issues. Domain user is unable to login NetVault Server if the workstation attribute is set. Domain user is unable to login NetVault Server on Debian 9. Adding the target machine as a client fails, after successful push installation. Unable to install, uninstall or navigate catalog search page after manually uninstalling NetVault Client Host. Unable to install, uninstall catalog search on client after NetVault Server migration with the same or different server name External Azure AD user cannot add an external Azure AD user to NetVault Server Failed to verify target Windows machine from a Linux-based NetVault Server NetVault is unable to send reports as an email attachment in PDF format on RHEL 5.x platform Restore fails on NetVault Database backup When using RDA for backups, only four streams are used at once Unable to create large VTL on Linux Browsing a folder with a large number of files times out
Safe Mode in NetVault

Starting or stopping the NetVault Service

The NetVault Service is configured to start automatically on the server and client machines. You can use the Txtconfig utility or CLI to manually start or stop the NetVault Service.

a
In a terminal or command prompt window, type, txtconfig, and press Enter or Return.
b
On the Machine page, press p to view the main menu, and then press the option number for the Services page.
a
To start the service, type: $NV_HOME/etc/startup.sh start
To stop the service, type: $NV_HOME/etc/startup.sh stop
To start the service, type: net start “NetVault Process Manager”
To stop the service, type: net stop “NetVault Process Manager”

Enabling Web Service over HTTP or HTTPS

By default, the Web Service is enabled over HTTPS. You can modify the Web Service settings to change the port or protocol. These settings also let you specify the security certificate file and private key file for HTTPS communications.

You can modify the Web Service settings through the following interfaces: NetVault WebUI (through the Change Settings page), or Txtconfig.

b
On the NetVault Server Settings page, under Services, click Web Service.
a
In a terminal or command prompt window, type, txtconfig, and press Enter or Return.
b
On the Machine page, press p to view the main menu, and then press the option number for the Web Service page.

HTTP settings

To access the Web Service through HTTP, configure the following settings:

Enable Web Service over HTTP: Select this check box.

HTTPS settings

To access the Web Service through HTTPS, configure the following settings:

Enable Web Service over HTTPS: This protocol is selected by default.
HTTPS Listen port for incoming Web Service connections: By default, NetVault uses port 8443 for HTTPS. If this port is in use by any other server or application, configure an alternate port.
WebService security certificate file: To use HTTPS, provide a SSL certificate.
NetVault provides a self-signed certificate (server.crt), which resides in the etc directory under the NetVault installation directory. This certificate generates warnings in most browsers.
Ciphers to disable for incoming Web Service connections: You can modify the Web Service configuration to disable ciphers for incoming web service connections settings to prevent from allowing one or more ciphers. These settings can be configured from the NetVault Server Settings page. By default, this field is blank and all the ciphers are allowed.
Protocols to disable for incoming Web Service connections: You can modify the Web Service configuration to disable protocol for incoming web service connections settings to prevent from allowing one or more protocols. These settings can be configured from the NetVault Server Settings page. By default, this field is blank and all the protocols are allowed.
WebService private key file: Provide the private key file required for HTTPS communications.
The default key file is server.key, which resides in the etc directory under the NetVault installation directory.
NetVault WebUI: Click Apply to apply the settings and close the WebUI dialog box.
Txtconfig: Press s to save the settings, and then press q to quit Txtconfig.

Logging in to NetVault

The following options are available for logging in to the NetVault Core:

For more information about logging in using AD, see Integrating Active Directory with NetVault.

Before logging in with the Azure AD option, register NetVault in the Azure portal and then configure Azure AD in NetVault. For more information, see Using Azure Active Directory as an identity provider.

Press Enter.
admin: The administrator account for NetVault.
default: A standard user account that can be used to perform various operations in NetVault.

After installing NetVault, you can use either the admin or the default user account to log in to NetVault. By default, no password is assigned to these user accounts.For more information about NetVault user accounts, see Managing user and group accounts.

To log in using Azure AD credentials, click Sign in with Azure AD, enter the appropriate credentials, and then click Enter.
After you log in, the WebUI opens the Server Monitor page in your browser window.

Overview of NetVault WebUI

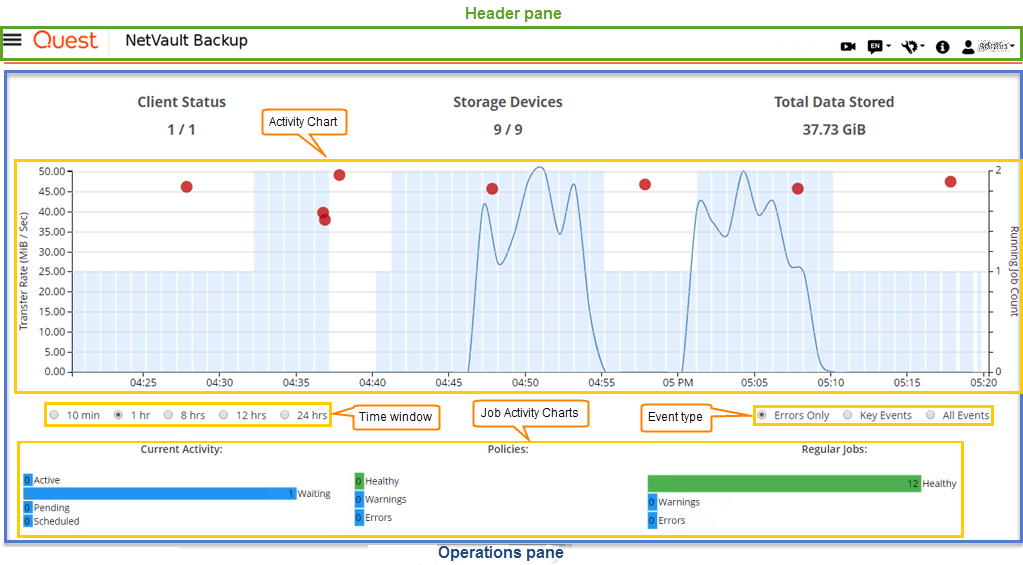
The NetVault WebUI consists of the Header pane, Navigation pane, and Operations pane.

The following table provides a brief description of the WebUI panes:

Header pane

This pane includes the following items:

Video icon: Provides access to the video tutorial for the currently loaded page. The link opens in a new browser window or tab.
Language: Displays the list of available languages from which you can select the display and input language for NetVault WebUI.
Settings icon: Displays the list of options to change Application Settings, Clear NetVault cache, and Clear NetVault UI Preferences.
a
In the header pane of NetVault WebUI, click the Settings icon and select Application Settings. Application Settings drawer is displayed on the right- side of the page. Configure the following options:
Navigation: To remove the auto-hide setting of navigation bar in the NetVault WebUI, clear the Auto-hide Navigation Drawer check box. By default, the navigation bar is set to auto-hide.
Color Palette: To change the color theme of NetVault WebUI to dark theme, select the Dark theme. By default, the NetVault WebUI is displayed in Light theme.
Show Actions as: To view the Actions option as a page-level and table-level context menus, select Context menus. By default, the action options are displayed as buttons on bottom of the NetVault WebUI pages.
When you select the Context Menus option, the page-based action buttons on the bottom of the page are replaced with a context menu shown as Horizontal Ellipsis icon at the top of the page (after the page title). Also, the table-based actions are shown in the ‘Actions’ column in the table. Click the Horizontal Ellipsis icon and select the required action.This option is applicable to some of the NetVault WebUI pages.
Time Formatting: To change the time format, select 12-hour or 24-hour format from the application settings. By default, the application sets 24-hour time format from the server settings. Change the time format in following ways:
12-hour (AM/PM): Sets 12-hour (AM/PM) format of the NetVault WebUI.
24-hour: Sets 24-hour format for the NetVault WebUI.


Default Table Pagesize: To change the default page size for tables in NetVault WebUI click the Default Table Pagesize drop down. If you have already configured the page size for respective tables from Table Settings, then these settings supersedes Application settings. By default, the application sets the page size to Auto from the server settings. You can change NetVault WebUI page size to the following options or you can manually enter page size number:
25: Sets the page size to display 25 records in a table.
50: Sets the page size to display 50 records in a table.
100: Sets the page size to display 100 records in a table.
500: Sets the page size to display 500 records in a table.
1000: Sets the page size to display 1000 records in a table.
b
a
In the header pane of NetVault WebUI, click the Settings icon and then click Clear NetVault UI Preferences.
Information icon: Shows the About dialog box.
User: Displays the user icon and user name. To quit NetVault, move the pointer over the area, and click Sign Out.

Navigation pane

This pane provides links to set up, manage, and monitor various aspects of NetVault. The navigation links are organized into the following sections:

For more information about this pane, see Navigation pane.

Operations pane

This pane is the main area where you perform all NetVault operations. The Operations pane loads various WebUI pages depending on the item you select in the Navigation pane.

Related Documents

The document was helpful.

Select Rating

I easily found the information I needed.

Select Rating