|
IMPORTANT: Because it introduces minimal performance overhead on the database during normal operations, Block Change Tracking is disabled by default on Oracle® 10g and later. However, the benefits of avoiding full datafile scans during Incremental Backups are considerable, especially if only a small percentage of data blocks is changed between backups. For more information on Incremental Backups and change tracking, see Improving Incremental Backup Performance Change Tracking in the Oracle Database Backup and Recovery Basics guide. |
|
1 |
Start SQL*Plus, and connect with administrator privileges to the target database. |
|
• |
To store it in the default location: |
|
• |
Set the DB_CREATE_FILE_DEST parameter for the target database. |
|
• |
To store it in a user-defined location, issue the following SQL statement: |
|
1 |
In the Navigation pane, click Manage Clients. |
|
2 |
On the Manage Clients page, select the machine that contains the Oracle® Database Server, and click Manage. |
|
3 |
|
4 |
Click Choose Plug-in File, navigate to the location of the “.npk” installation file for the plug-in (on the installation CD or the directory to which the file was downloaded from the website). |
|
5 |
Select the file entitled “ora-x-x-x-x.npk” (where xxxx represents the version number and platform), and click Open. |
|
6 |
To begin installation, click Install Plugin. |
|
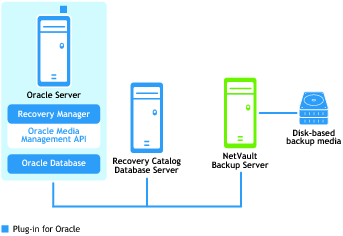
IMPORTANT: When installing Plug‑in for Oracle on Windows®, the plug-in copies a dynamic-link library (DLL) file, “ORASBT.DLL,” to the “…\system32” directory. (If you are installing the 32-bit version of the plug-in on a 64-bit version of Windows, this directory is named “…\sysWOW64”.) This DLL is the link between Oracle and the media management utilities used by NetVault Backup, and is required for the proper functioning of the plug-in. Ensure that the ORASBT.DLL exists in this directory. |
|
1 |
In the Navigation pane, click Manage Clients. |
|
2 |
|
3 |
In the Installed Software table on the View Client page, select Plug‑in for Oracle, and click the Remove Plugin button ( |
|
4 |
