Chat now with support
Chat with Support

NetVault 12.2 - Administration Guide

Introduction Getting started Configuring clients Managing catalog search Configuring storage devices Backing up data Managing policies Restoring data Managing NetVault Backup dashboard Managing jobs Monitoring logs Managing storage devices
Monitoring device activity Managing disk-based storage devices in list view Managing disk-based storage devices in tree view Managing the Snapshot Array Manager Managing tape libraries in list view Managing tape libraries in tree view Managing tape drives in list view Managing tape drives in tree view Adding shared devices
Managing storage media Managing user and group accounts Monitoring events and configuring notifications Reporting in NetVault Backup Working with client clusters Configuring default settings for NetVault Backup
About configuring default settings Configuring encryption settings Configuring plug-in options Configuring default settings for post-scripts Configuring default settings for Verify Plug-in Configuring Deployment Manager Settings Configuring Job Manager settings Configuring Logging Daemon settings Configuring Media Manager settings Configuring Network Manager settings Configuring Process Manager settings Configuring RAS device settings Configuring Schedule Manager settings Configuring Web Service settings Configuring Auditor Daemon settings Configuring firewall settings Configuring general settings Configuring security settings Synchronizing NetVault Time Configuring default settings for global notification methods Configuring the reporting utility Configuring NetVault Backup WebUI default settings Configuring NetVault Backup to use a specific VSS provider Configuring default settings using Txtconfig
Diagnostic tracing Managing diagnostic data Using the deviceconfig utility NetVault Backup processes Environment variables Network ports used by NetVault Backup Troubleshooting

Adding a container from the Quest QoreStor page

To add a container as a media, see Adding a container as a Media for QoreStor.

Passthrough: When this mode is selected, deduplication processing occurs on the Quest QoreStor system. The passthrough mode requires at least 200 MB of free memory on the NetVault Backup Client.
Optimized: When this mode is selected, deduplication processing occurs on the NetVault Backup Client. The Optimized mode requires at least 4 GB of free memory on the NetVault Backup Client.
Auto: When this mode is selected, NetVault Backup decides the deduplication mode (Passthrough or Optimized) based on the criteria for Passthrough and Optimized.

NetVault SmartDisk

This section includes the following topics:

About NetVault SmartDisk

NetVault SmartDisk provides disk-based storage with optional data deduplication capability.

NetVault SmartDisk uses byte-level, variable block-based software deduplication, which packs up to 12 times more data into the same storage area for a 92 percent reduction in storage footprint. NetVault SmartDisk is installed and licensed separately from NetVault Backup.

A NetVault SmartDisk instance consists of one or more Storage Pools and a set of processes that perform backup and deduplication operations. A Storage Pool consists of one or more file system volumes, which can be easily extended by adding more file system paths. An instance can accept data streams from heterogeneous platforms.

You can install a NetVault SmartDisk instance that has deduplication enabled (the default mode) on a dedicated NetVault SmartDisk Server or a NetVault Backup Client. (If deduplication is enabled, you cannot install NetVault SmartDisk on the NetVault Backup Server.) If deduplication is disabled, you can also select the NetVault Backup Server as the host machine.

For more information about installing and configuring NetVault SmartDisk, see the Quest NetVault SmartDisk Installation Guide and Quest NetVault SmartDisk Administrator's Guide.

Adding a NetVault SmartDisk

To use a NetVault SmartDisk for backups and restores, you must first add the device to the NetVault Backup Server. You can use the configuration wizard to add and configure this device.

1
In the Navigation pane, click Guided Configuration, and then on the NetVault Configuration Wizard page, click Add Storage Devices.
In the Navigation pane, click Manage Devices, and then click Add Device.
2
On the Add Storage Devices page, select the NetVault SmartDisk option, and click Next.
3
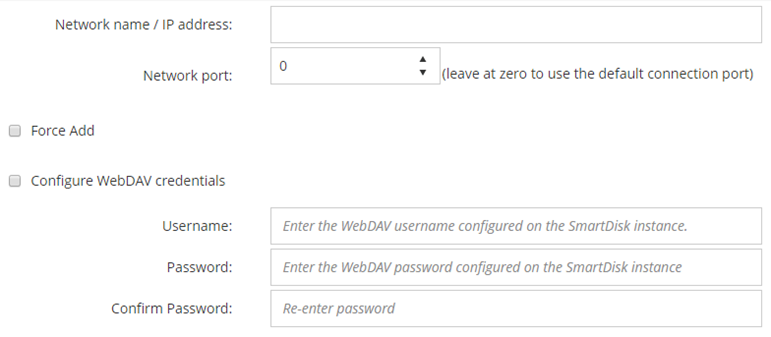
On the Add NetVault SmartDisk Instance page, provide the following details.

Network name/IP address

Type the Fully Qualified Domain Name (FQDN) or IP address of the host on which NetVault SmartDisk is installed. You must provide this information even if the device is deployed on the NetVault Backup Server.

If the server is unable to resolve the host name, it fails to add the device.

Network port

The default value for this setting is zero (0). If the device is listening on the default port, do not change this value.

If the device is listening on a non-default port, type the port number configured as the Network Settings:Remote Listen Port in the percolator.cfg file. For more information about configuring a non-default port for a NetVault SmartDisk, see the Quest NetVault SmartDisk Administrator’s Guide.

Force Add

If the device is already added to another NetVault Backup Server with the same name, select the Force Add check box. This option can be useful if you have performed a disaster recovery to rebuild the NetVault Backup Server.

Configure WebDAV credentials

To prevent unauthorized access to data, you can set up WebDAV authentication for server requests on NetVault SmartDisk. NetVault SmartDisk uses Digest Access Authentication with WebDAV. For more information about setting up authentication on the NetVault SmartDisk Server, see the Quest NetVault SmartDisk Administrator’s Guide.

If WebDAV authentication is enabled on the NetVault SmartDisk, select this check box, and provide the following information:

Username: Specify the user account configured on the NetVault SmartDisk Server.
Password: Type the password for the user account.
Confirm Password: Type the password again for confirmation.
4
Click Next to add the device.
Related Documents

The document was helpful.

Select Rating

I easily found the information I needed.

Select Rating