|
1 |
In the Navigation pane, click Manage Sets. |
|
2 |
|
4 |
|
NOTE: To preview the selection set summary and plug-in options set summary, move the pointer over the information icons on Edit Selection Set page. |
|
5 |
The Search option on the Create Restore Job — Choose Saveset page allows you to find specific files or data items without opening any savesets or browsing through their contents. You can use filenames or regular expressions to find the data items that you want to restore.
To configure or enable the catalog search, click the bulb icon shown near Search button on the Create Restore Job — Choose Saveset page.
|
1 |
|
2 |
In the Search for files in savesets dialog box, configure the following options: |
|
• |
Search String: Type the search string. |
|
• |
Regular expression search: To use POSIX (Portable Operating System Interface for Unix) regular expressions in the Search String box, select this check box. |
|
• |
Use legacy search method: This check box is displayed if both cataloged and non-cataloged savesets are included in the search. |
|
3 |
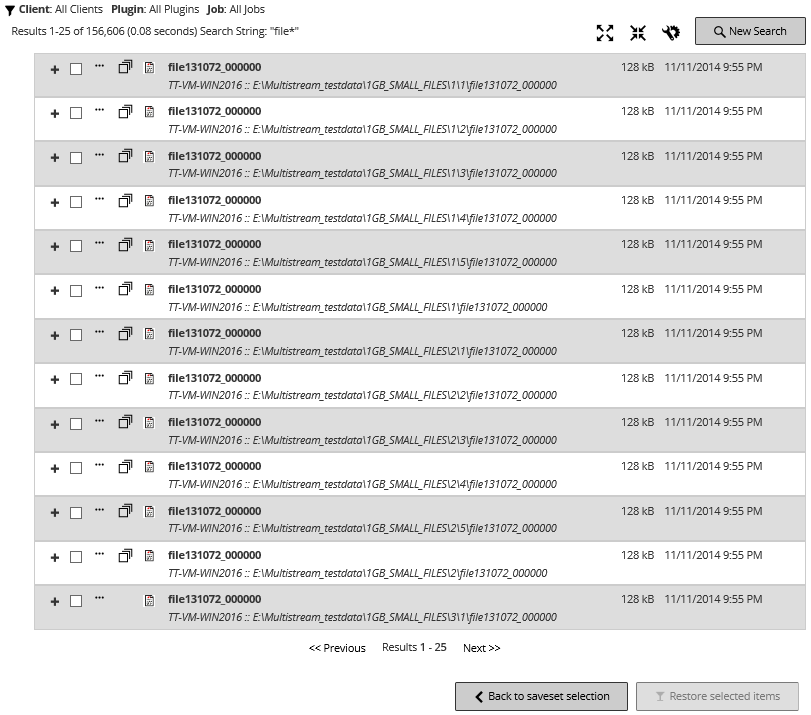
To search the data items in one or more specific savesets, select the desired saveset (s) and click Search. If you do not select any saveset, then all savesets are included in the search. On the Search Results page, you can view the specified files or data items. The following search results page is displayed when catalog search is configured and enabled on your NetVault Backup system. |
|
• |
|
• |
|
• |
Expand icon: To expand all result items, click the expand icon shown on top of the results table. |
|
• |
Collapse icon: To collapse all result items, click the collapse icon shown on top of the results table. |
|
• |
Settings icon: To set the number of search results per page, click the settings icon. ‘Settings’ drawer is displayed on the right- side of the page. Type or select the value and click OK. By default, the page displays 25 records. You can view a minimum 10 and maximum 100 records on the Search Results page. |
|
• |
New Search button: To search the data items in the selected saveset, click New Search. In the Search for files in savesets dialog box, configure the following options and click Search: |
|
• |
Search String: Type the search string. |
|
• |
Regular expression search: To use POSIX (Portable Operating System Interface for Unix) regular expressions in the Search String box, select this check box. |
|
• |
|
• |
|
• |
|
4 |
Select the items you want to restore. You can only restore items from one saveset. Click Restore selected items. |
|
5 |
The Media List option on the Create Restore Job — Choose Saveset page lets you view information about the media items used to store a backup. You can view details about the data segments and index segments for a backup.
|
1 |
On the Create Restore Job — Choose Saveset page, select the applicable saveset. |
|
2 |
|
• |
Backup size: This area shows the total size of the saveset in number of bytes |
|
• |
Data segment table: This table shows information about the media items that contain the data segments. You can view the following details: media label, media group label, stream ID, starting byte number, ending byte number, and media location |
|
• |
Index segment table: This table shows information about the media items that contain the index segments. You can view the media label and media location. |
|
4 |
Click Close to close the dialog box. |
A Source Set is used to specify source device options. You can create Source Sets for restore jobs from the Create Restore Job page.
|
1 |
|
2 |
On the Create Restore Source Set page, click Device Selection, and configure the following settings. |
|
To use only devices that are locally attached to the target client, select this check box. |
|
3 |
