Scheduling a Report
The Metalogix Diagnostic Manager Scheduled Reports feature lets you set up reports to run in the background at a specified date and time, either once or on a recurring basis.
To schedule a report do the following:
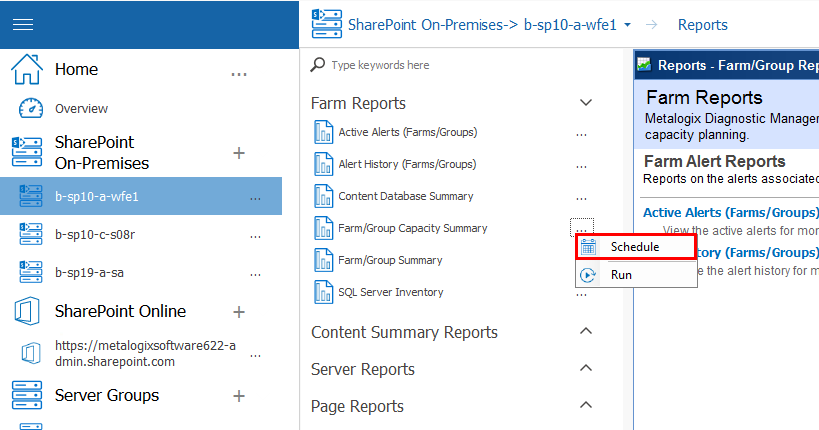
1.In the Management Console, select a farm whose reports you wish to see.
2.Click the farm name, above the overview area, and select Reports from the drop down pane.

3.From the left hand pane, select (...) next to the report that you would like to schedule, and select Schedule from the drop down list.
This feature is especially useful for reports that you want to run and distribute on a regular basis.
|
|
NOTE: Currently, you cannot schedule a custom report or a report that includes a custom date range. |

Scheduling a Recurring Report for Which a Specific Time Period was Selected
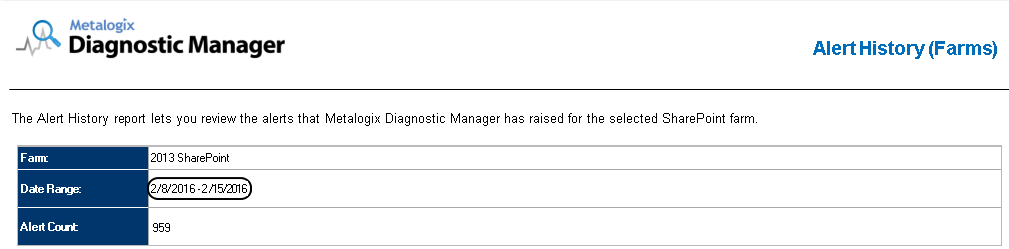
When report parameters specify a fixed time period (for example, "Today" or "Last [x] Days (or Hours)," the Metalogix Diagnostic Manager scheduler will interpret it as a relative date range (that is, relative to the date when the scheduled job is run). Whenever the job runs, the report will cover the specified time period, as of the run date.
EXAMPLE: If you initiate an Alert History Report for a date range that covers the past 7 days, then schedule it to run every week, beginning in the first week of February:
·the first time the scheduled job runs, results will include data for the week specified in the report parameters:

·the second time the scheduled job runs (the following week), results will include data for the second week of February.
Creating a Scheduled Report
|
|
NOTE: Currently, you cannot schedule a custom report or a report that includes a custom date range. |
To create a Metalogix Diagnostic Manager Scheduled Report job:
1.In the Management Console, select a farm whose reports you wish to see.
2.Click the farm name, above the overview area, and select Reports from the drop down pane.
3.From the left hand pane, select (...) next to the report that you would like to schedule, and select Schedule from the drop down list.
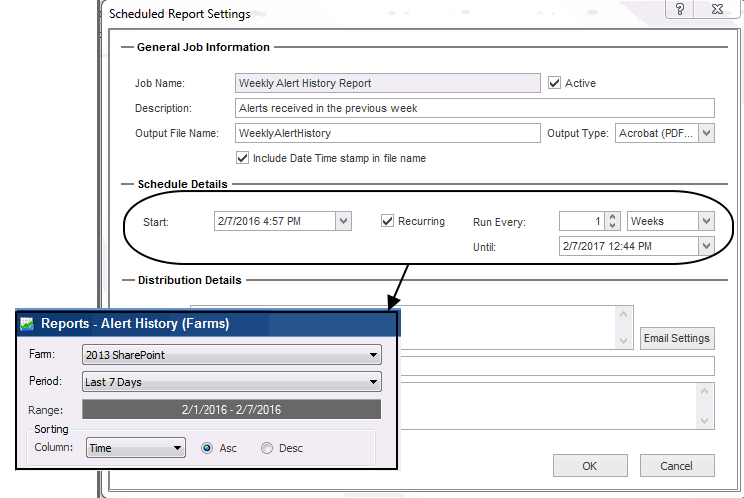
4.Complete the General Job Information section as follows:
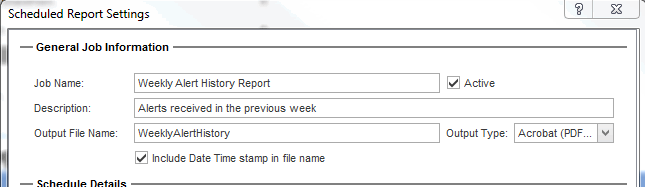
a)Enter a Job Name and Description.
|
|
NOTE: Choose a brief but descriptive name that uniquely identifies the job. This will make it easier for you to identify it in the Scheduled Reports grid. |
b)If you want the job to be active, make sure the Active box is checked.
|
|
NOTE: Once a scheduled job has been added, it can be activated or deactivated as needed. |
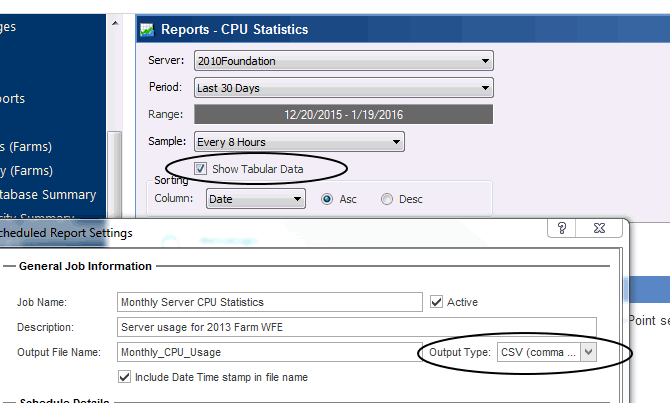
c)Enter an Output File Name.
|
|
NOTE: It is not necessary to enter a file extension; it will be applied automatically based on the selected Output Type. |
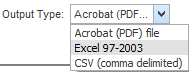
d)Select an Output Type (Acrobat (PDF), Excel 97-2003, or CSV (comma delimited) from the drop-down
|
|
NOTE: If you select the CSV option, only tabularnot graphicaldata will be output. For reports that include graphical data (such as Statistics or certain Summary reports) that you want to output to CSV, tabular data will be included regardless of whether the Show Tabular Data box is checked. |
e)If you want the date and time that the job is run to be appended to the file name, click the Include Date Time stamp in the file name box. (This will enable you to retain a historical record of report results.)
5Complete the Schedule Details as follows:
|
If you want to ... |
Then ... |
|---|---|
|
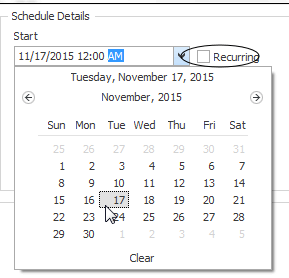
run an operation one time only |
a.Enter or select a Start date and time. b.Uncheck the Recurring box. |
|
run an operation at regular intervals |
a.For Start, enter or select the first date and time that you want the job to run. b.Make sure the Recurring box is checked. c.For Run every: ·Enter or select the interval (as a positive integer) at which you want the job to run. ·Select an interval type (Weekly, Hourly, Daily, or Monthly). d.For Until, enter or select the last date and time that you want the job to run. |

|
|
NOTE: Dates and times correspond to those of the server on which the Metalogix Diagnostic Manager scheduler is running. |
6For Distribution Details:
§Complete the Send to:, Subject, and Message fields. (Note that you can enter multiple email addresses (separated by commas) in the Send to field.
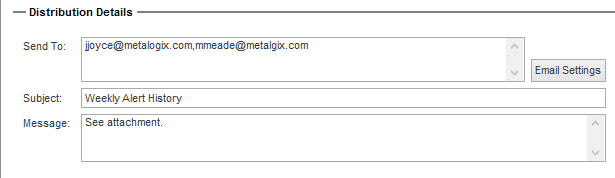
§If you want to configure email settings, click the [Email settings] and follow the instructions for Configuring e-mail Settings.
|
|
CAUTION: Email settings are common across Metalogix Diagnostic Manager operations. For example, any changes made to email settings initiated from the Scheduled Report dialog will also impact Alert Responses. |

7To save the job, click [OK].
Once a scheduled job has been created, it can be accessed via the Scheduled Reports grid.
Managing Scheduled Reports
From the Scheduled Reports grid, you can view the status of scheduled jobs. You can also:
·view the report's parameters
·edit scheduled report settings
·delete scheduled jobs
·run a scheduled report immediately
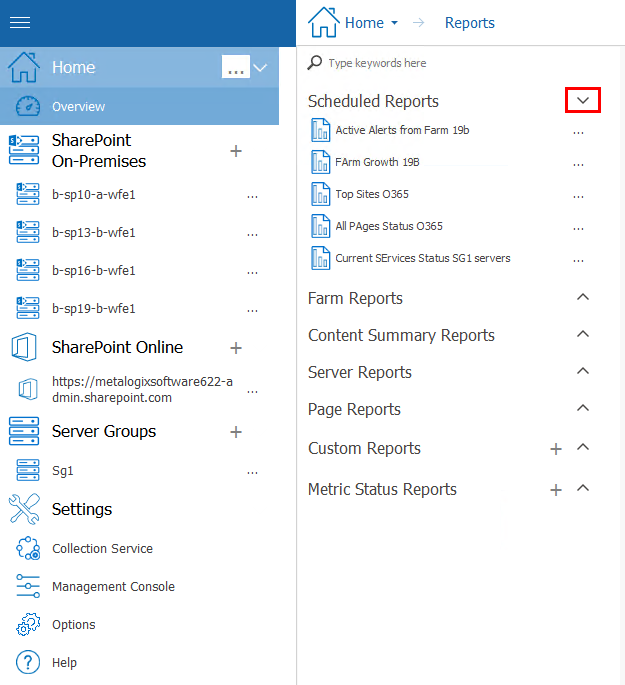
To access the Scheduled Reports grid:
1.In the Management Console, select the farm whose reports you want to view, select the name above the viewing pane and click Reports from the drop down panel.
2.Select the (\/) next to the Scheduled Reports section.
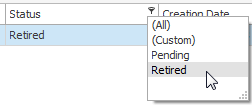
3.The Scheduled Report grid displays the following information for each scheduled job:
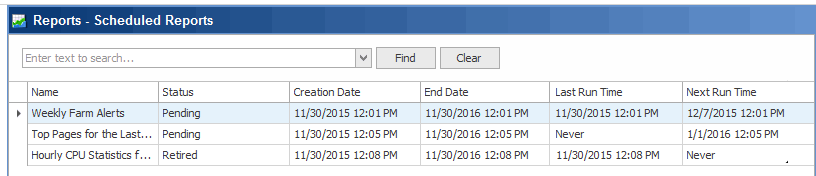
·Job Name
·One of the following Schedule Status values:
|
Status |
Description |
|---|---|
|
Pending |
All jobs that are scheduled to run within the specified date range. Pending jobs include: ·one-time jobs that have not yet run AND ·recurring jobs that have not yet reached their End Date. |
|
Running |
All scheduled jobs that are currently running (as long as the specified date range includes the current date). |
|
Inactive |
Jobs that are not currently active but were created or last ran during the specified date range. |
|
Retired |
Jobs that finished running within the specified date range. Retired jobs include: ·one-time jobs that have already run AND ·recurring jobs that have reached their End Date. |
·Creation Date and time
·End Date and time (which, for recurring jobs, displays the last date and time that the job is scheduled to run)
·Last Run Time
|
|
NOTE: If a job has not yet run for the first time, the Last Run Time displays as "Never." |
·Next Run Time, which identifies:
§the next date/time a Pending job is scheduled to run
§the last date/time a Retired or Inactive job ran
§the start date/time that an in-process job started running.
|
|
NOTE: If a job has reached its End Date and time, the Next Run Time displays as "Never." |
If you want to narrow displayed results, you can:
·search for a specific text string
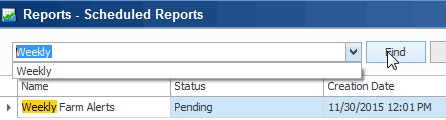
AND/OR
·filter by one or more column headers.