Offline Activation
NOTE: The offline activation option is generally used in cases where you cannot use the online activation due to security settings or lack of internet access. This option will still require some internet access, but allows for the authentication to be done from another machine that is not as restricted by security or has a connection to the internet.
1.Select Offline activation.
2.Click [Next].
A Generate Activation Request dialog displays with a different key. This key can be copied from the window, or the Save to file option can be used to save the key into a text file (in case it needs to be copied to another machine).
3.Copy the Activation URL (listed under the Activation Request) to a web browser that has internet access.
Alternately if the system the Metalogix Content Matrix Console is on does have internet access through a Web browser, click Go to automatically open a web browser to this URL.
4.On a machine that has internet access, use the Activation URL to navigate to the Offline Activation page.
5.Either:
§Enter the key into the Activation data text box.
OR
§If the key was saved to a file, select Browse and navigate to the file.
6.Click [Activate].
Upon successful activation, a new key displays in the text box.
7.Do one of the following:
§To save the key as a DAT file, click [Download file].
OR
§To copy the key to the clipboard (if the license will be activated on the same machine), click [Copy text].
8.Click [OK] to continue.
9.Return to the Activate License dialog.
10.If the Generate Activation Request window is still active, click [Next]. to the Enter your Activation Response window.
11.Use one of the following options:
§If you copied the key to the clipboard on the same machine, paste it into the window.
§If you saved the key to a DAT file, navigate to, and select the DAT file.
12.Click [Next]. The license key will be active and in use.
13.Click [Finish] to complete the process.
Checking the Current Content Matrix Console License
To check the status of the license key in use, open the About dialog. Here, information such as the license type, expiration date (if any), size limitations for migrations, and how much data has already been migrated can be seen.
NOTE: If an offline license is used, the offline activation process will need to be used to do this update instead, unless the system that the Metalogix Content Matrix Console is installed on has internet access.
To check the current license:
1.In the Content Matrix Console ribbon toolbar, choose Help > About.
2.In the dialog that opens, click [Refresh]. This will initiate a refresh of this data from the licensing servers and update the information.
Selecting the SQL Database You Want to Connect to
The first time you launch the Content Matrix Console you will be prompted to select the SQL database that you want to connect to. Options are:
·Connect to Job Database (SQL Server)*
* NOTE: The option Connect to Distributed Database (SQL Server) is disabled as it is only valid for SharePoint Edition.
·Connect to New Job List (SQL Server Compact 4.0* Required)
·Connect to Existing Job List (SQL Server Compact 4.0* Required)
NOTE: The use of SQL CE in a production environment is discouraged because of the following limitations:
§It uses a single .lst file that is less robust and reliable and may be corrupted after the database reaches 4 GB.
§Data compression is not supported.
§Support for large objects is limited.
§Microsoft support for SQL CE has ended.
If you still want to use SQL CE, SQL Server Compact 4.0 must already be installed on your machine. You can download it from Microsoft, install it, then restart the Console.
NOTE: If you have upgraded from version 9.3 or earlier and are using SQL CE (.lst) files but SQL Server Compact is not installed, a pop-up will display. You will be given the option of either installing SQL Server Compact 4.0 or selecting a different Job database.
To create or connect to a full SQL database:
IMPORTANT: If you are connecting to an Azure SQL database, the database must already have been created via Azure Portal. You cannot create or delete an Azure SQL database from within Content Matrix.
1.From the Please connect to a job database dialog, select Connect to Job Database (SQL Server).
2.Complete the Connect to SQL Server dialog:
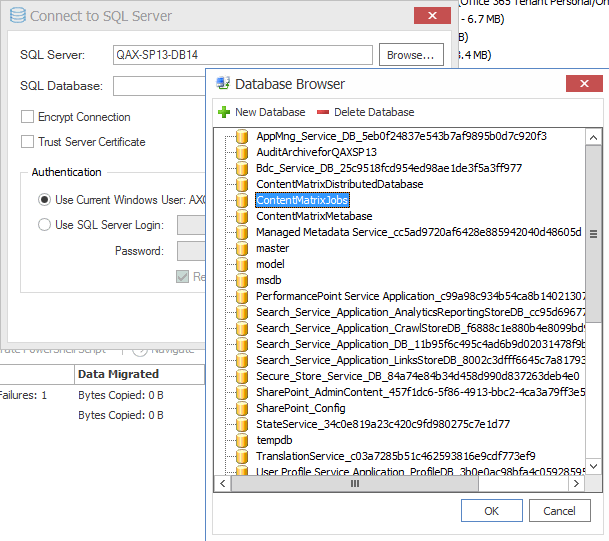
§If you are connecting to an on premises SQL database, create (using the New Database option) or select the database you want to use.
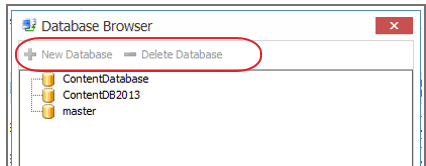
§If you are connecting to an Azure SQL database, select the database that has been created in Azure Portal for use by Content Matrix. (Note that the New Database and Delete Database options will be disabled.)
3.If you want to use an encrypted connection to the database, check the Encrypt Connection box.
NOTE: If the certificate used for encryption is not trusted, you will also need to check the Trust Server Certificate box.
4.Select an Authentication method for connecting to SQL server.:
·Use Current Windows User
OR
·Use SQL Server Login
NOTE: Currently, Use SQL Server login is the only valid option for an Azure SQL server.
5.Click [OK].
Content Matrix Console End User Interface
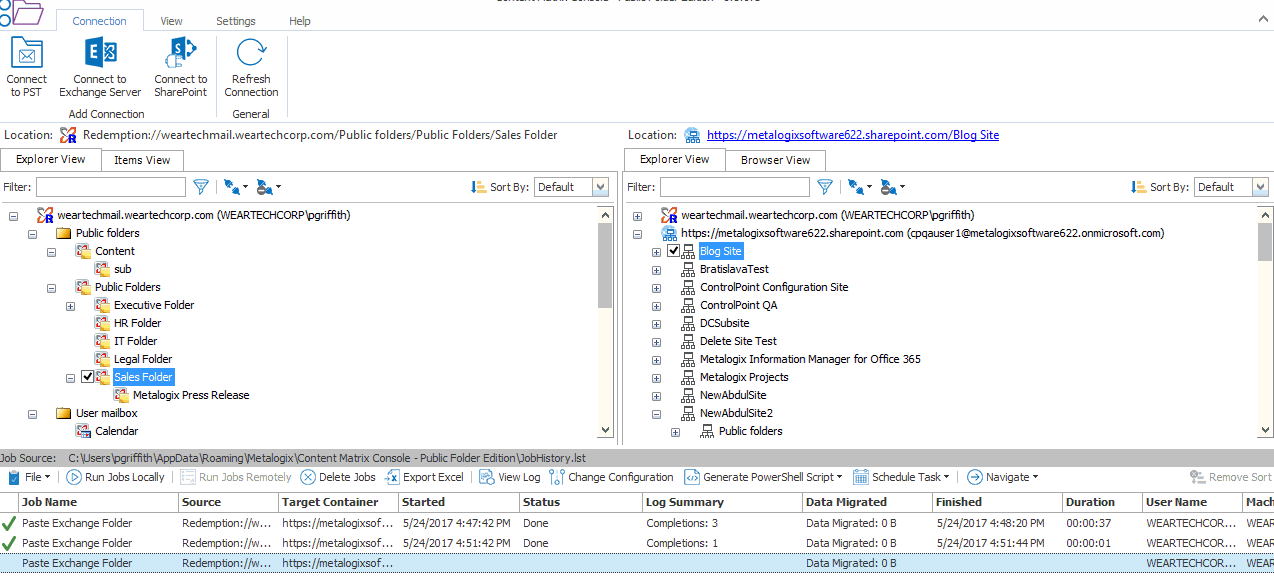
The Metalogix Content Matrix Console User Interface (UI) is simple and easy to use. There are three high level components to the configurable interface:
·Explorer View 1 - At minimum, the interface will always display one Explorer Control, providing multiple ways to view the content for any active connections to source and target environments.
·Explorer View 2 - A second explorer control can be displayed simultaneously. Having two explorers visible allows the user to simultaneously view two different parts of the connected content set. For example, in many cases it makes sense to show a migration source on the left in Explorer Control 1, and a SharePoint migration target on the right in Explorer Control 2.
·Job List - Beneath the Explorer Control windows is a Job list that shows the history of migration jobs and other tasks that have been run or batched in Content Matrix.
More information on these UI components is provided in the topics that follow.


