
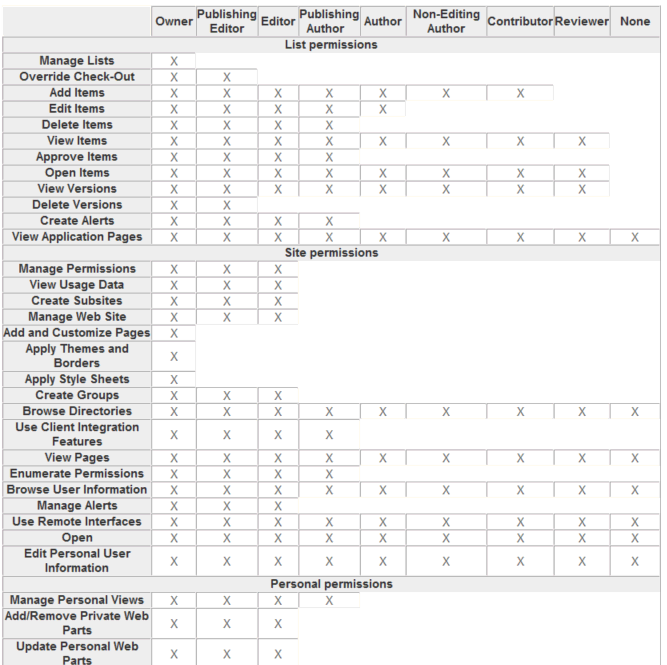
Automatic Permissions Mapping
When you Configure Users and Permissions Options, you can either map user permissions explicitly, or have Metalogix Content Matrix map permissions automatically, as specified in the following table.
NOTE: Custom permission groups will be created in SharePoint.
Filter Options
Filters can be applied to the migrating content to help limit the content that is migrated. Metalogix Content Matrix Console uses inclusive filters, meaning that any criteria that meets the set filter will be included in the migration. You can apply multiple filters to a single migration action, and the order in which these filters are applied and be modified.
To configure Filter Options:
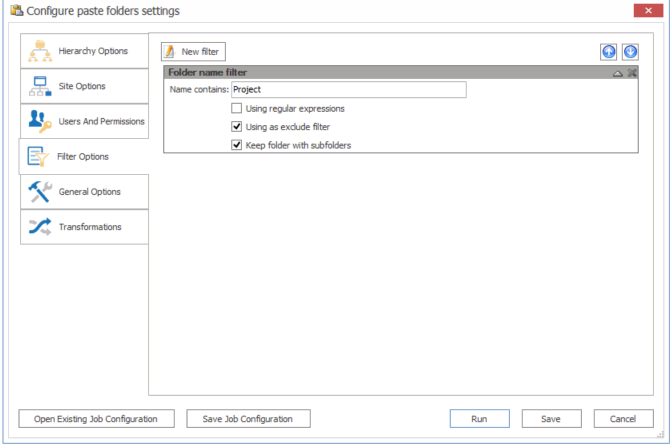
1.If you want to apply a filter to the migration, click [New Filter] to display the Select Filter dialog.
2.Select the type of filter you want to apply.
A new dialog displays based on the filter type you selected.
3.Enter the filter criteria that you want to apply to the migration.
4.To apply another filter, repeat steps 1-3.
Note that you can use the up and down arrows (
General Options
Use the General Options tab to configure additional options such as logging, item output type, fields to migrate, and column mappings.
To configure General Options:
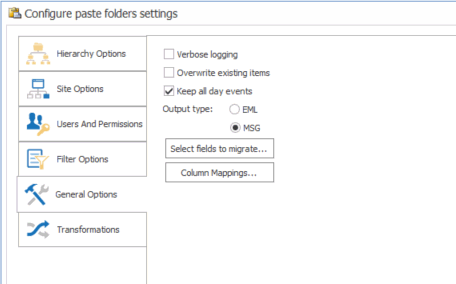
1.If you want more detailed logging for the migration action, make sure the Enable verbose logging box is checked.
2.If you want to overwrite any any existing items that have been migrated to the same target location with the same connection adapter type, check the Overwrite existing items box.
3.If you want to allow all day events to remain as all day events in SharePoint after the migration, make sure the Keep all day events box is checked.
NOTE: If this box is not checked, all day events will be converted to standard (not all day) events with a duration of 24 hours. This conversion is mainly useful if the migration is between systems using different time zones.
4.Select the desired Output type. Use the information in the following table for guidance.
NOTE: Exchange folders can be pasted to a SharePoint list or folder only if that list or folder was created by Metalogix Content Matrix Some restrictions apply when migrating; for example, calendar items can only be migrated to SharePoint calendars, and so on
|
If you want to migrate items ... |
Then ... | ||
|---|---|---|---|
|
in electronic mail (EML) format |
select EML. NOTE: Items migrated in this format do not retain all original MAPI properties of the source Exchange item. | ||
|
in message object (MSG) format |
select MSG. NOTE: Items migrated in this format to SharePoint open automatically with Outlook, and the email body, header, and any attachments are fully preserved and maintained within a single envelope in one file on SharePoint.
|

5.To select the fields to migrate to the SharePoint target:
a)Click [Select fields to migrate] to display the Select Fields to Migrate dialog.
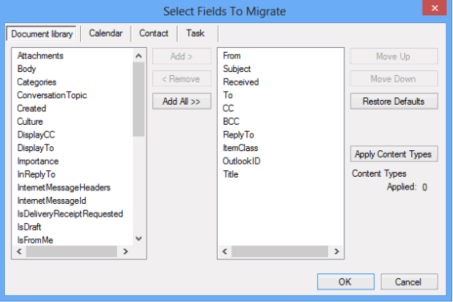
NOTE: In MS Exchange, every item has dozens of properties which can be read and potentially migrated to SharePoint. Most of these properties have little meaning for end users, and are not particularly useful in a SharePoint environment, however, users may want to retain them for historical or audit purposes. Metalogix Content Matrix Console offers a default set of properties that will automatically be migrated for every list type.
b)Select additional fields to be created and migrated to the target SharePoint site and/or removed from the list.
EXCEPTIONS: The following properties cannot be removed because they are needed for identifying migrated items:
·OutlookID - A unique item identifier field that is typically not visible to the end user, in the default SharePoint list or library view.
·Subject - A string field that lists the item's subject (i.e. mail subject, document name, calendar item title, etc.)
c)If you want to apply Content Types to the target list, click [Apply Content Types] to display the Content Type Application Options dialog and follow the procedure for Applying Content Types to Lists and Libraries.
NOTE: This button is available for each list type (Document Library, Task, Contact, Calendar, etc.). Settings defined for one list type do not affect other list types. The content types specified in the pop-up dialog will be applied to the target list and it will be possible to create items based on this content type in SharePoint (see further).
6.If you want to map source to target columns, click [Column Mappings] to display the Edit Column Mappings dialog and follow the procedure for Mapping Columns.
Mapping Columns
You can map columns from the source connection into separate columns on the target when migrating content into a SharePoint target.
NOTE: Metalogix Content Matrix allows one-to-one column mappings. If a source or target column is already used in a mapping, then that column will no longer be available for any other mappings.
The following types of column mappings can be made:
·Standard column mapping, when you click [Column Mapping] from the General Options tab
·Content Type column mapping, when you click the [...] button from the Content Types Application Options dialog.
To map columns:
1.Use the information in the following table to determine the appropriate action to take.
NOTE: You can Filter items in each window to narrow displayed lists.
|
If you want to ... |
Then... |
|---|---|
|
manually map each individual source column to a target SharePoint column |
·From the left (source) window, select the Item that you want to map. ·From the right (target) window, select an available Item. ·Click the Map icon. |
|
create a new column on the target for any columns that are selected on the source side |
·From the left (source) window, select the Item that you want to map. ·Click the Target icon to display the New Mapping Target dialog. ·Enter a Column Name. ·If you want the column to be created as a site column, check the Create as Site Column, , and choose a column type from the Group drop-down. ·If you want to add the column to a content type that exists on the target: §check the Add to content type scoped at target site box AND §select the content type to which you want to add the column from the Type drop down. |
The mappings you create will display in the bottom window. (Note that you can also Unmap individually-selected mappings in the bottom window or Clear all mappings from the bottom window.)
2.Click [OK] once all desired mappings have been made and return to the Configuration Options dialog.