
Site Options
If you are migrating folders into a site, use the Site Options tab to specify how you want a newly created site to be configured.
NOTE: This tab will not display if you are migrating emails directly into a SharePoint Online document library.
To configure Site Options:
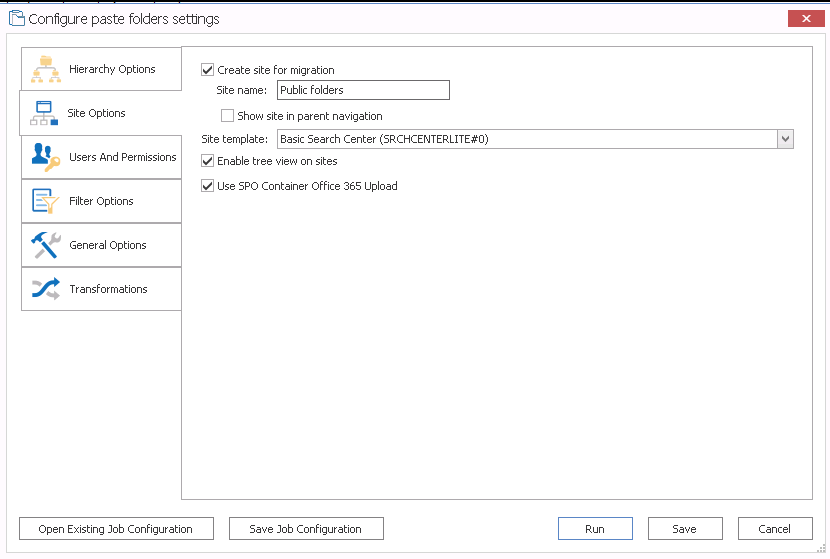
1.Check the Create site for migration box to have a new site created under the selected target SharePoint node.
2.For Site name, enter the display name text as the display name that you want to use for the newly created SharePoint site.
3.If you want the newly created site to be included in the navigation settings of the parent SharePoint site, check the Show site in parent navigation box.
4.Select an available Site template for the new site from the drop-down.
5.If you want the SharePoint site to use the tree view setting in the quick launch navigation (left-hand navigation) for the new site, make sure the Enable tree view on sites box is checked.
6.If you have connected to a SharePoint Online site and want to migrate using SPO Containers, make sure the Use SPO Container Office 365 Upload box is checked.
NOTE: If you are migrating to a SharePoint on premises environment, this box will be disabled.
Users and Permissions Options
Users And Permissions Options enable you to map Exchange user accounts and permissions (such as Author, Reviewing Author, etc.) to SharePoint user accounts and permissions (such as Full Control, Contribute, Read, etc.).. This means that an Exchange user account can be mapped into a SharePoint user account.
IMPORTANT: Users from the source can only be mapped to the SharePoint target if there is some kind of shared authentication method (such as Active Directory) between them.
If no mappings are specified for any user based metadata that is migrated, Metalogix Content Matrix will use the migrating user account for this metadata instead.
To configure User and Permissions Options:
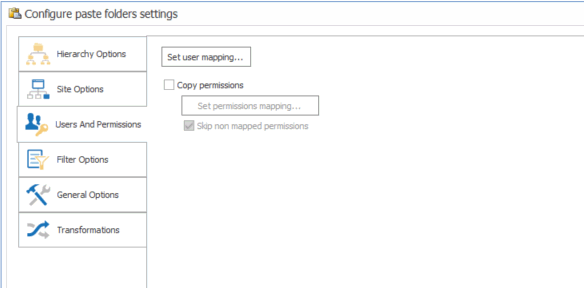
1.Click [Set user mappings...] to display the User Mapping dialog, and follow the procedure for Mapping Users and Permissions.
2.If you want to copy user permissions:
a)Check the Copy permissions box.
b)If you want to explicitly map permissions between source and target, click [Set permissions mapping] and follow the procedure for Mapping Users and Permissions.
NOTE: If you choose not to map permissions, Metalogix Content Matrix will be use Automatic Permissions Mapping.
c)If you want any permissions that are not explicitly mapped to be skipped, check the Skip non-mapped permissions box.
NOTE: If this box is not checked, Metalogix Content Matrix will be use Automatic Permissions Mapping for permissions that are not explicitly mapped.
Mapping Users and Permissions
You can explicity map users and permissions when you click the [Edit Users] or [Edit Permissions] button from the Users and Permissions tab.
NOTE: If the source environment has a large number of users, it is recommended that the XML user mapping method be used instead, to help improve performance, and for better control over user mapping.
To map user and permissions:
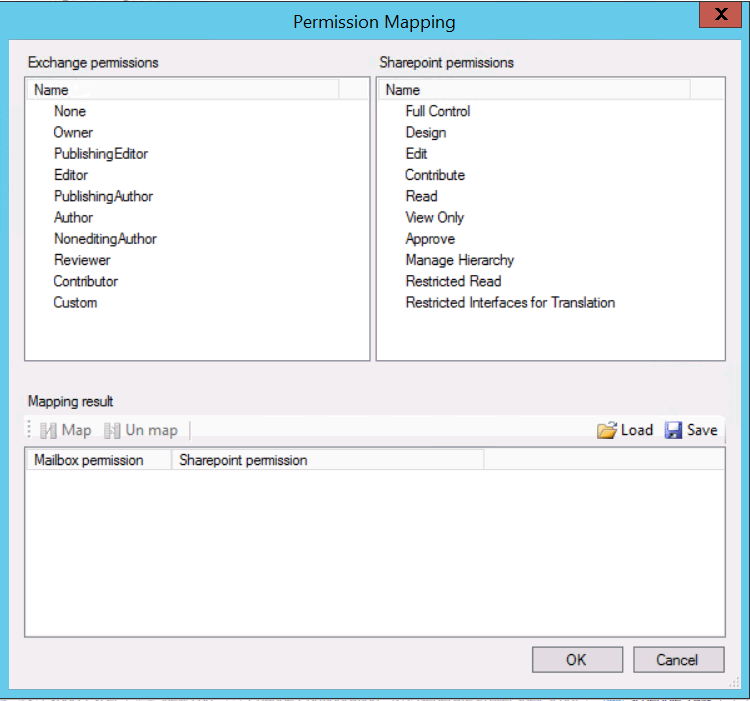
1.Use the information in the following table to determine the appropriate action to take.
NOTE: You can Filter items in each window to narrow displayed lists.
|
If ... |
Then... |
|---|---|
|
you want to load mappings from a previously-saved xml file |
click the Load icon. |
|
you want to manually map individual users or permissions on the source to a target SharePoint user or permission |
·From the source list, select the Item that you want to map. ·From the target list, select a target Item. ·Click the Map icon. |
|
you are mapping users and want to have Metalogix Content Matrix automatically map source users to target SharePoint users (based on email address) |
·From the User Mappings dialog - source list, select the Item(s) that you want to map. ·Click the Auto icon. NOTES: ·The Exchange From field will be mapped to the SharePoint Created by field. ·The Exchange Last modified by user field will be mapped to the SharePoint Modified by field. ·If a user has already been mapped during a migration, the SharePoint Created and Last Modified fields are maintained on the target. |
|
save mappings in the dialog as an xml file |
click the Save icon. |
The mappings you create will display in the bottom window. (Note that you can also Unmap individually-selected mappings in the bottom window or or Clear all mappings from the bottom window.
2.Click [OK] to return to the Copy Options dialog.
Importing Mappings from an xml File
Metalogix Content Matrix can import any desired user or permissions mappings from an XML file. Importing user or permissions mappings from an XML file involves creating an XML file with the desired mappings, then importing that file. This option is generally used if migrating from an environment that has a large number of users and/or permissions
Example Permission mapping XML
<?xml version="1.0" encoding="utf-8"?>
<StaticMaps>
<Map ExPermission="Owner" SpPermission="Full Control" />
<Map ExPermission="NoneditingAuthor" SpPermission="Read" />
</StaticMaps>
There could be more Mapped sections within the root StaticMaps section of the XML file. Each Map section defines mapping for Exchange permission into SharePoint permission.
ExPermission - Exchange permission (mandatory)
SpPermission - SharePoint permission (mandatory)
Example User mapping XML
<?xml version="1.0" encoding="utf-8"?>
<StaticMaps>
<Map ExUser="adm@tests.local" SpUserDisplayName="adm" SpUserEmail="adm@tests.local" SpUserIsGroup="False" SpUserLoginName="TESTS\adm" />
<Map ExUser="test02@tests.local" SpUserDisplayName="test02" SpUserEmail="test02@tests.local" SpUserIsGroup="False" SpUserLoginName="TESTS\test02" />
<Map ExUser="test03@tests.local" SpUserDisplayName="test03" SpUserEmail="test03@tests.local" SpUserIsGroup="False" SpUserLoginName="TESTS\test03" />
<Map ExUser="test05@tests.local" SpUserDisplayName="test05" SpUserEmail="test05@tests.local" SpUserIsGroup="False" SpUserLoginName="TESTS\test05" />
</StaticMaps>
There could be more Map sections within the root StaticMaps section of this XML. Each Map section defines mapping of Exchange user (or distribution list) into SharePoint user (or group).
·ExUser - Exchange user or distribution list email address (mandatory).
·SpUserDisplayName - SharePoint user display name (optional).
·SpUserEmail - SharePoint user email address (optional).
·SpUserIsGroup - group flag whether SharePoint user is a group (optional, default value set to "False").
·SpUserLoginName - SharePoint user login name or the group name in case of group (mandatory).