When log entries matching a certain criteria are entered into any of the event logs you can have ExpertAssist send you email alerts to an email address of your choice.
Email alerts will not work until you configure your SMTP server under Preferences > Network.
Once you've set that up, you can configure email alerts according to the following criteria:
Enables/Disables the event alert
The event log to watch.
Can be Error, Warning, Error & Warning, Information, Audit Success, Audit Failure, or All types.
Type in the source of the message you want to be alerted on. For example, Security, Disk, etc. This field is optional.
Type in the category of the message as it would appear in the event log. This field is optional.
Type in the event code as it would appear in the event log. This field is optional.
The email address the notifications are sent out to. You can only specify a single email address per entry, so if you want several people to receive these messages you should specify a group alias here.
The Task Scheduler gives you a simple interface to NT’s Scheduler. In order to be able to view, add and delete tasks, the Schedule service must also be running.
On the main page, you can see a list of all currently scheduled tasks. The table shows you the following:
To remove a task from the list:
Select it and click on the Delete button in the toolbar.
To add a new scheduled task:
Click on the Create new task button.
To view/modify the attributes of your existing tasks:
To download a CSV file containing the currently displayed table of scheduled tasks available on the remote computer:
Click the Export button.
|
|
Note: All scripts require you have PowerShell 1.x command line shell installed on the remote computer. You may download the installation package for your version of Windows on the manufacturer’s site at http://microsoft.com/powershell. |
This page in ExpertAssist provides an extension interface in which you can create custom PowerShell scripts that interact with the remote system, ExpertAssist and the remote user.
ExpertAssist comes shipped with a set of scripts that allow you to perform some typical administrative tasks on the remote computer. You may use them as a basis for your custom scripts, or you may create your own scripts from scratch as well.
Table 5: Pre-defined scripts description.
| Script | Description |
|---|---|
|
CheckCDrive |
Checks and lists a free space left on C drive on a remote computer |
|
dainclude |
Include file. Contains supplementary methods used in interactive scripts to output data back from a remote computer to the ExpertAssist page on the local computer. |
|
|
Sends a message via a defined mail relay and outputs back the result into the ExpertAssist page |
|
File |
Gets a hexadecimal dump of the file specified and outputs it back to the ExpertAssist page |
|
Ping |
Pings the remote computer where ExpertAssist is running on |
|
Processes |
Queries the remote computer processes and their properties. Outputs collected info arranged into a table back to the ExpertAssist page. |
|
Services |
Queries the remote computer services and drivers, and their properties. Outputs collected info arranged into a table back to the ExpertAssist page. |
|
WatchProcess |
Watches the state of the specified process and notifies you if it’s not running. |
There are three kinds of scripts you can create:
Interactive scripts display their output on HTML pages, returning script output back to your right within the ExpertAssist’s Scripts page. An example for an interactive script is the File.ps1 script, which is installed with ExpertAssist. These scripts do not have to return a value from their main function. They communicate with the user via the htmlBeginOutptut(), htmlEndOutput().
|
|
Note: You can locate this and other built-in PowerShell scripts (*.ps1) within the ExpertAssist program folder on the remote computer. |
A Quiet script is one that is usually called from the System Monitoring script. It does not display output. A return value is required at the end of the main function.
A skeleton example for a Quiet script is here:
& {$POWERSHELL_RES = 1;}
This script does not do anything useful. It simply sets the $POWERSHELL_RES variable to 1, meaning that a problem has occurred.
By default, PowerShell is initialized with the $POWERSHELL_RES variable set to 0. When using PowerShell scripts in monitoring scripting, setting $POWERSHELL_RES to something other than 0 allows the ExpertAssist to automatically execute the action followed by the monitoring script function declaration.
In the example above setting the $POWERSHELL_RES variable to 1 will indicate to the ExpertAssist built-in monitoring script compiler that the PowerShell interpreter has failed executing the script. This enables the monitoring script compiler invoking the PowerShell script to trigger and execute the ‘else’ branch of the monitoring script.
Hybrid scripts, on the other hand, are executable interactively and also return a value at the end of their main function. Hybrid scripts check the return value of the htmlBeginOutput() function, and if it’s a zero value, the script is run in non-interactive mode.
These PowerShell scripts can be invoked from the System Monitoring scripts via the PowerShell() function call. This function takes the name of the PowerShell script name you want to invoke for monitoring as an input parameter. For example, if you want to regularly send notifications to your inbox, you can invoke the Email script written in PowerShell right from the monitoring script. This can be done by passing the PowerShell script name to the PowerShell() function:
PowerShell(Email)
See the MonitoringScript.txt file in the ExpertAssist program folder for an example.
|
|
Note: The Small() call can be used as an alias for the PowerShell() function. This function has been left for compatibility to allow you to re-use your monitoring scripts without having to rewrite them for the new PowerShell scripts. |
For the PowerShell scripting language reference, please see the Owner’s Manual available for downloading at http://www.microsoft.com/technet/scriptcenter/topics/winpsh/manual/default.mspx.
To run a script:
Click the script's Run icon to execute it immediately. ExpertAssist will show the notification message on the Scripting page during the script runtime to indicate that the script is being executed on the remote computer.
Figure 14: The script is being executed.
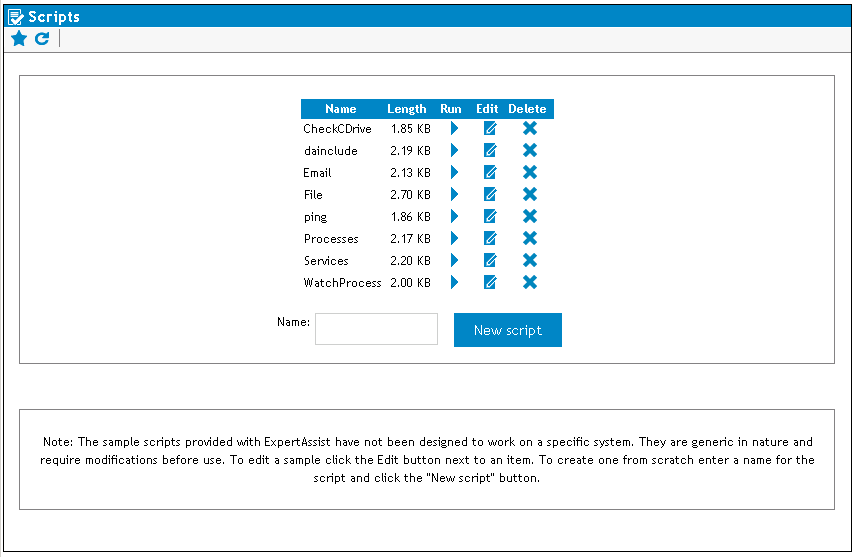
The Length column shows the size of the PowerShell script.
To edit and save changes made to the PowerShell source code of the script:
The Delete command removes the script. Confirm script deletion by clicking OK in the message box or click Cancel to skip deleting the script.
Deleting the script will permanently delete the script *.ps1 file from the remote computer!
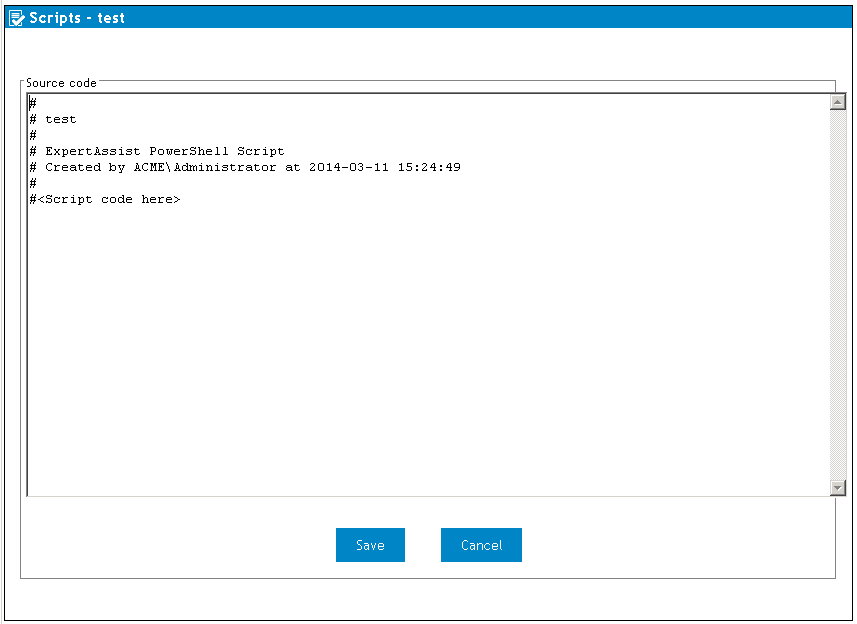
To create a new script, enter its desired name in the Name field and click the New script button.
Suppose, you want to create a script that will check to see the printer drivers available on the remote computer to help you troubleshoot printing errors. Of course, you would like to have this script output the results back to you elegantly wrapped in a table.
Figure 15: The new blank script file.
|
|
Note: It is recommended that you use PowerShell naming convention when defining cmdlet verb names http://msdn.microsoft.com/en-us/library/ms714428.aspx. Please make sure to not use spaces for script names. You can use spaces in commentary headers within the scripts though. |
The time stamp is given in the UTC.
Put the cursor at the beginning of the #<Script code here> line, press Shift+End and start typing the script. Since we want to create an interactive script, we want ExpertAssist to automatically wrap the output into a table. To do that, we need to load ExpertAssist built-in functions preparing formatted output into the runtime. This is done by declaring the dainclude.ps1 file:
. .\dainclude
|
|
Note: Make sure to have two dots and space between (. .) before the backslash (\). You may use slash (/) as well. |
Next, we want the output table to have its title. The dainclude file contains the function htmlBeginOutput that indicates the start of the output data and creates the title. Let us name it according to the script name.
htmlBeginOutput -title "Printer Drivers";
Following this line we want to prepare table columns. To query printer drivers on the remote compute we will use the Win32_PrinterDriver WMI class. We have to open MSDN or use the Get-Member cmdlet to retrieve the class properties. When done, we can select ones that fit our needs. For out test purposes, let’s select the following ones:
Name
Driver Path
Configuration File
Data File
Dependent Files
Help File
Supported Platform
To prepare the columns, we invoke the htmlBeginTable function and pass the properties that we want to check on the remote computer.
htmlBeginTable "Name" "Driver Path" "Configuration File"`
"Data File" "Dependent Files" "Help File" "Supported Platform";
|
|
Note: You can use the backtick (`) to denote escape sequence and indicate line continuation. Please see Get-Help about_escape_character for more information. |
Once we formed the table header, we can start to retrieve the data from the WMI. TO work with WMI we will use the Get-WMIObject cmdlet or its GWMI alias. Since the querying the Win32_PrinterDriver class returns an array, we will need to walk though it to select each of the desired properties passing the output to the ForEach-Object cmdlet via the pipe (|). Type the following on a new line:
Gwmi Win32_PrinterDriver | ForEach-Object {
Now we need to form the table row. To do that, type:
write-host "<tr>"
This is where we start to feed the table row with data using the <td> tag and selecting the properties found in the Win32_PrinterDriver class. Add the following line by line:
write-host "<td>" $_.Name "</td>"
write-host "<td>" $_.DriverPath"</td>"
write-host "<td>" $_.ConfigFile "</td>"
write-host "<td>" $_.DataFile "</td>"
write-host "<td>" $_.DependentFiles "</td>"
write-host "<td>" $_.HelpFile"</td>"
write-host "<td>" $_.SupportedPlatform"</td>"
Once all the properties are selected, we have to close the row and end the loop by adding a line:
write-host "</tr>"
}
That is almost it and we are a couple of lines before finishing. All is left to do is to finish the table by invoking the htmlEndTable function (which is available in the dainclude.ps1) and terminate the output using the htmlEndOutput:
htmlEndTable
htmlEndOutput
If we sum up, we will get this script:
#
# Printer Drivers
#
# ExpertAssist PowerShell Script
# Created by PM\Gluon at 2009-06-10 18:33:54
#
. .\dainclude
htmlBeginOutput -title "Printer Drivers";
htmlBeginTable "Name" "Driver Path" "Configuration File" "Data File" "Dependent Files" "Help File" "Supported Platform";
Gwmi Win32_PrinterDriver | ForEach-Object {
write-host "<tr>"
write-host "<td>" $_.Name "</td>"
write-host "<td>" $_.DriverPath"</td>"
write-host "<td>" $_.ConfigFile "</td>"
write-host "<td>" $_.DataFile "</td>"
write-host "<td>" $_.DependentFiles "</td>"
write-host "<td>" $_.HelpFile"</td>"
write-host "<td>" $_.SupportedPlatform"</td>"
write-host "</tr>"
}
htmlEndTable
htmlEndOutput
Click the Save button to create the script.
The pages under Performance Monitoring allow you access to the performance data collected by ExpertAssist. Descriptions for each of the pages can be found below.

